

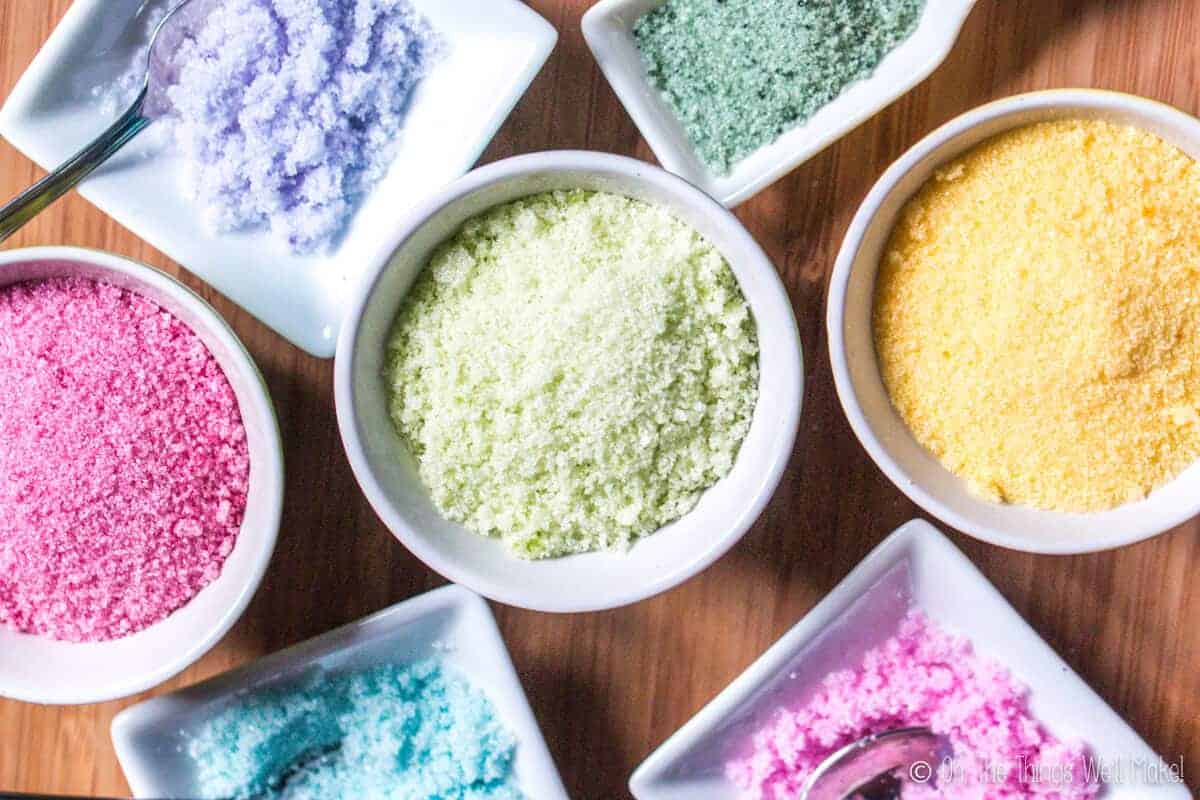
DIY Natural Food Coloring and Homemade Colored Sugar Crystals
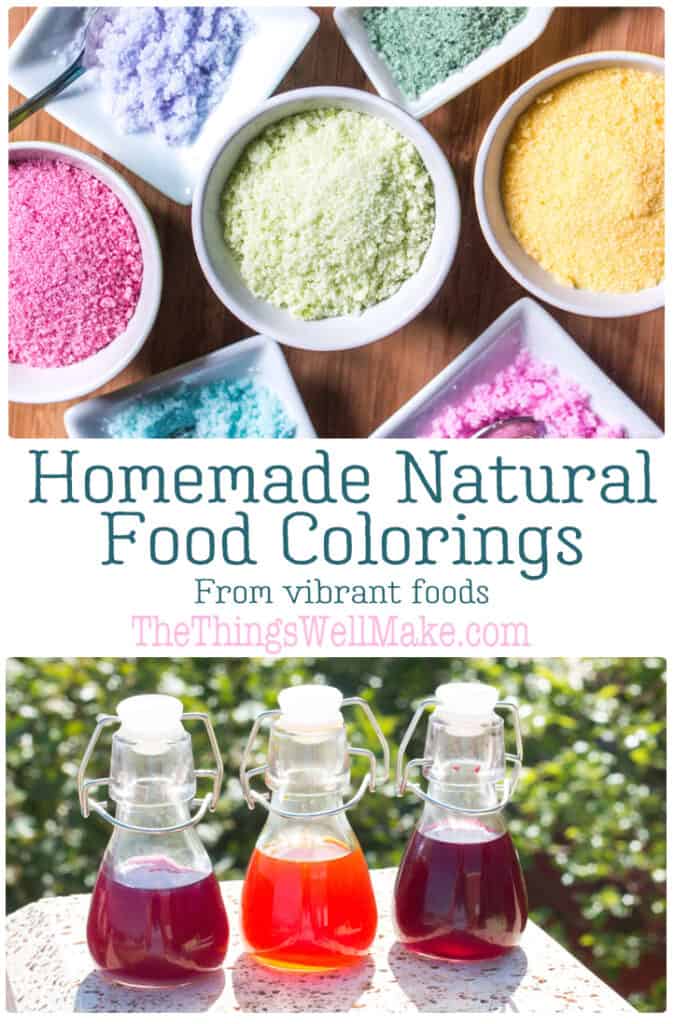
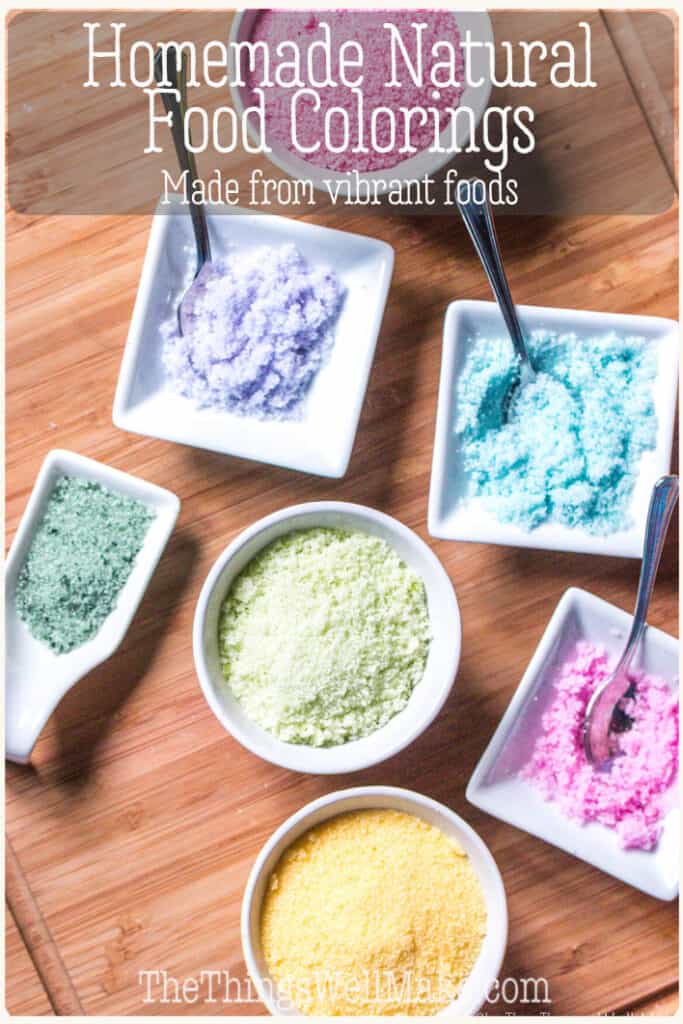
It’s simple to make vibrant natural homemade food coloring from a variety of colorful foods that you may already have in your pantry. These colorants can then be used to tint sugar crystals and other foods.
Recently, we revisited a fun family favorite, making homemade marshmallow Peeps-like Easter treats. When I first made them several years ago, it was the first time I really experimented with making my own colorants from foods at home.
I was trying to color some sugar crystals for coating my marshmallows and didn’t want to use artificial food coloring. On the other hand, I didn’t have any natural colorings either. So, I decided to try to use what I had in my kitchen.
While, in the end, it isn’t difficult to make your own food coloring, I did waste a bit of time on failed experiments.
What doesn’t work?
It never ceases to amaze me how many times I’ve tried something (like a recipe) on the internet that just doesn’t work. It seems like some people just copy someone else’s recipe without actually trying it, assuming that it will work.
Natural food colorings were one of those topics where pretty much all of the posts I read (back in 2015 when I first published this post) used a method that just isn’t very effective!
Boiling spinach and other vegetables
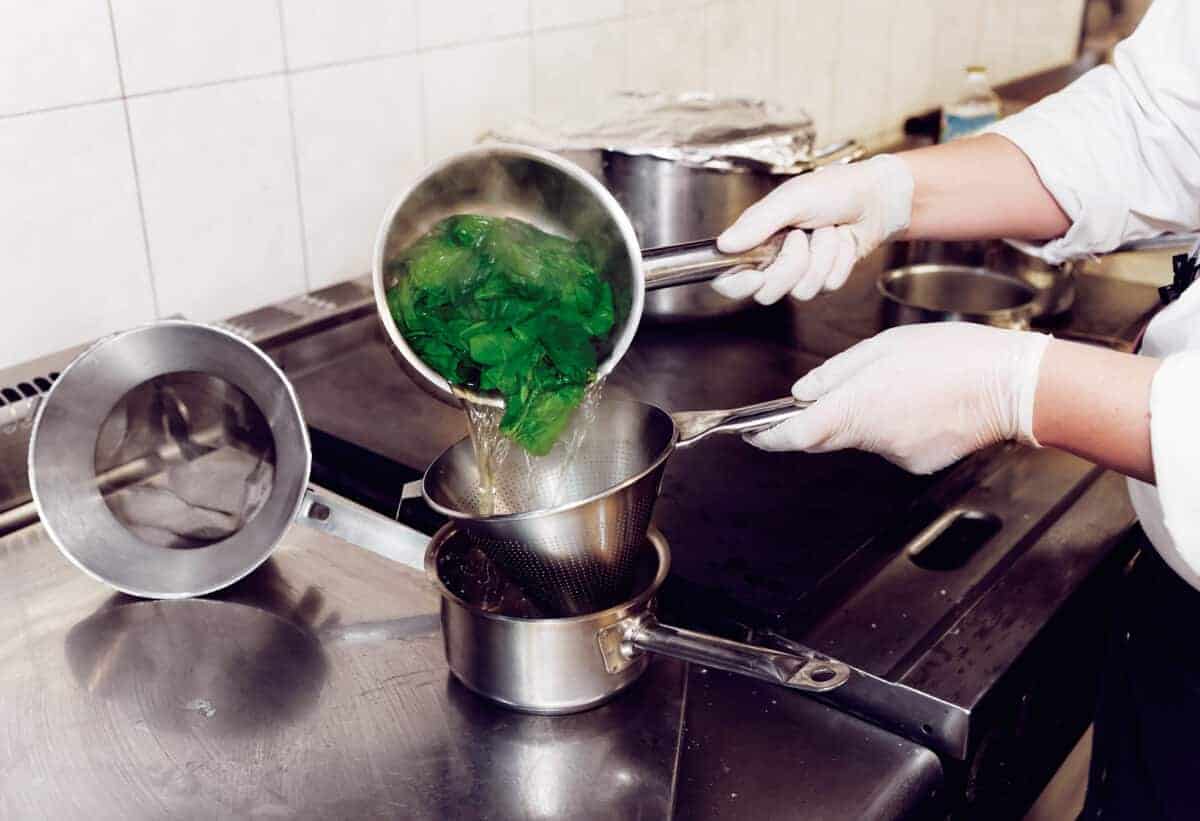
One popular method of making homemade natural food coloring involved boiling spinach in water. The theory is that after cooking the water covered spinach long enough to evaporate the water away, you’ll end up with a concentrated solution perfect for dyeing foods.
The idea makes sense, of course, but in practice, it just isn’t very effective. The water doesn’t absorb enough of the dye to actually do anything. Unfortunately, I wasted a lot of spinach leaves trying to make a faded, brownish, greenish water that wasn’t potent enough to dye anything at all. It definitely didn’t work to dye sugar crystals.
Don’t let that scare you away from using spinach to color your foods, though. Fresh, raw spinach can be blended into smoothies and other foods to turn them a beautiful shade of green. I’ve already shown you how to use spinach leaves to make a naturally colored shamrock shake green. (I also used it to color my paleo homemade mint chocolate ice cream.)
How to make a vibrant food coloring
So, if boiling veggies wasn’t going to cut it? What’s the best method for extracting vibrant colors from food?
I decided to look to other methods of extracting substances from plants. If flavors can be extracted, as when making an extract, then it goes to reason, that it would be possible to extract colors by the same method.
My homemade vanilla extract actually gave me the idea. When extracting the vanilla flavor from vanilla beans, I also ended up inevitably extracting the brown color. To be honest, in the case of vanilla, it was more of a problem than it was an advantage. Using real vanilla extract tinged my white treats beige or light brown when I didn’t want that to happen.
Alcohol extraction
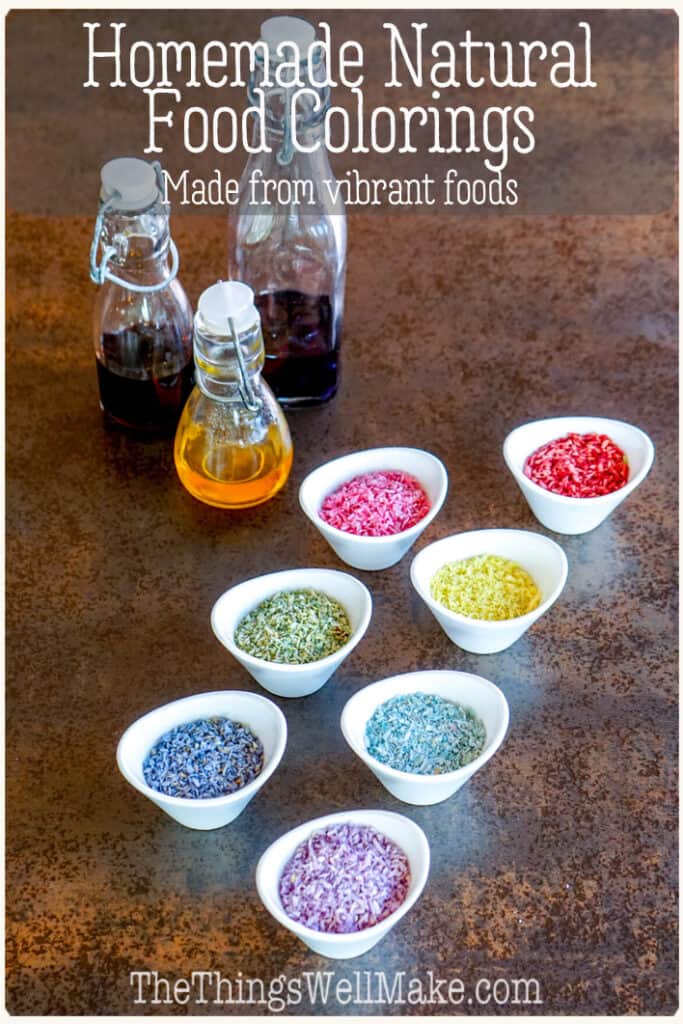
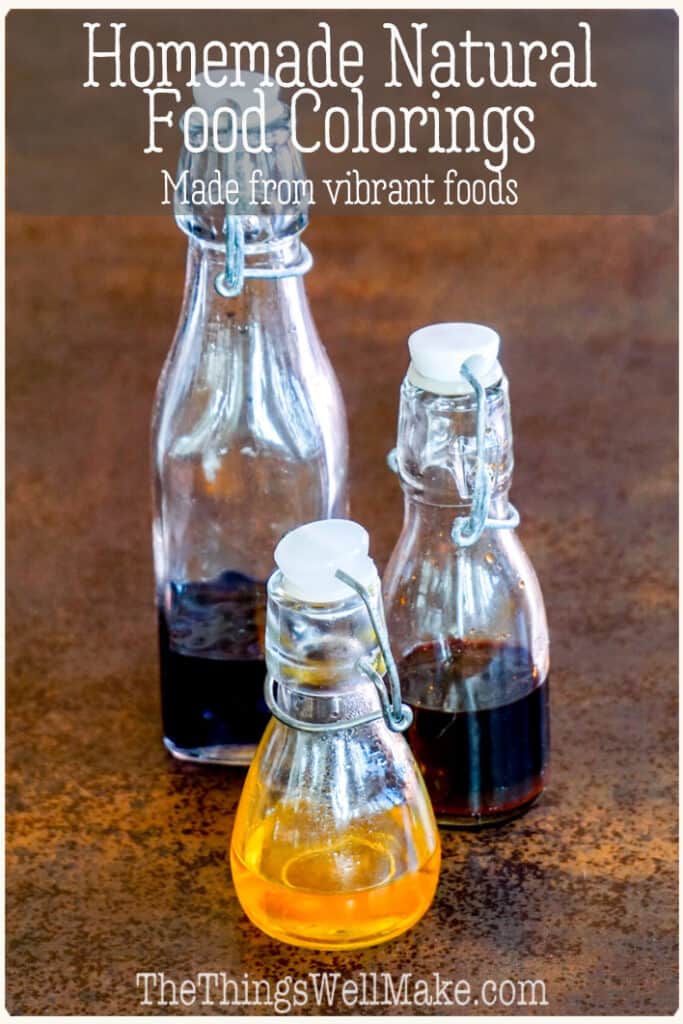
The great thing about using alcohol to extract colorants from foods is that alcohol also works as a preservative. (Read more about natural preservatives in my beginner’s guide to preservation.) Because it’s a preservative, you can use alcohol to make homemade colorants that will keep outside of the fridge for longer than a couple of days. (Without a preservative, you’d need to keep it in the fridge and use it almost immediately.)
Another advantage of alcohol is that it evaporates more quickly than water. I had begun making natural colorants during my quest to make colored sugar crystals. To successfully color sugar, it’s important to add color without a lot of moisture so the sugar doesn’t dissolve. It’s also important to dry the sugar relatively quickly. An alcohol-based coloring can do just that!
There are several ways to use alcohol to extract a natural food coloring:
- Place the food (dried or fresh) directly in alcohol for several hours, until the color has infused into the alcohol. Then, strain out the food.
- Juice the food to obtain a concentrated pigment. Then, mix the juice with enough alcohol to keep the alcohol content above 20%. (How much you use, depends on the concentration, or proof, of alcohol used.) This is important if you will be trying to conserve the coloring for more than a few days. You can filter out any solid material from the juice to help the coloring keep longer.
Glycerin extraction
While I haven’t personally tried doing this (yet) to make a homemade coloring, I have used glycerin before to make non-alcoholic extractions. I’ve made cucumber and chamomile extracts for my homemade cosmetics and they, like my alcohol-based extracts, have also absorbed color from the plant material.
While I’m not sure how strong the final coloring would be, I imagine that glycerin would work as a non-alcoholic method of extracting and preserving color. In fact, I think many of the more natural food colorings for sale also use glycerin.
To extract using glycerin, place the (dried or fresh) food into the glycerin for several days, or long enough to develop enough color. You may have to strain out the food and replace it with more if the color isn’t strong enough.
Keep the glycerin concentration above 50% for safe preservation. Consider, before trying to dilute, that some foods may give off humidity to the glycerin, so the glycerin concentration may be lower than you think.
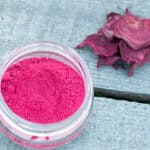
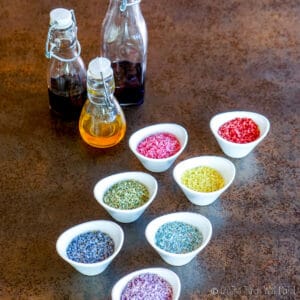
Bright pink homemade food coloring
To make a beautiful bright fuchsia pink, I ended up using beets!
I imagine that you could also use fruits like raspberries, but beets have such bright, potent color that I stuck with them.
There are a few ways that you can use beets to obtain a bright pink food coloring.
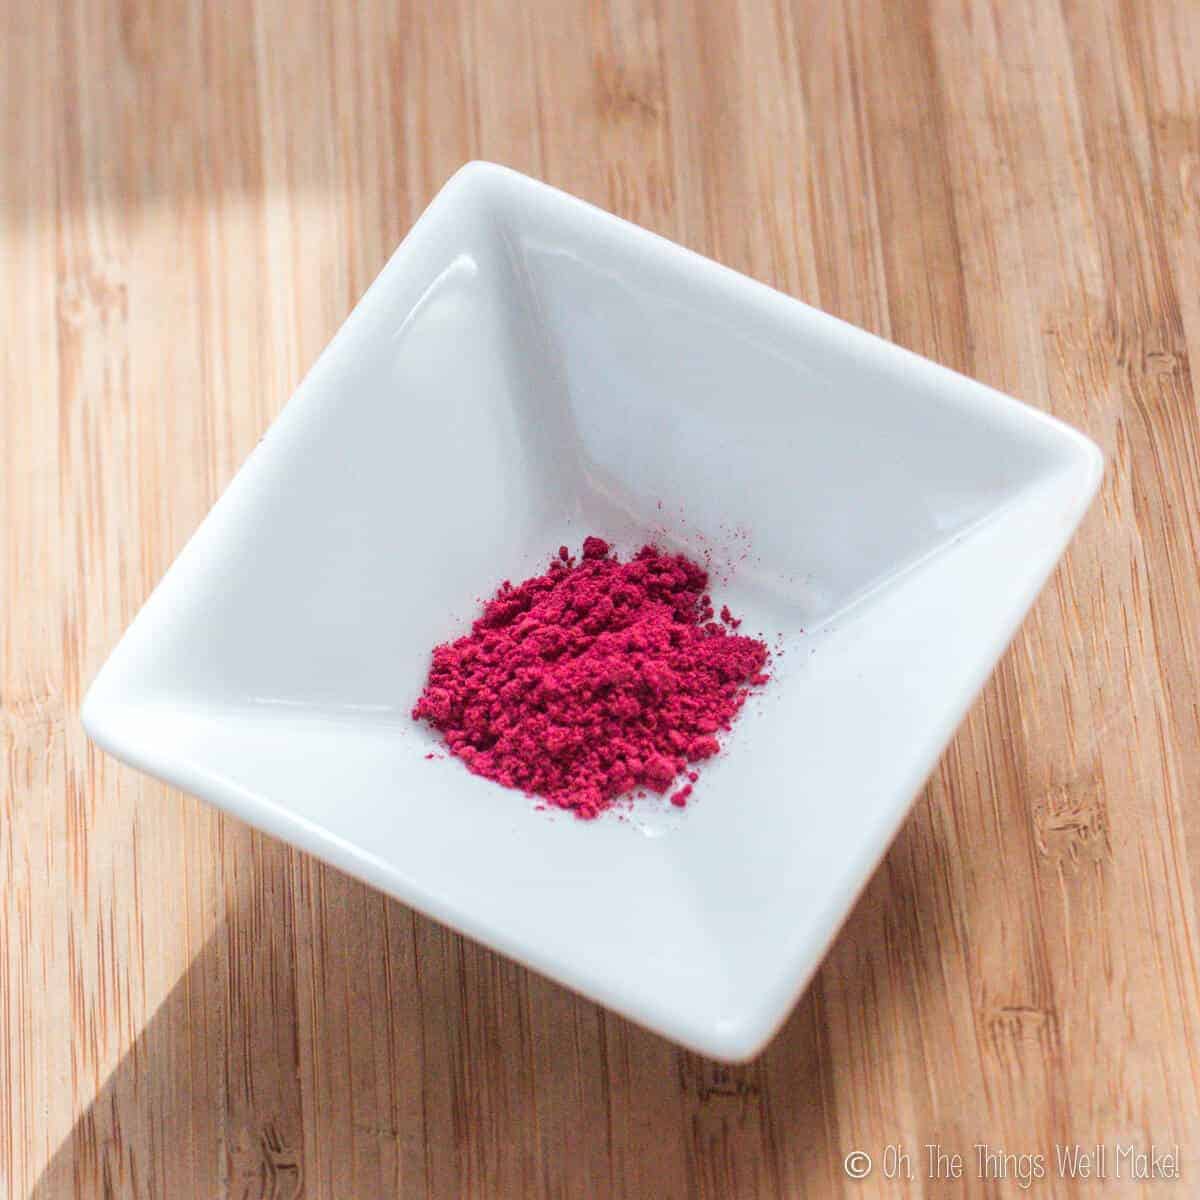
When I first wrote this post, I had recently made a homemade beetroot powder. So, I used the powder to make my coloring. The process was simple…
How to Make Beetroot Powder
Beetroot powder
Mix a small amount of vodka or high proof alcohol into a small amount of beetroot powder. You can leave it for several hours to infuse the color into the alcohol. If using that method, you can later strain out the solid material using a cloth or coffee filter. If you aren’t picky about a small amount of beetroot powder left behind, though, that’s not completely necessary.
I stirred the beetroot powder and vodka together and immediately added the mixture to some white sugar. I was quite happy to see that my sugar crystals turned a beautiful hue of pastel pink!
You can directly use beetroot powder as a powdered food coloring.
It can also be used to color certain cosmetics, like powdered blushes, but should be ground very, very finely or it won’t adhere well to skin. I use only the powder that accumulates on the lid of my coffee grinder for use as a powdered colorant. I find it otherwise impossible to grind it finely enough for cosmetic use.
Even when ground finely, it may still clump up in oil-based products like lip balms as it is water-soluble.
Beetroot powder 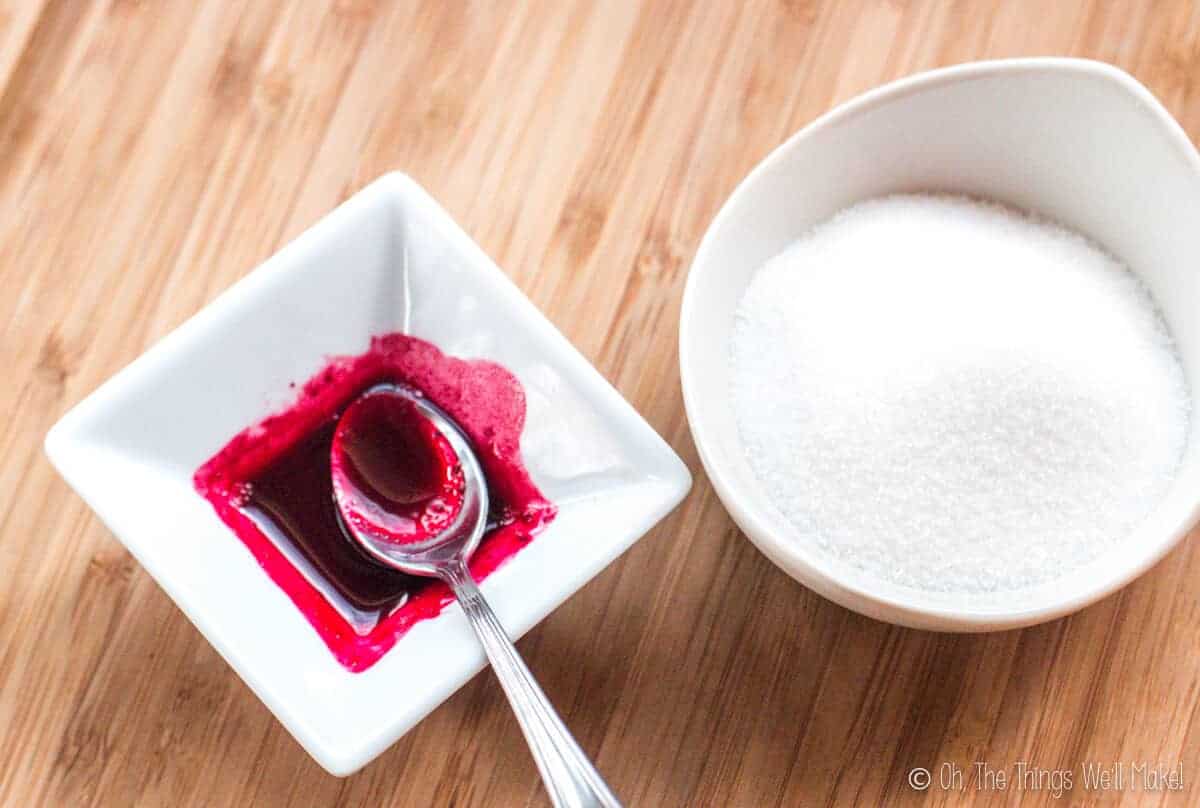
Mixing vodka with the beetroot powder 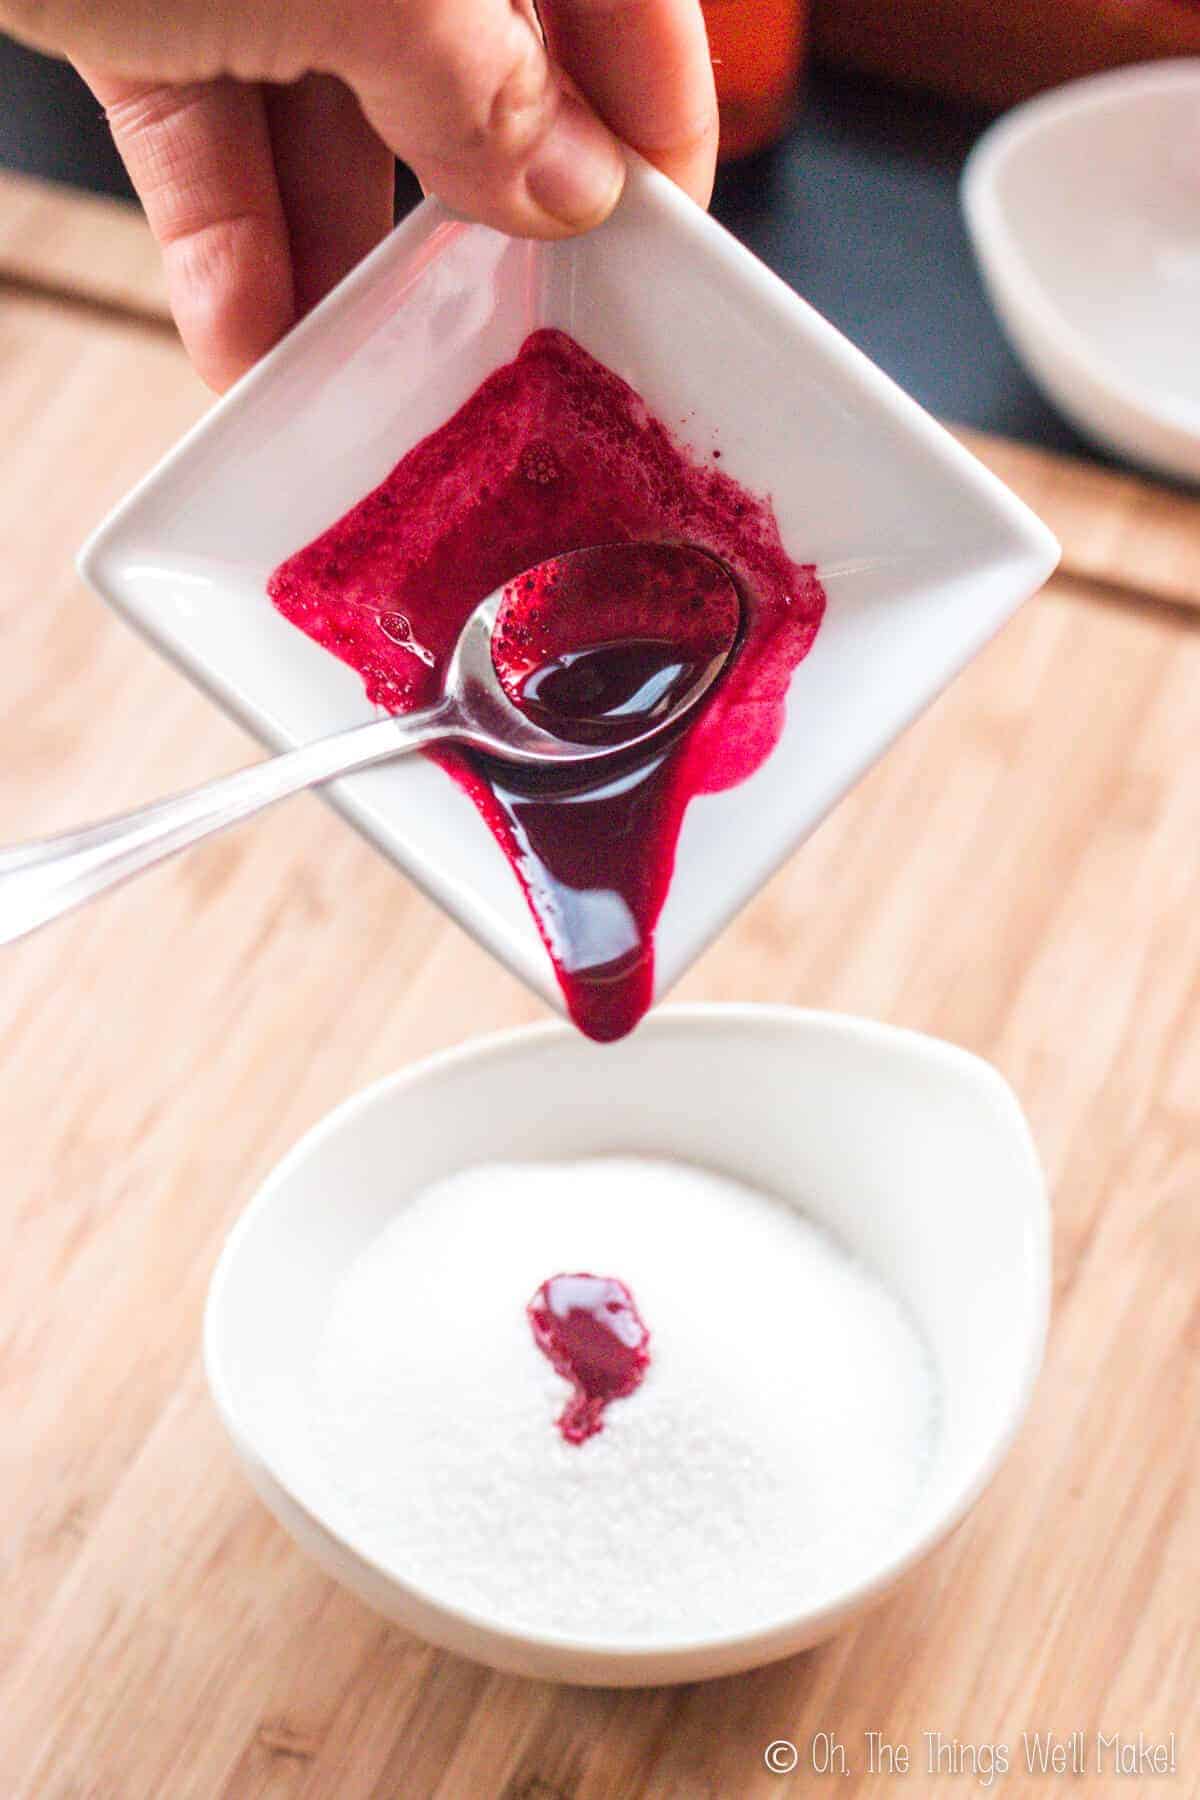
Pouring the mixture over the sugar 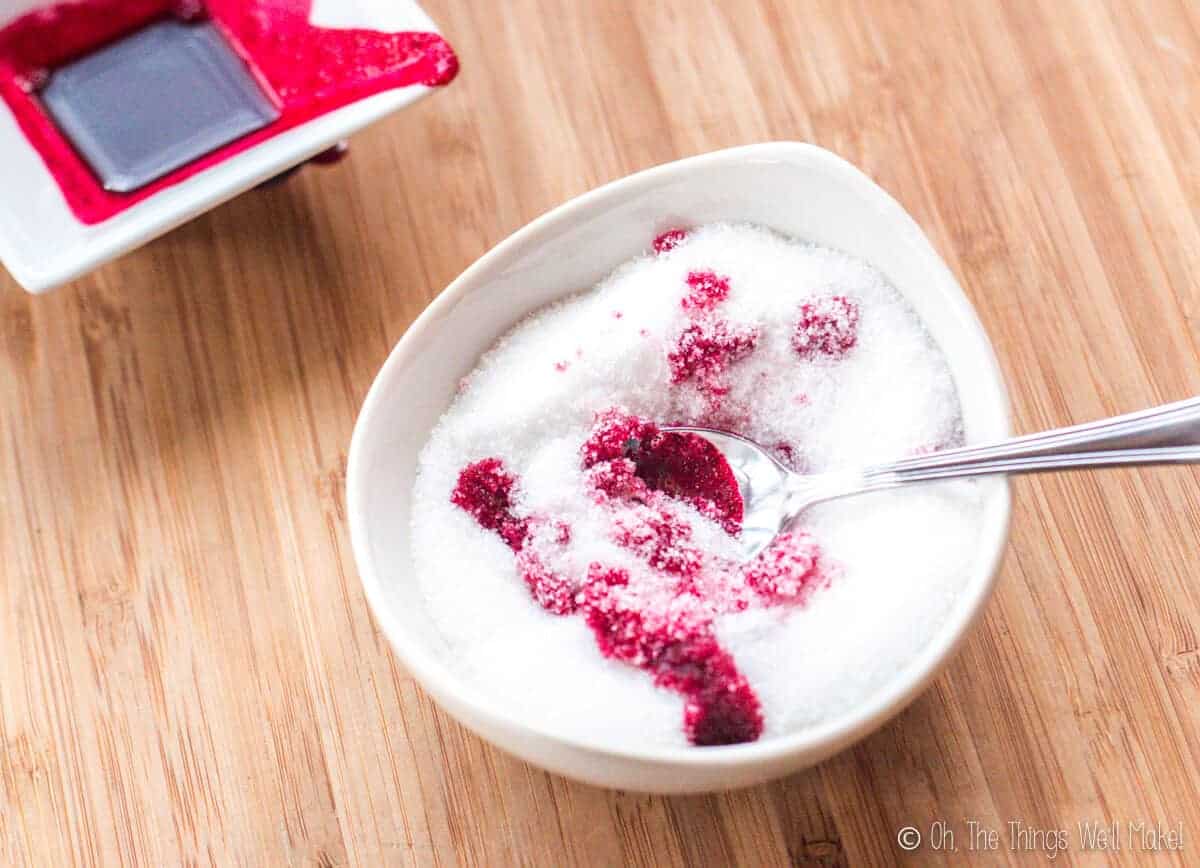
Mix together 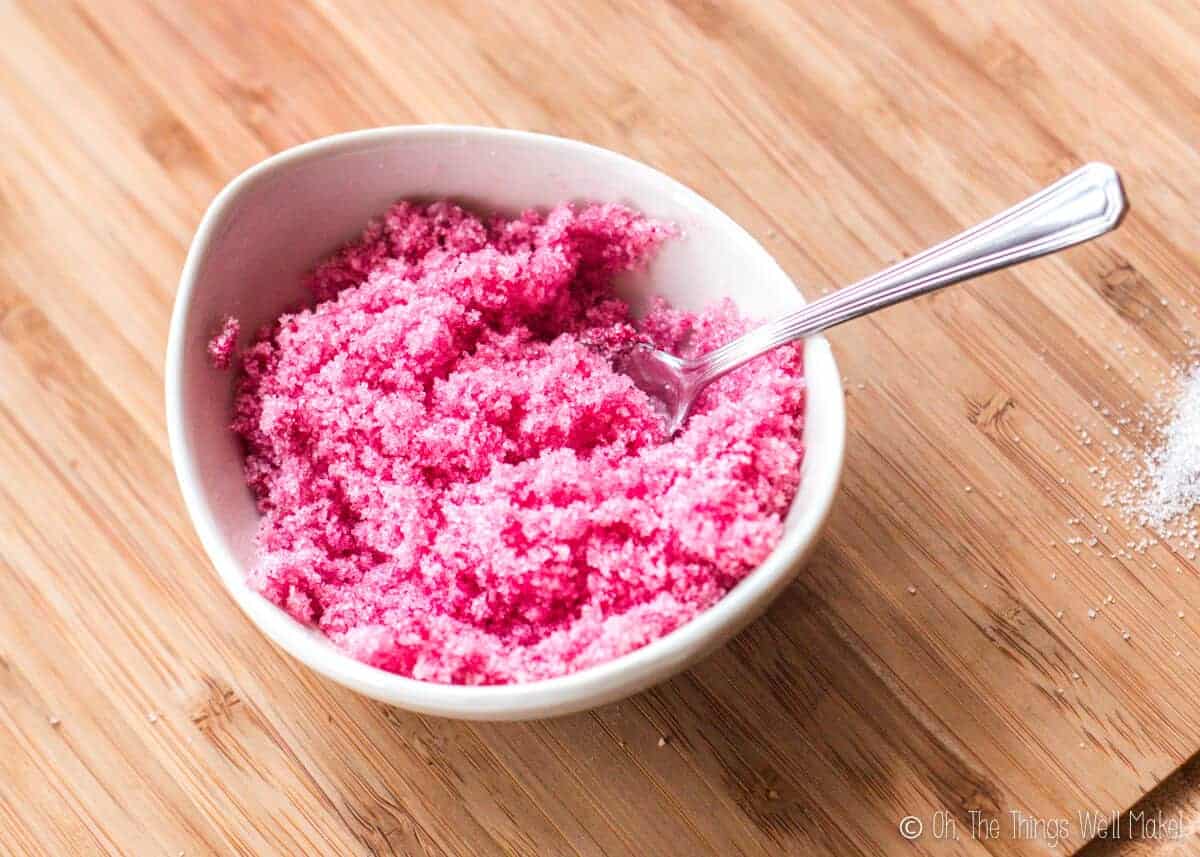
until easily dispersed 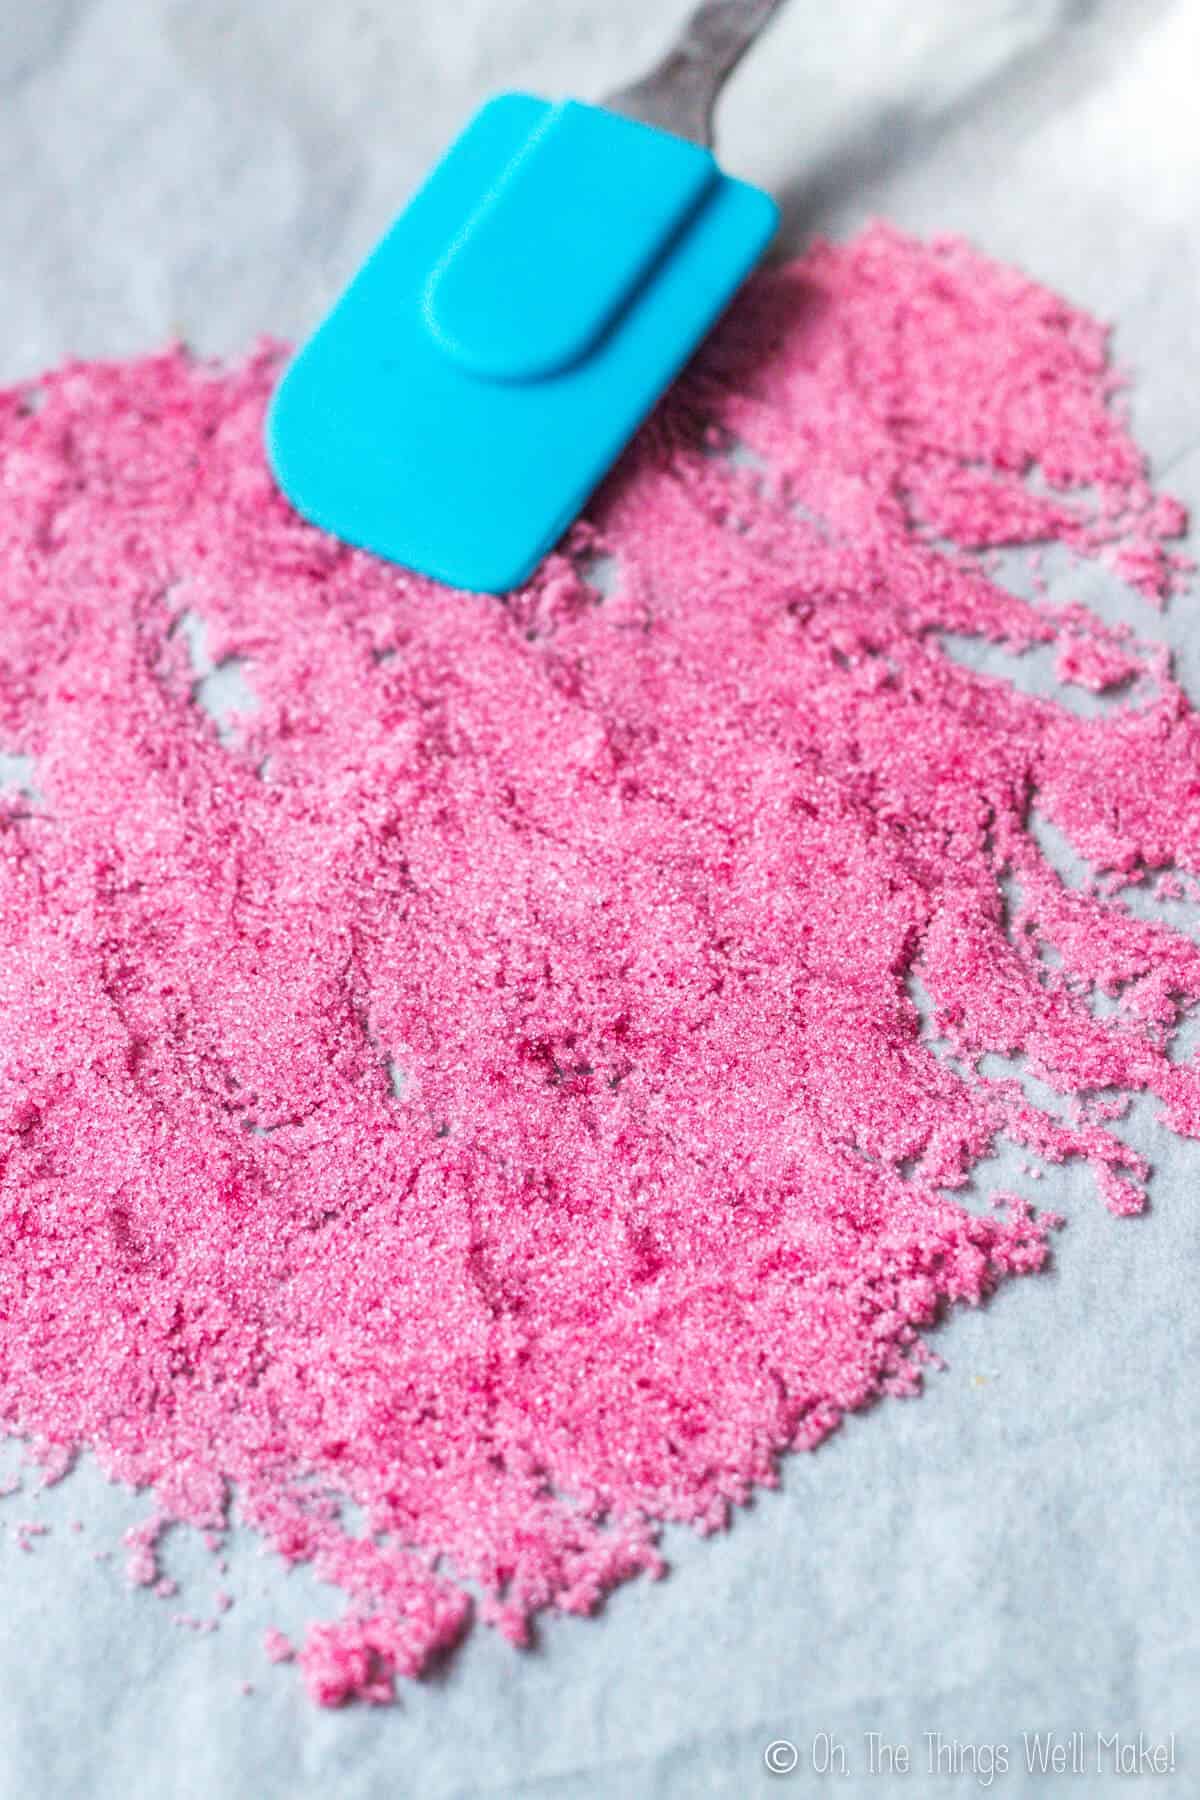
spread out on trays to dry
Don’t try coloring your homemade soaps pink using beetroot!
While many spices and food powders work wonderfully to naturally color soaps, others, like beets, give unexpected results.
When using beets, the lye changes the beautiful fuchsia to brown!
(Expect similar results from dyeing cotton with bee
Using fresh beets
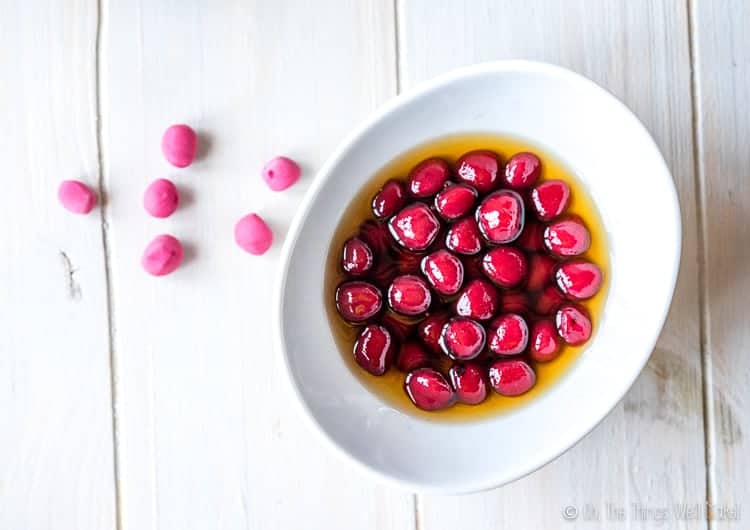
If you don’t have beetroot powder on hand, you can just as easily use fresh beets. This year, I juiced half a beet to make my pink colorant.
While you can use the beet juice to directly color your foods, I found it worked best to dilute the juice first. Pure juice colored my shredded coconut a dark pink that I wasn’t very fond of.
I ended up diluting the juice with alcohol, but you can just use water if you’ll be using it all immediately.
One thing that I have noticed is that the color obtained from beets can vary greatly depending on the beets themselves.
When I first wrote this post, I used beets I had bought from the farmer’s market. The bright fuchsia pink obtained (as seen in these photos) was absolutely gorgeous!
Since then, I’ve used beets from the supermarket and, while I was able to get a pretty pink color from them, it wasn’t as beautifully vibrant as those first beets whose color I fell in love with.
Some have been more of a baby pink. Others have even been more of a mauve!
Also, keep in mind that not all beets are pink! Beets can be found in a variety of colors!
When looking for beets for food coloring, you may have to try from several sources to get the hue you’re looking for.
Hibiscus powder
Hibiscus powder also works well to color foods bright pink. It’s what I used to make bright pink homemade boba.
Natural red food coloring
Alkanet root, also known as ratan jot, is a reddish root that is often used in Indian cooking. It has a very bright, vibrant red that is perfect for using in homemade cosmetics.
I used alkanet root powder to make a homemade blush stick because it is one of the few natural colorants that evenly disperses in oils and butters without clumping up.
While I haven’t tried using it to make food coloring yet, I imagine it would work perfectly!
Orange DIY food coloring
Annatto (or achiote) seeds are often used in Latin American cooking to add an orange color to foods. While it does have a flavor of its own, I find the flavor quite mild.
Annatto, like alkanet root, is another one of my favorite natural pigments for using in natural cosmetics. It also disperses well in oils and butters, making it perfect for tinting homemade lip balms or using in other makeup recipes. (I think it would also work wonderfully in homemade Halloween makeup!)
Yellow
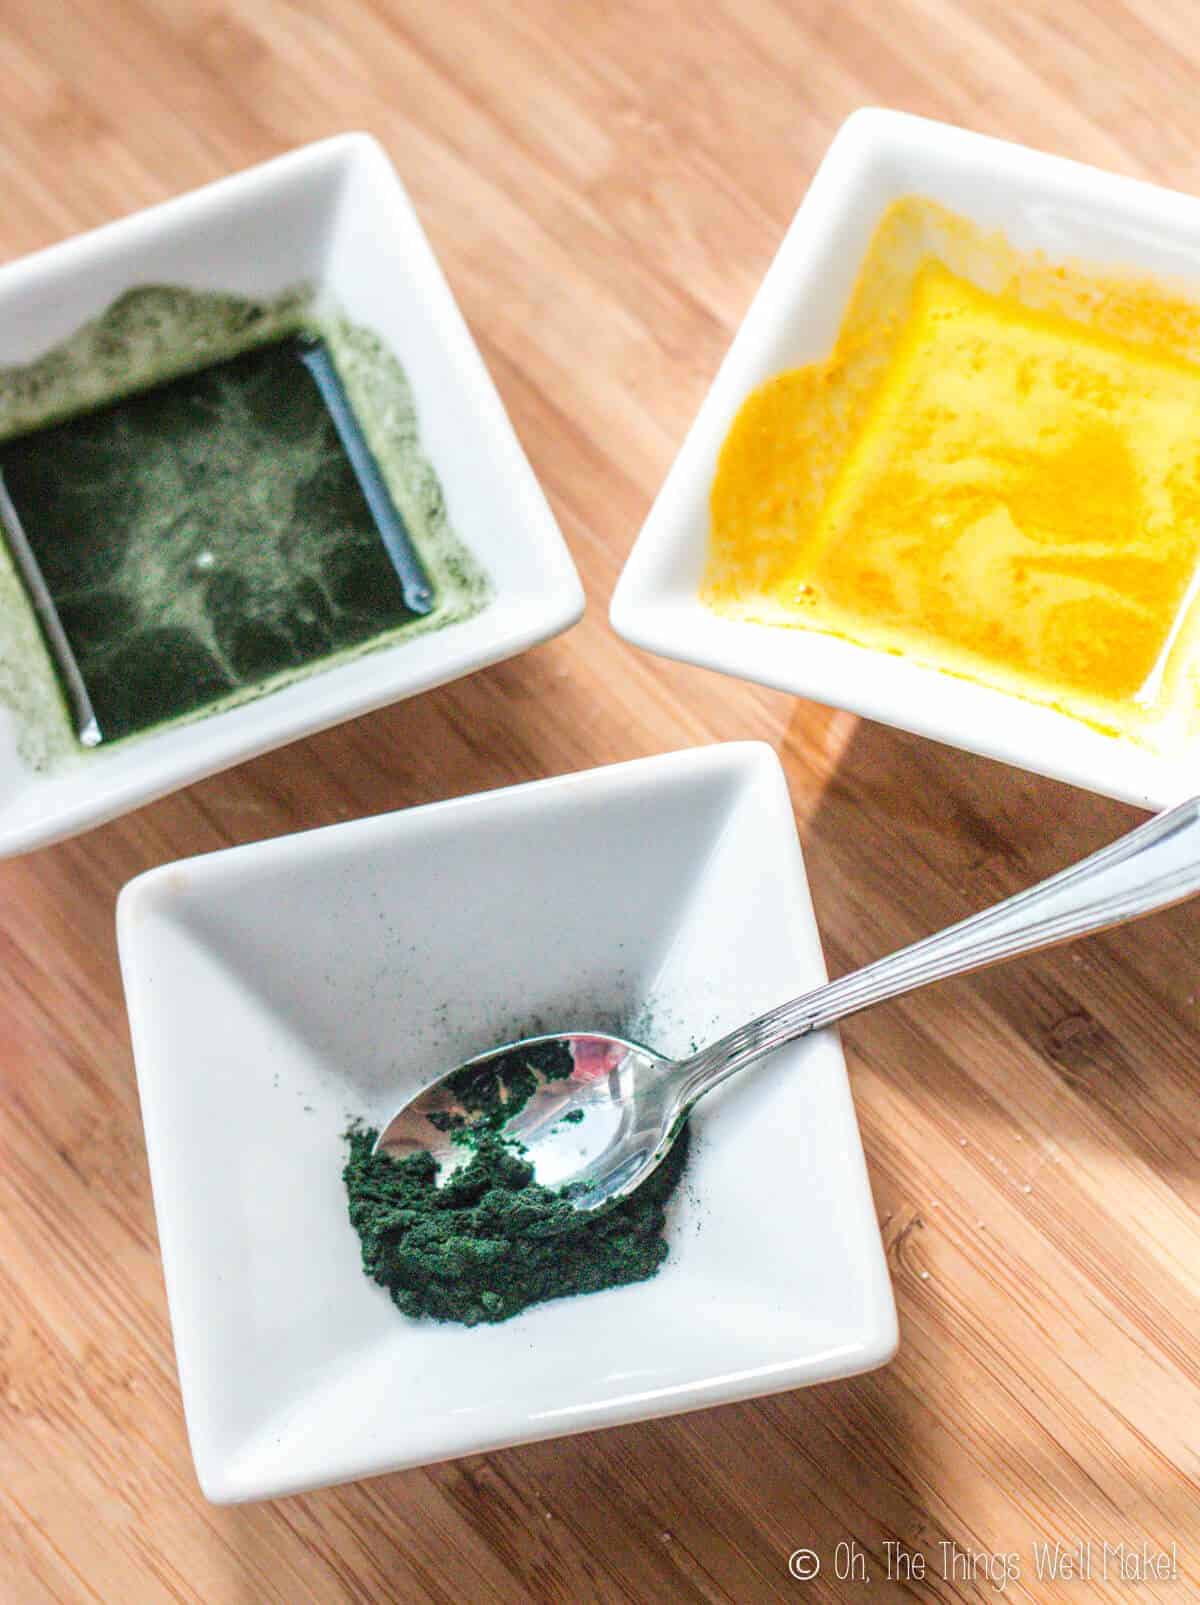
To make a bright yellow homemade food coloring, I used turmeric.
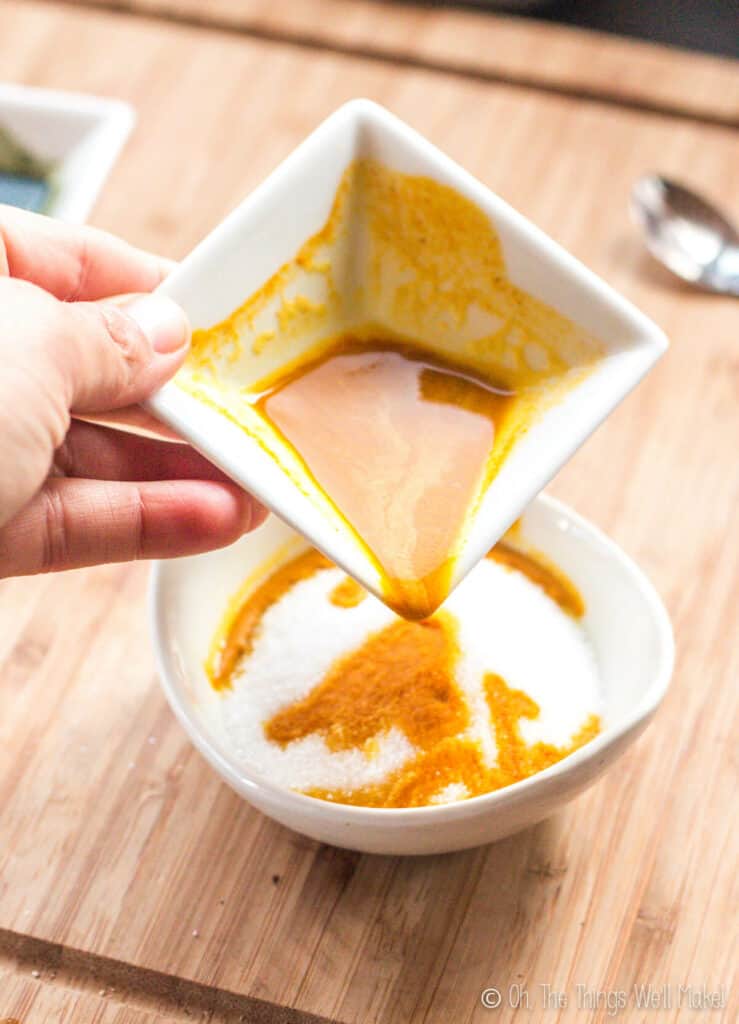
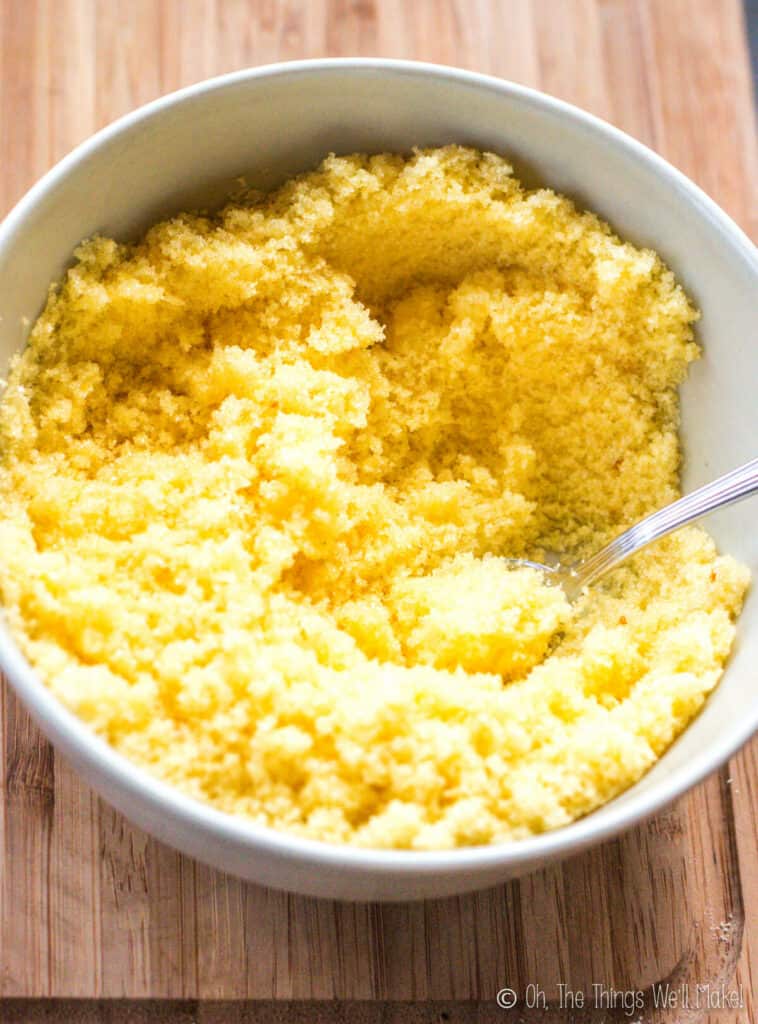
I followed the same process that I used with the beetroot powder. I mixed the turmeric powder with vodka and immediately poured the mixture into my sugar crystals.
I’ve since tried filtering out the solid matter of the powder. My sugar crystals, made with the filtered coloring, ended up being lighter in color. That said, I hadn’t left the powder in the alcohol for long enough to infuse more of its color.
I imagine that you could also use fresh turmeric to make a super vibrant yellow coloring. Either juice it or infuse the fresh root directly into alcohol.
Be careful, turmeric is such a powerful colorant that it stains clothing!
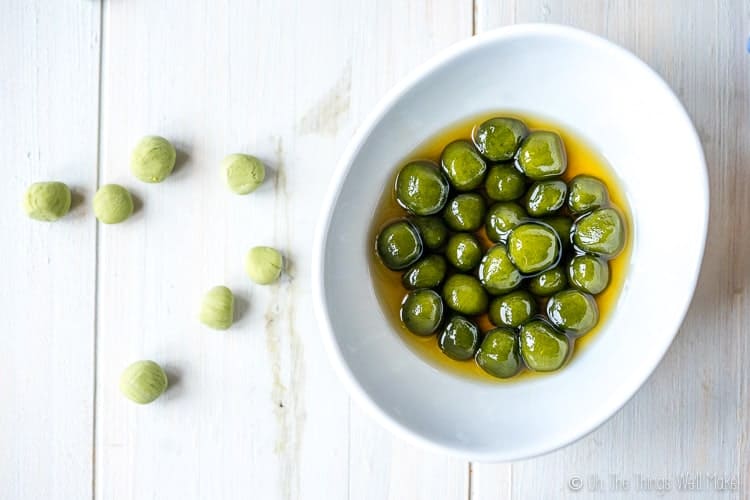
Homemade green food colorings
Ther are many ways to obtain various hues of green.
Chlorella and spirulina powders
At first, I tried using some of the powdered greens that I had in my cupboard, chlorella and spirulina.
While both work successfully to make green coloring, chlorella made a sort of dirty green that didn’t strike me as particularly pretty.
Spirulina powder, on the other hand, resulted in a pretty blue-green color. When using spirulina powder, the results were more splotchy than with other powders. I think that filtering out the powder, after infusing it in alcohol for a longer time, would result in a more even color.
Spirulina powder 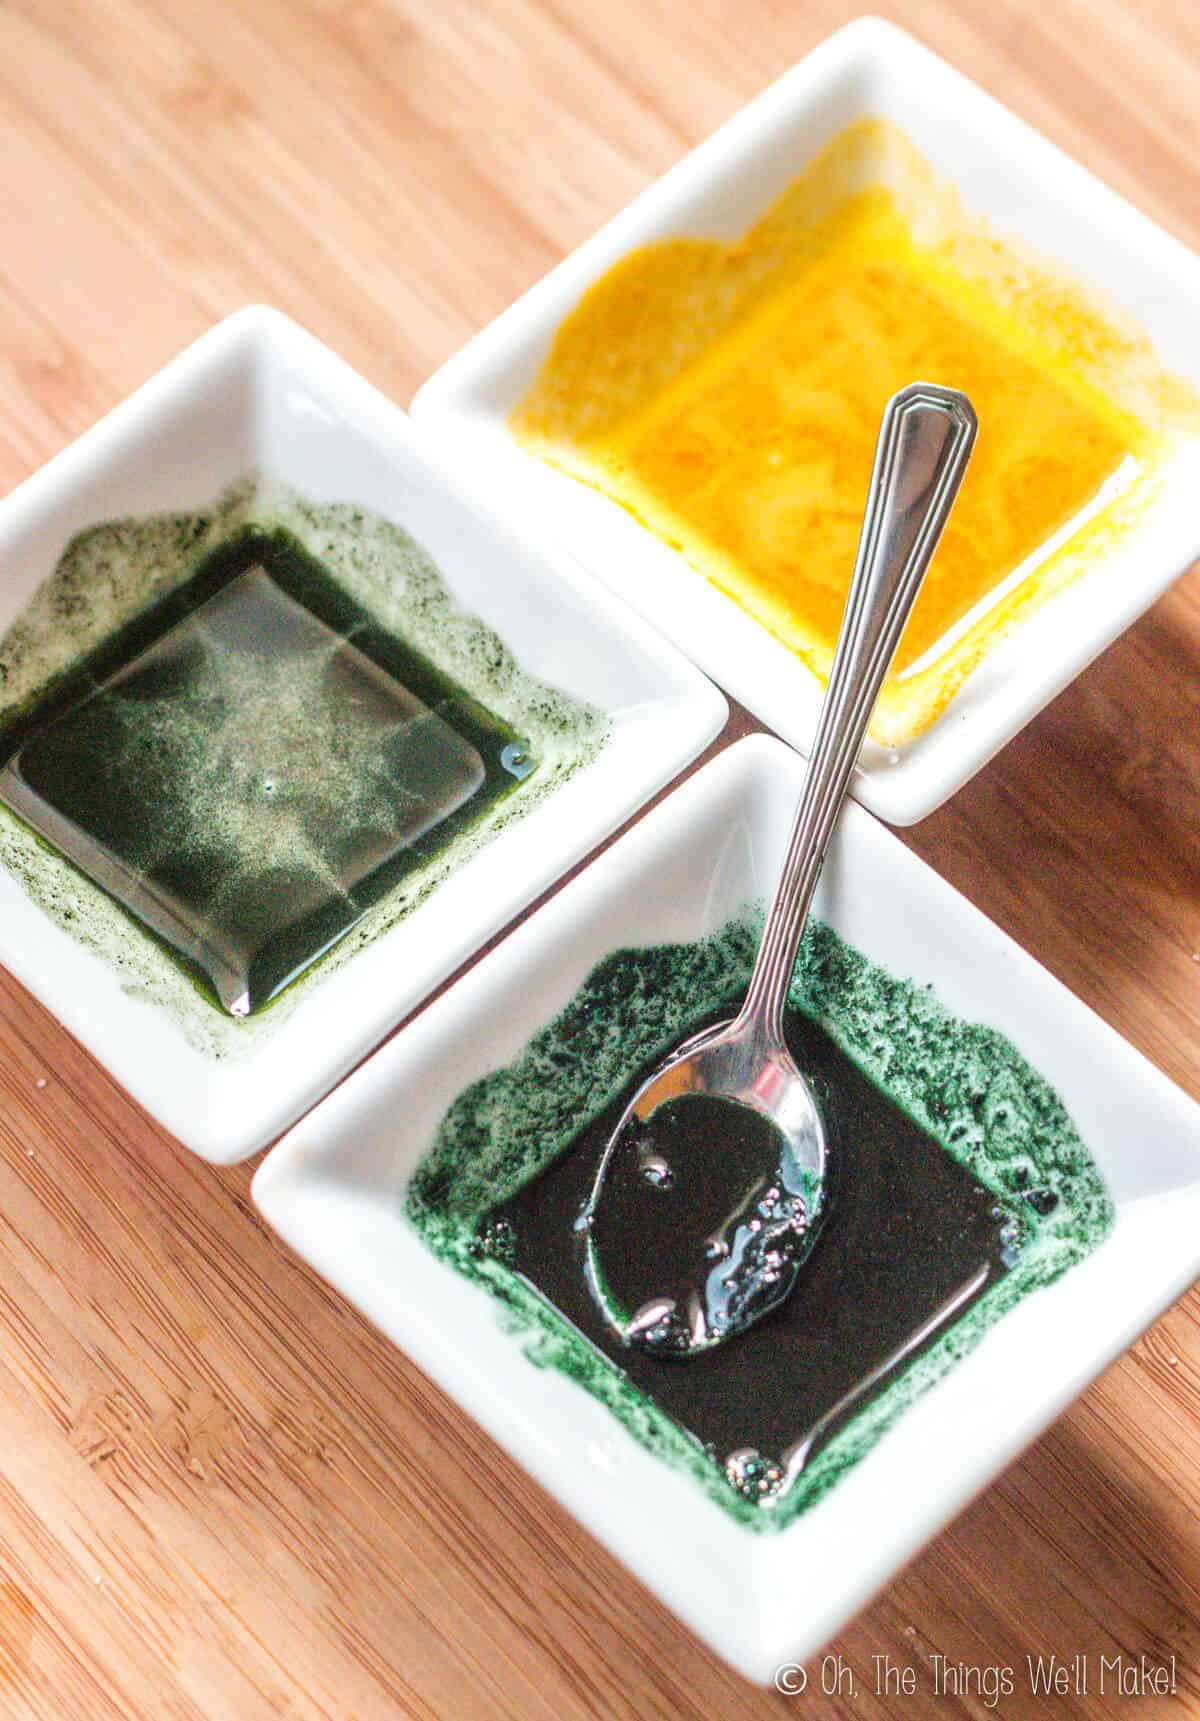
colorants made from turmeric, chlorella, and spirulina 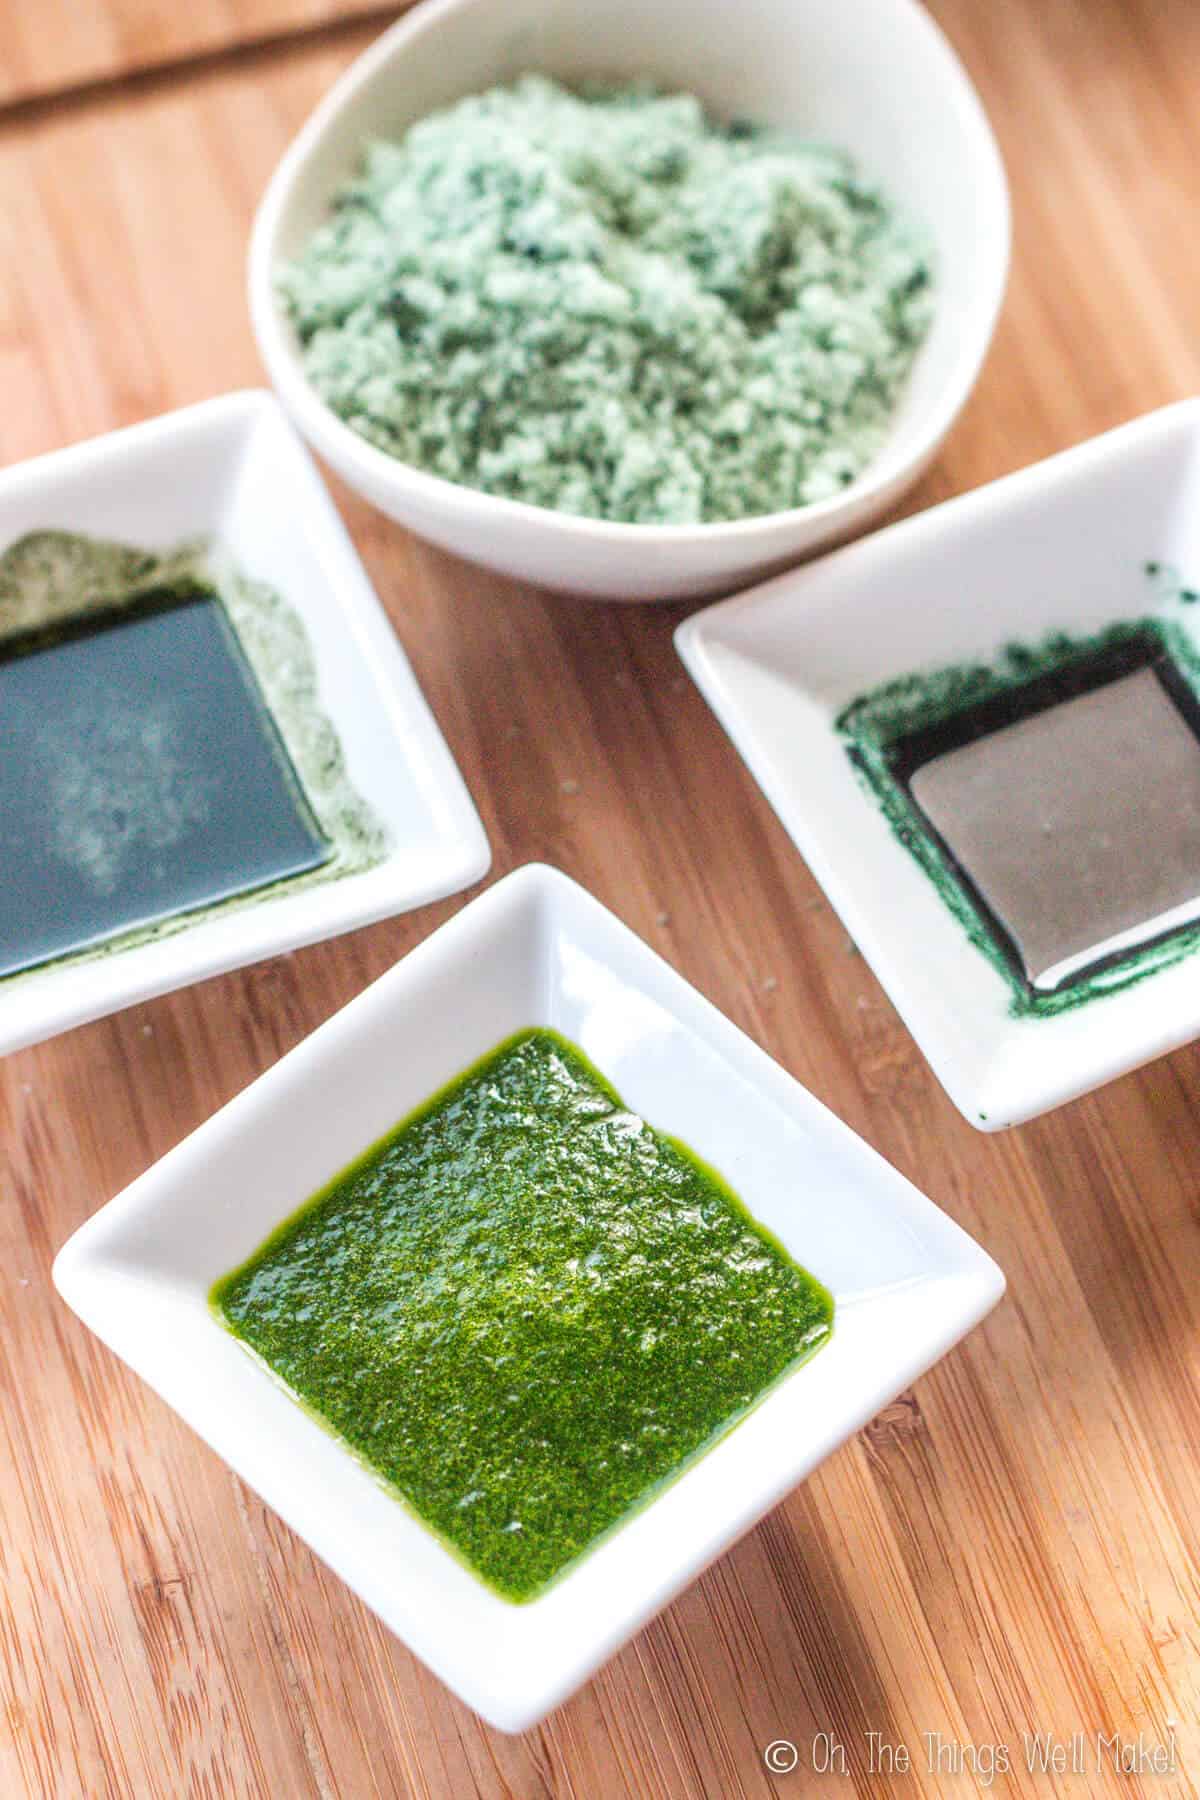
Sugar colored with spirulina 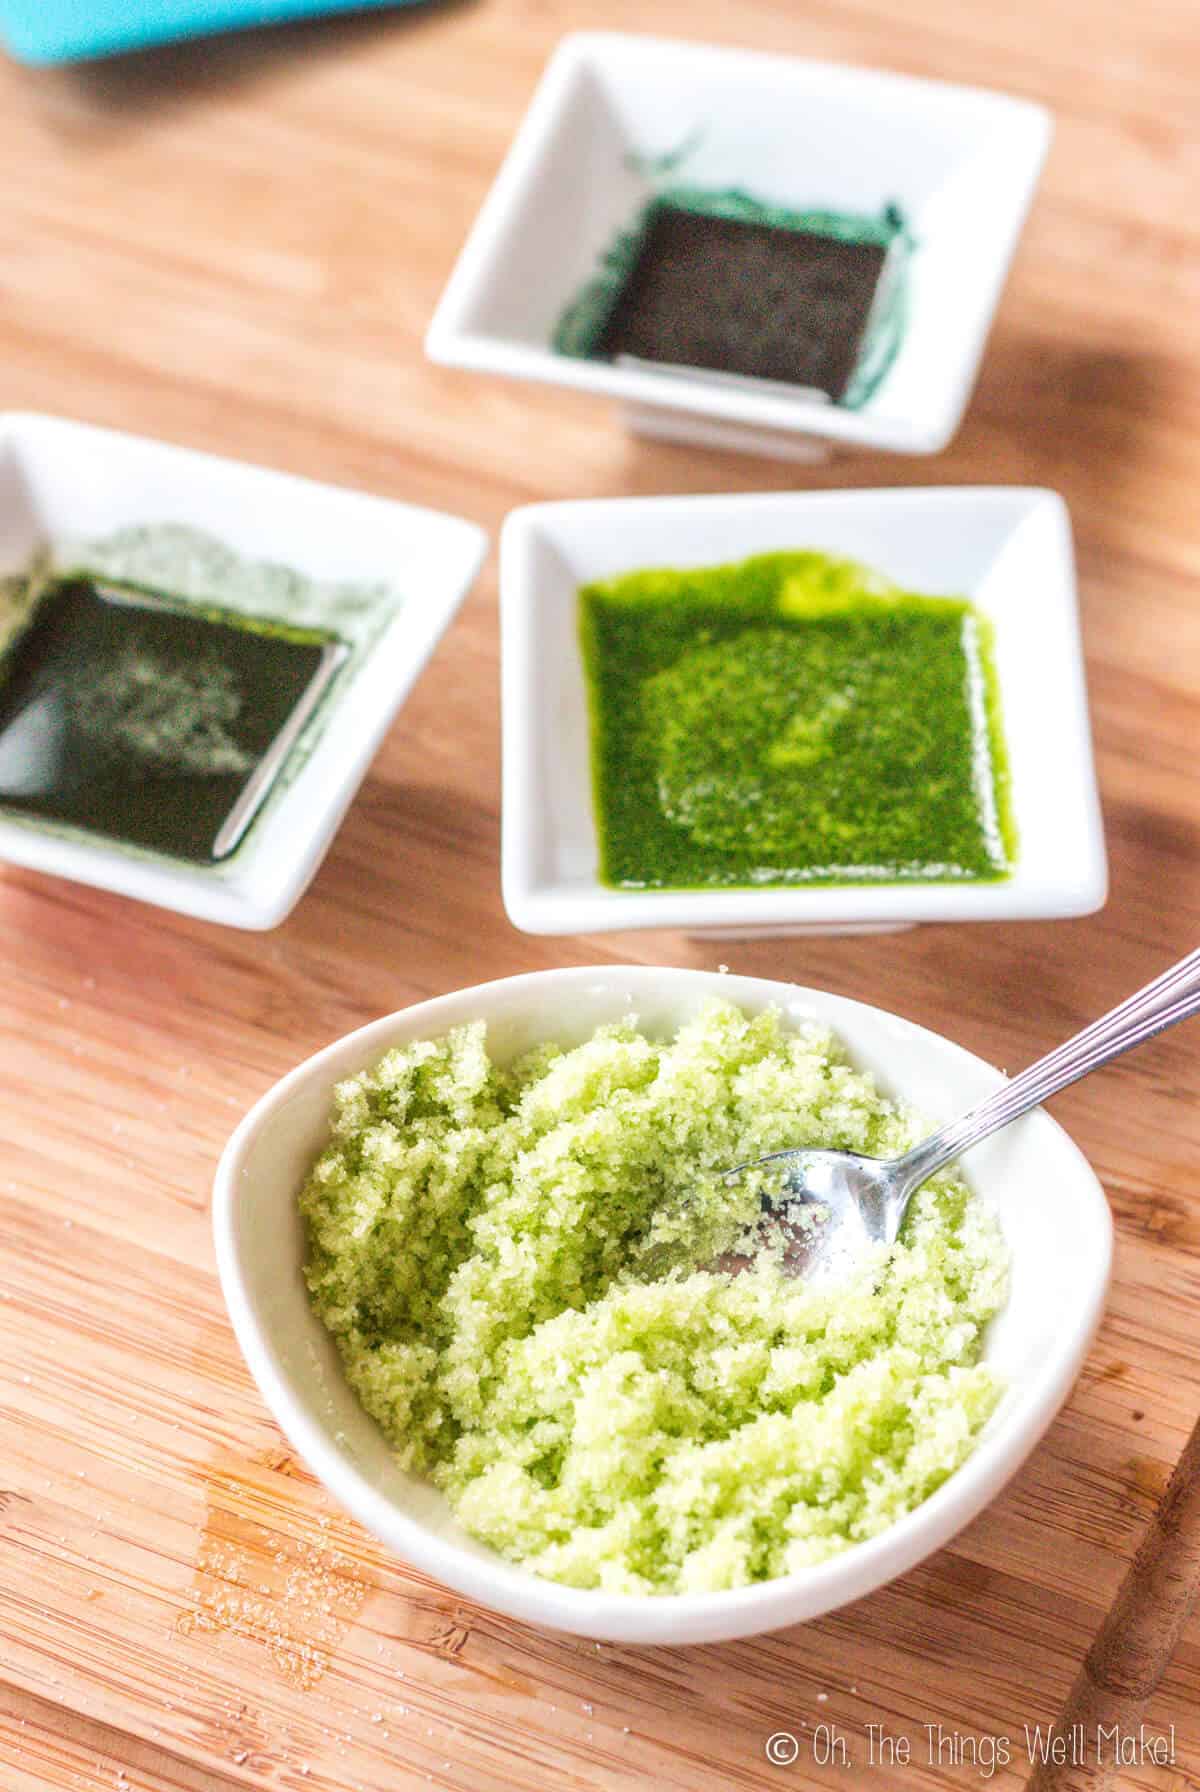
Coloring sugar with spinach 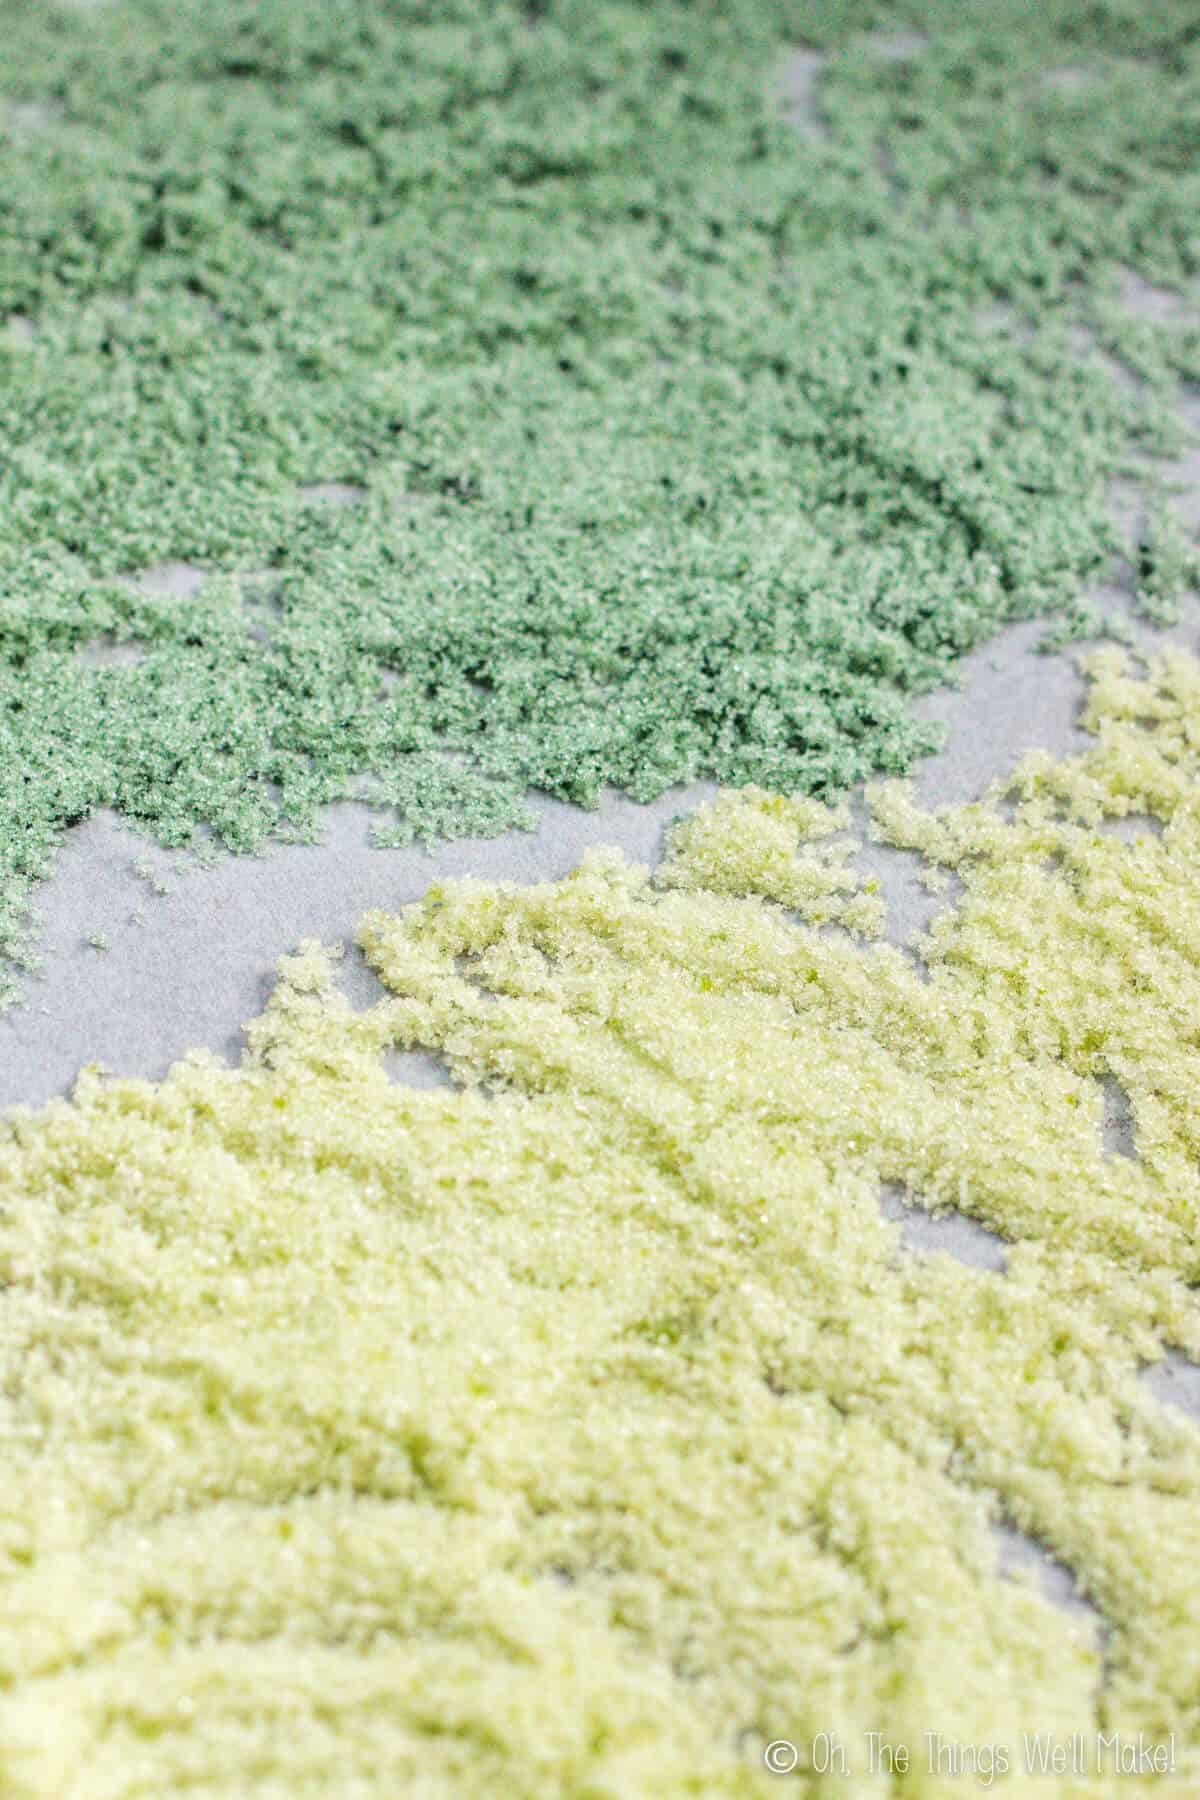
Sugar colored with spirulina (back) and spinach (front)
Spinach
Raw spinach leaves made a light, yellow-green color that was probably my favorite of all of the greens.
To use spinach, I blended a few leaves with a little bit of vodka, just enough to be able to blend everything together. The resulting mixture turned my sugar crystals into a light shade of spring green. Beautiful!
I didn’t bother straining out the spinach and the color was quite homogenous anyway. That said, if I were wanting to preserve the color, I’d strain out the leaves using a cloth or coffee filter. (I’d also make sure that the alcohol concentration was high enough, over 20%.)
Matcha powder
Just as spirulina and chlorella, matcha powder can be used to make a green coloring. It makes more of a yellow-green, but isn’t as vibrant spinach. I used matcha to color my homemade boba green.
Chlorophyll
This year, I also tried using a chlorophyll supplement that I had bought as recommended by my naturopath. Chlorophyll is normally sold as a dark green liquid which is often flavored with a mint flavoring.
It’s potent color and mint flavor made it ideal for coloring foods too!
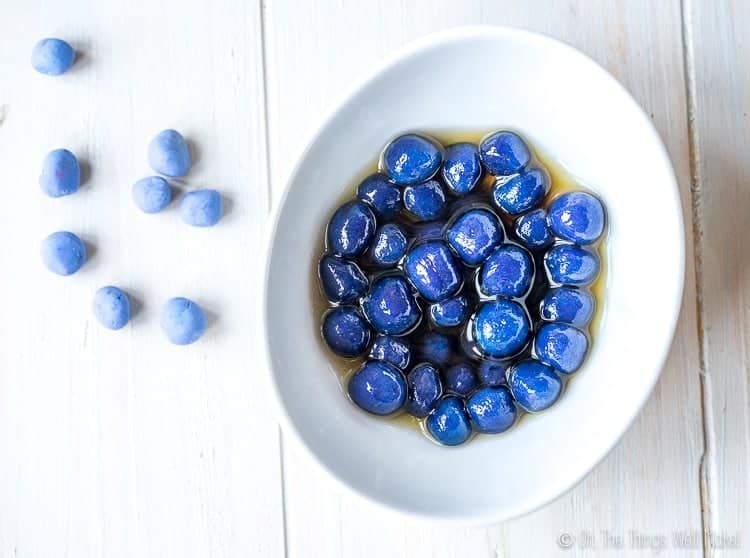
Natural blue food coloring
At first, it seemed impossible to make a natural blue coloring. With some experimentation, though, I found that there are several ways to achieve various hues of blue.
Blue spirulina
Not as common as the green variety, blue spirulina is also sold as a powder with a gorgeous turquoise color. It’s perfect for making beautiful blue smoothies and also works great to color other foods. It can be used in the same way as turmeric and green spirulina.
Butterfly pea flower tea
When I first wrote this post, I still hadn’t tried butterfly pea flowers. Butterfly pea flowers are the blue flowers of the clitoria ternatea plant which are often sold dried for making tea. When infused in hot water, the resulting tea is a beautiful bright blue color.
Its beautiful color and mild flavor make it perfect for coloring other foods.
To make a colorant with them, I poured some vodka over the flowers in a bottle and allowed the color to infuse overnight. I then strained out the flowers (but you could just pour off the alcohol as needed).
You can also grind the flowers into a powder, also sometimes referred to as blue matcha. While it comes from a completely different plant and isn’t a true matcha, the fine powder is often used to make beautiful blue lattes in the same way as matcha.
By grinding it into a powder, it can be used in the same ways as the beetroot and turmeric powders to instantly color sugar or other foods.
Magical color-changing food colorings
Both butterfly pea flowers and red cabbage have pigments that are pH-dependent. That means that they will change in color, depending on the pH of their environment. The colors I’m describing refer to the pigment when used at a neutral pH. If an acid is added to them, they tend to turn pink in color. Adding a base tends to turn them blue.
Keep that in mind when using those pigments. You may be hoping to turn a food blue or purple and find that you actually turn it pink instead!
Read more about using these “magical color-changing food colorings” in my post about them.
Homemade violet food coloring
Red cabbage gets its beautiful violet color from an anthocyanin pigment. While the flavor of cabbage isn’t very pleasant in sweet foods, when used in small amounts, it can work. By using only the parts of the leaves with the most pigment, you can ensure that the flavor isn’t as strong.
I’ve made violet pigment by juicing the leaves and then combining the juice with alcohol. I’ve also dried the leaves, ground them into a powder, and mixed that with vodka.
In the end, I didn’t notice a huge difference in results between the various methods. I’d probably only bother with drying the leaves if you want to try to use a powdered pigment.
Natural black food coloring
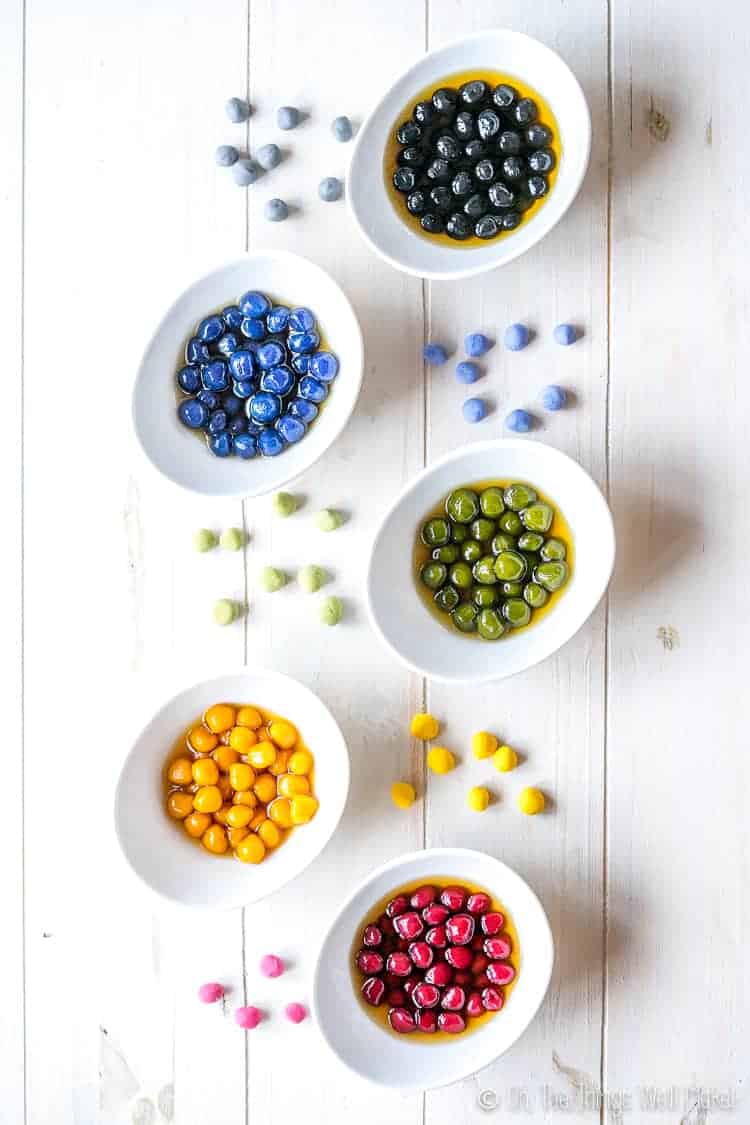
I hadn’t considered trying to dye foods black until people started asking me how to change my homemade boba (aka. tapioca pearls for bubble tea) black!
After some tips from readers, I learned of a bubble tea company that used activated charcoal to naturally color their boba black. I tried it out and was pleasantly surprised by how well it worked.
The great thing about homemade boba is that in the cooking process, the tapioca pearls develop vibrant colors. The tapioca becomes more translucent, allowing the colors to show through.
You can see how I made my rainbow of homemade boba colored with some of these natural colorings in my post about how to make colored boba.
What about the flavor?
Unlike flavorless synthetic colorants, these homemade food colorings usually do have a flavor that accompanies the color. Some of the colors, like the blue obtained from the butterfly pea tea, have a very mild flavor that is hardly noticeable. Others, though, will change the flavor of whatever you are going to color. So, keep that in mind.
Beets have a mild, sweet flavor. Turmeric, on the other hand, has a more potent flavor. My son actually likes the flavor added by turmeric, but others may be more put off from it. For me, the red cabbage has the least pleasant flavor when added to sweets, but I don’t find it bad enough to avoid using it. (It would depend on the recipe and concentration needed, though.)

How long do they keep?
If you want to be able to keep your homemade food colorings for more than a few days, you’ll need to preserve them with alcohol or glycerin. When preserved, you can store them in a cool, dark place for a much longer time. Otherwise, they must be kept in the fridge and will only keep for a few days, at most.
For a maximum shelf life:
- Make sure the alcohol concentration of your final mixture is over 20-25%.
- Make sure the glycerin concentration is over 50%.
- Strain out remaining plant material using a cloth of coffee filter.
Keep in mind that fresh foods may give off some water to the glycerin or alcohol, so shoot for higher concentrations to account for the possible addition of humidity which will lower the concentration of preservative. Or use only dry foods when trying to preserve the colors, just in case.
While these should be safe to use for quite some time (months), I’ve found that the colors may change after a few weeks. It will depend a lot on the foods and alcohol used. (Stronger alcohol like Everclear may preserve the colors longer.)
How to color sugar crystals
To color sugar, mix white sugar crystals with a small amount of homemade liquid colorant and stir until the color is well dispersed. Add more color, a small amount at a time, until you’ve achieved the right saturation of color. Be careful not to add too much liquid, though, or you may dissolve the crystals.
Once the sugar has been colored, it should be dried before use. (You don’t want the crystals to dissolve into a colorful puddle, right?)
To dry out your sugar crystals, spread them out in a thin layer on a baking sheet and place it in the oven on the lowest temperature or with only the fan on. While you can let them air dry, using a dehydrator or oven helps speed up the drying process. This is especially important if you’re working in a humid environment. I chose to dry mine in the oven with only the fan and light on and it took about an hour.
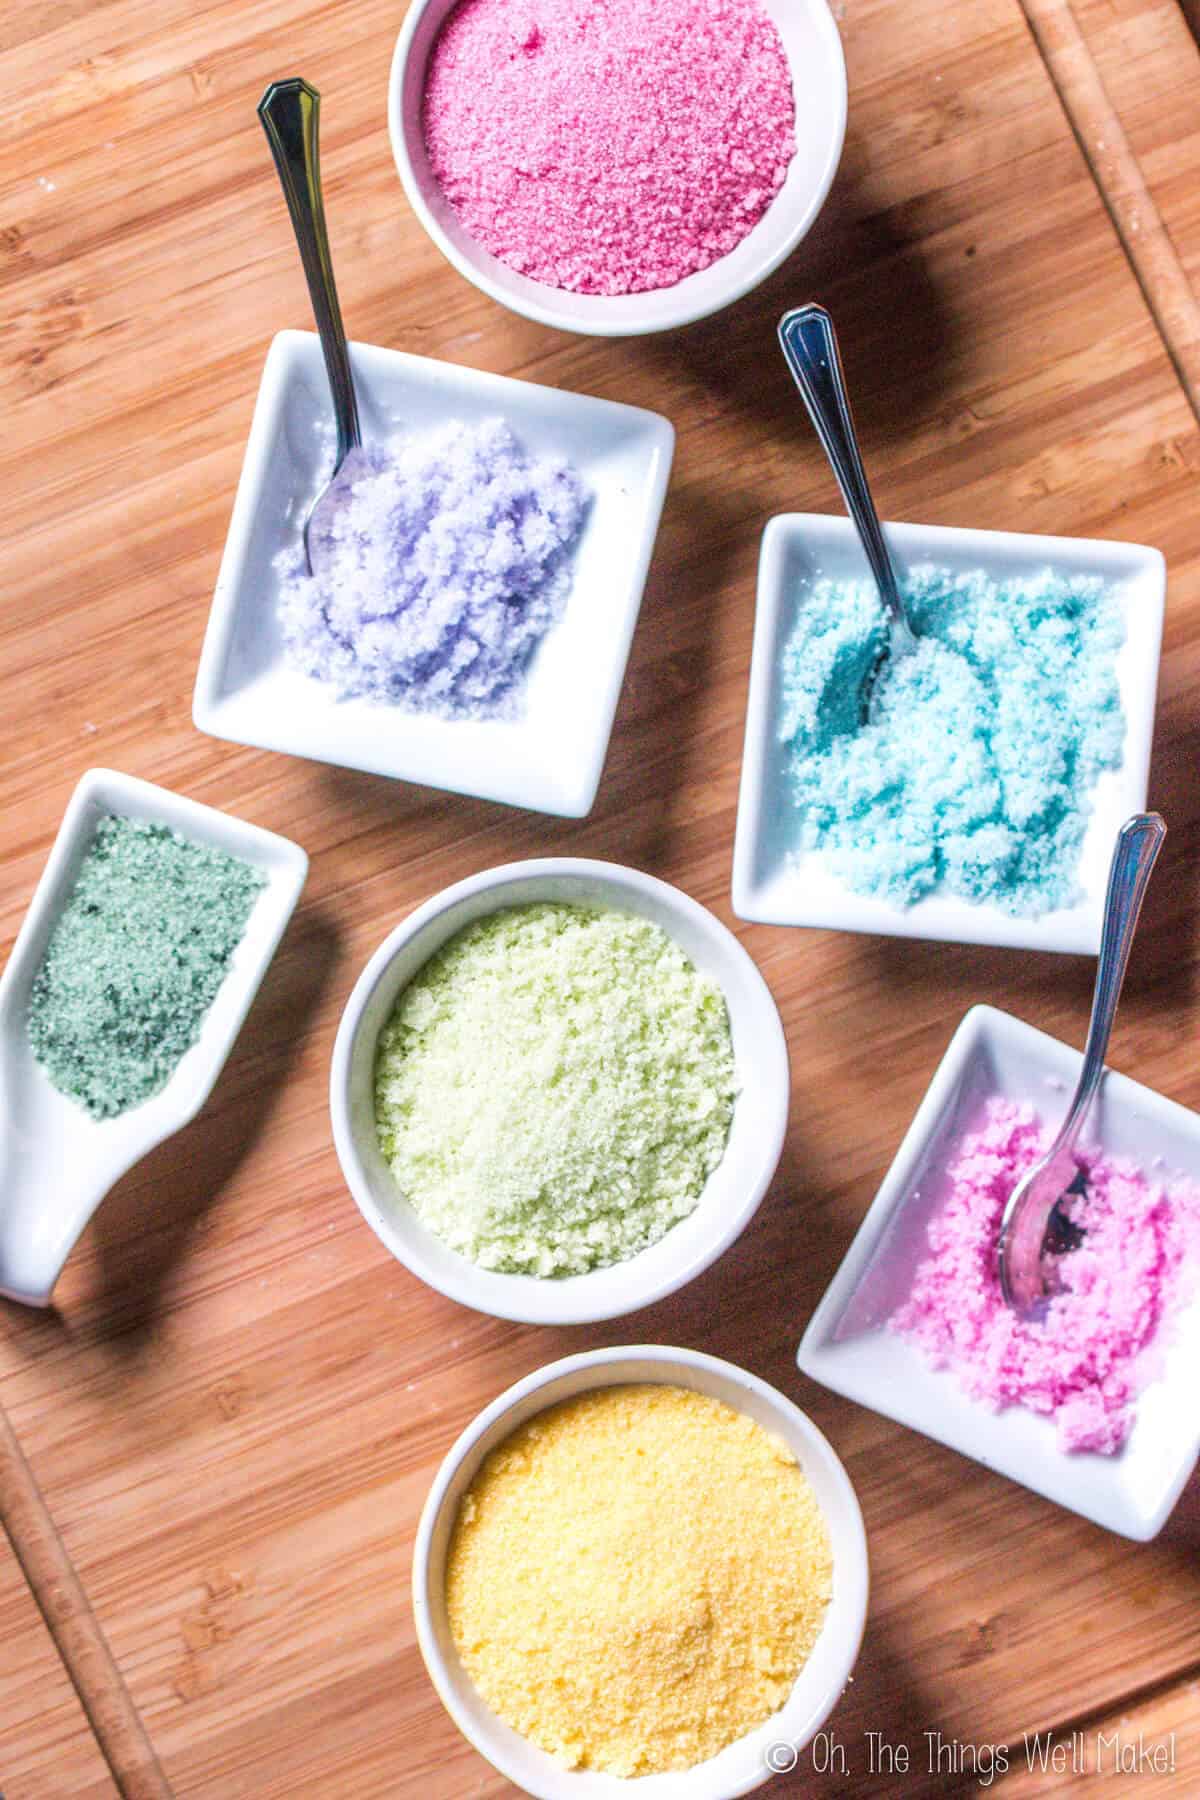
During the drying process, you may end up with a bit of clumping. That is OK and normal! Just break up the pieces with your fingers or press on them with your spatula. They should easily separate into separate, perfectly dyed sugar crystals again.
Store them in an air-tight container until you are ready to use them.
You can color dried coconut in the same way to make fun, healthy “sprinkles” for decorating a variety of foods. (I used them to decorate my homemade marshmallow “peeps.”)
Vibrant, Easy Paleo Sprinkles
Video
Natural Food Coloring
Ingredients
For pink coloring
- 1 tsp. beetroot powder or hibiscus powder, or fresh beets
For red coloring
- 1 tsp. alkanet root powder
For orange coloring
- 1 tsp. annatto seeds ground into powder
For yellow coloring
- 1 tsp. turmeric powder or fresh turmeric
For green coloring
- 1 tsp. spirulina or chlorella powder
- 1 handfull fresh spinach leaves
- 1 tsp. matcha powder
- 1 tsp. liquid chlorophyll
For blue coloring
- 1 tsp. blue spirulina powder
- 1 Tbsp. butterfly pea flowers or 1 tsp. of the powder
For purple coloring
- 2 red cabbage leaves
For black coloring
- 1 tsp. activated charcoal
For extracting the colors
- 1/3 cup vodka or other high proof alcohol, or glycerin
Instructions
- Choose one of the colorant choices above and one of the extration ingredients (alcohol or glycerin).
When using fresh foods
- Either cut the fresh foods into small pieces or juice them. Add the cut pieces to a small bottle or jar with enough alcohol to fully cover them. If using juice, mix the juice with alcohol to dilute the color and help preserve your coloring. (The final alcohol concentration should be over 20% for safe preservation.)
- After steeping for several hours, the plant material can be strained out by pouring the mixture through a cloth or coffee filter.
When using dried powders
- Mix together one of the powders with some alcohol or glycerin. (Water can also be used if you aren't concerned with preserving the homemade coloring.)
- The mixture can be used as-is immediately or allowed to steep for several hours. After steeping, the powders can be strained out with a cloth or coffee filter. Using the coloring with the powder may add speckling in some cases, but straining may also lighten the color. Experiment to find the look that works best for your project.
Storing
- Colorings made without alcohol or glycerin should be stored, covered, in the refrigerator and used within 5 days. If the alcohol concentration is high enough (over 20%), you can keep your coloring for longer. Pour the liquid into small bottles and store in a cool, dry place for up to several weeks. (After that time, it's probably still safe to use them, but I find that the colors often change with time.)If using glycerin, it should make up 50% of the concentration for safe storage.
Notes
This post was originally published on March 25, 2015. It was rewritten with clearer instructions, more ways to use the colorings, and better tips for storage. New photos and video were also added.


Excellent idea! Thank you for sharing such a valuable technique.
Hi! Doesn’t this alter the flavor of the sugar?
Hi Wendy,
Yes, it does slightly alter the flavor of the sugar, but I didn’t think it was that noticeable, or at least wasn’t unpleasant. I actually haven’t used sugar since I made these the first time because the sugar didn’t hold up well when I covered the marshmallows in it, and I found that I liked coloring coconut for decorating a lot more. The coconut absorbs a lot of color, so you don’t need a lot to get the colors vibrant. You need a bit more when using sugar, but I don’t remember the flavors being overpowering.
Beets gave the most pleasant flavor as they are sweet to begin with, and didn’t really add much of an unusual flavor to anything. Turmeric has a strong flavor, but it also has a very bright color. You can notice a slight turmeric flavor, but I also made everything really vibrant because I wanted bright yellow peeps. You could always do a bit of a test batch, and use less if the flavor bothers you.
When I made the color changing coloring using red cabbage, I used an anise flavored liqueur, and in that case both the sugar and coconut tasted a bit like anise, so I’m not sure if the cabbage adds much flavor or not. That could be an option, though, if you are concerned about the flavor, you can use a (colorless) liqueur with a flavor you like to mask any flavor from the coloring agents.
This is exactly what I have been looking for! Thank you!
I’m so glad, Amelia! 🙂
I love these ideas for natural food coloring! I personally love the colour spirulina made, but that’s a great idea to use spinach to get that lighter green! Definitely going to be trying this out 🙂
Thanks, Kyra!
They really worked out much better than I expected because most of the other natural food coloring posts I had seen didn’t give a lot of color at all.
I think the key to using spinach is using it raw- and it’s always best if you can get as much moisture out as you can.
The alcohol really seems to help.
I think some people are bothered by the fact that I used alcohol, but vanilla extract does too, and people don’t seem uptight about that. In any case, I’m doing some trials with glycerine just for fun! So far I’ve only tried with beetroot, but it seems pretty vibrant and stable for now. 😉
I’d love to make the green spinach sugar, and am wondering if you could clarify the amounts of each ingredient you used. I’m also curious if you’ve had any issues with the green changing color when mixed with ingredients with different pH levels. (I plan to mix mine with sour cream and coconut flakes for an icing.)
Hi Elise,
I’m so sorry this response is so late. I was going through old messages and somehow yours ended up with the spam!
I found it when clearing out the old spam messages.
I didn’t really measure out any of the ingredients. I found that in the end with the leaf type colorants like cabbage and spinach, they worked best when the leaves were dehydrated and ground into a powder. I usually just take a couple of leaves, dry them, grind them into a powder, and add enough alcohol to just cover all of the powder.
To actually color the sugar, I added in the colored alcohol little by little until I got the tone I liked. You don’t really need very much.
I hope that helps somewhat.
Love this! But can I use water to mix with the powders instead of vodka? I don’t have any on hand and I need the sugar asap. Let me know, thanks!
Hi Sophie,
The reason I used an alcohol was because alcohol evaporates quickly. With natural dyes the concentration isn’t quite as strong as artificial dyes and it might be hard to get bright colors without dissolving the sugar crystals.
That said, yes, you should be able to use water. Just try to make the liquid as concentrated as possible and add in a little at a time so as not to dissolve the sugar. You want to color the crystals, but keep them as intact as possible.
I hope that helps!
I recently made naturally colored sugar sprinkles and sugar hearts. I used water to extract the color: http://www.sewhistorically.com/naturally-colored-sugar-sprinkles-and-sugar-hearts/ But it sounds interesting to use alcohol instead: I’ll have to give this a try. 🙂
Hi Lina,
Your sugar hearts turned out lovely.
Yes, I chose to use alcohol for 2 reasons. One, so that it would evaporate more quickly, and that would keep the sugar crystals from dissolving. Obviously, you didn’t have that problem.
The other reason I chose to use alcohol was so that the color extraction would keep longer. I was able to keep the colors for at least several days without problems.
Of course, directly juicing the different plants/vegetables, etc. is a great way to get an intense color too.