• Skip to main content
  • Skip to header left navigation
  • Skip to header right navigation
  • Skip to site footer
es_ES Español
  • About
    • Meet Tracy!
    • Contact Me
    • Disclaimers & Disclosures
    • Terms and Conditions
    • Cookie Policy
    • Privacy Policy
  • Holidays
    • New Years Eve
    • Valentine’s Day
    • St. Patrick’s Day
    • Easter
    • Fourth of July
    • Halloween
    • Thanksgiving
    • Christmas
  • es_ES
Oh, The Things We'll Make!

Oh, The Things We'll Make!

Make it yourself so that you control the ingredients!

  • Recipes
    • Appetizers & Snacks
    • Soups & Salads
    • Breakfast
    • Lunch & Dinner
    • Desserts & Sweets
      • frozen treats
    • Breads & Wraps
    • MIY Pantry Basics
    • Condiments & Sauces
    • Beverages & Smoothies
    • Story Archives
  • Make it Yourself
    • Arts & Crafts
    • Face & Body
      • Cleansers, Soaps, & Gels
      • Deodorants
      • Hair
      • Skin Care
      • Oral Care
      • Baby & Toddler Care
    • Home & Garden
      • Cleaning & Laundry
      • Garden & Hens
    • Soap Making
    • Upcycling
  • About
    • Meet Tracy!
      • More About Me
    • Contact Me
    • Disclaimers & Disclosures
    • Cookie Policy
    • Privacy Policy
  • Recipes
    • Appetizers & Snacks
    • Soups & Salads
    • Beverages & Smoothies
    • Breakfast
    • Lunch & Dinner
    • Desserts & Sweets
      • frozen treats
    • Breads & Wraps
    • Condiments & Sauces
    • MIY Pantry Basics
    • Story Archives
  • Make it Yourself
    • Arts & Crafts
    • Natural Face & Body
      • Cleansers, Soaps, & Gels
      • Natural Skin Care
      • Natural Hair care
      • Oral Care
      • Deodorants
      • Baby & Toddler Care
    • Soap Making
    • Home & Garden
      • Cleaning & Laundry
      • Garden & Hens
    • Photography
    • Upcycling
  • Holidays
    • New Years Eve
    • Valentine’s Day
    • St. Patrick’s Day
    • Easter
    • Fourth of July
    • Halloween
    • Thanksgiving
    • Christmas
es_ES Español
Overhead view of a glass of homemade panna cotta in front of another one, both garnished with mango puree and raspberries.

Smooth and Creamy Panna Cotta

Last Modified: January 15, 2020 // by Tracy Ariza, DDS // January 10, 2020 I may receive a commission if you purchase through links in this post. Learn more here.

es_ES Español

Jump to Recipe Print Recipe
This smooth and creamy panna cotta has the perfect consistency and almost melts in your mouth. It's a light dessert that's easy to make yet sure to please. #pannacotta #italiancuisine #dessert #dessertrecipes #glutenfree #thethingswellmake #miy

This smooth and creamy panna cotta has the perfect consistency and almost melts in your mouth. It’s a light dessert that’s easy to make yet sure to please.

Overhead view of a glass of homemade panna cotta in front of another one, both garnished with mango puree and raspberries.
Pin this post for later!

Table of contents

  1. What is panna cotta?
    1. How to make a creamy panna cotta
      1. Customizing the recipe
        1. Panna cotta serving ideas
          1. How to make panna cotta
            1. Watch me make panna cotta
              1. Panna Cotta Recipe

                Panna cotta, when done right, is one of my favorite desserts. I love the smooth, creamy texture, and its delicate simplicity. It’s hard to imagine that something so impressive could be so easy to make. Oh, but it is!

                What is panna cotta?

                Panna cotta is a creamy Italian dessert made with gelatin and cream. It is often credited to the Northern region of Italy, specifically the region of Piedmont. As is common, though, there is some controversy about where it actually comes from. (Everyone wants to take credit for the best things, right?)

                While I’ve normally seen it served bright white and garnished with fruits and fruit purees, other flavors aren’t uncommon. For example, it may also be flavored with coffee or a cooked sugar caramel similar to the one that tops Spanish flan.

                What does “Panna Cotta” mean?

                The name “panna cotta” means “cooked cream” in Italian. (“Panna” means “cream” and “cotta” means cooked.)

                Panna Cotta vs. flan

                Unlike its Spanish counterpart, flan, a smooth custard made with eggs that needs to be baked for a while, panna cotta depends on gelatin to hold its shape. While the cream is “cooked” with the gelatin to help melt it, panna cotta doesn’t require any baking at all.

                How to make a creamy panna cotta

                When I first began making panna cotta, my goal was to create a perfectly creamy panna cotta. I wanted something that would hold its shape, but I didn’t want it to be firm like a homemade gelatin dessert.

                I made the recipe several times over a matter of weeks to get things just right.

                Cream or milk?

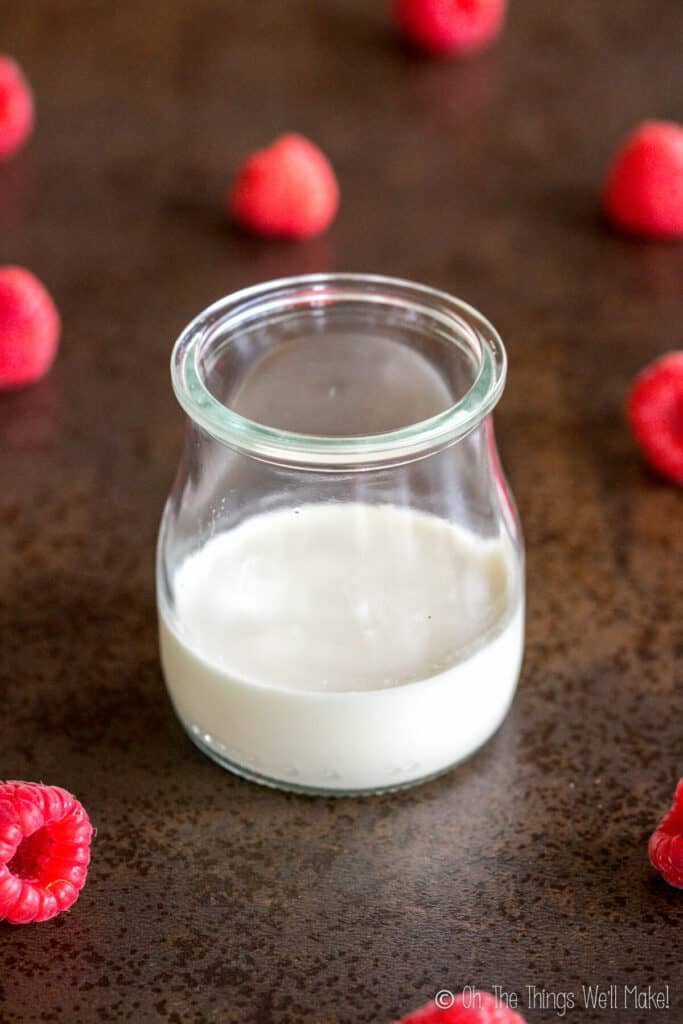
                To get the right consistency, you want the panna cotta to be smooth and creamy, and not heavy. Some recipes call for using only heavy cream, but I find that to be a bit too heavy. When using only cream, the panna cotta didn’t have the light, creamy texture I was looking for.

                Using only whole milk didn’t achieve what I was looking for either. Without the cream, my panna cotta just wasn’t, well, creamy.

                In the end, I used a combination of both milk and cream. While you can adjust the ratio to suit your taste, I prefer using a bit more cream than milk. That gives a dessert with the smooth, creamy texture I was hoping for.

                panna cotta with a smooth, creamy texture

                How much gelatin to use

                A good panna cotta has a custard texture, not the texture of a heavy gelatin dessert. So, while you want the dessert to set, you don’t want to overdo the amount of gelatin added to the mixture either.

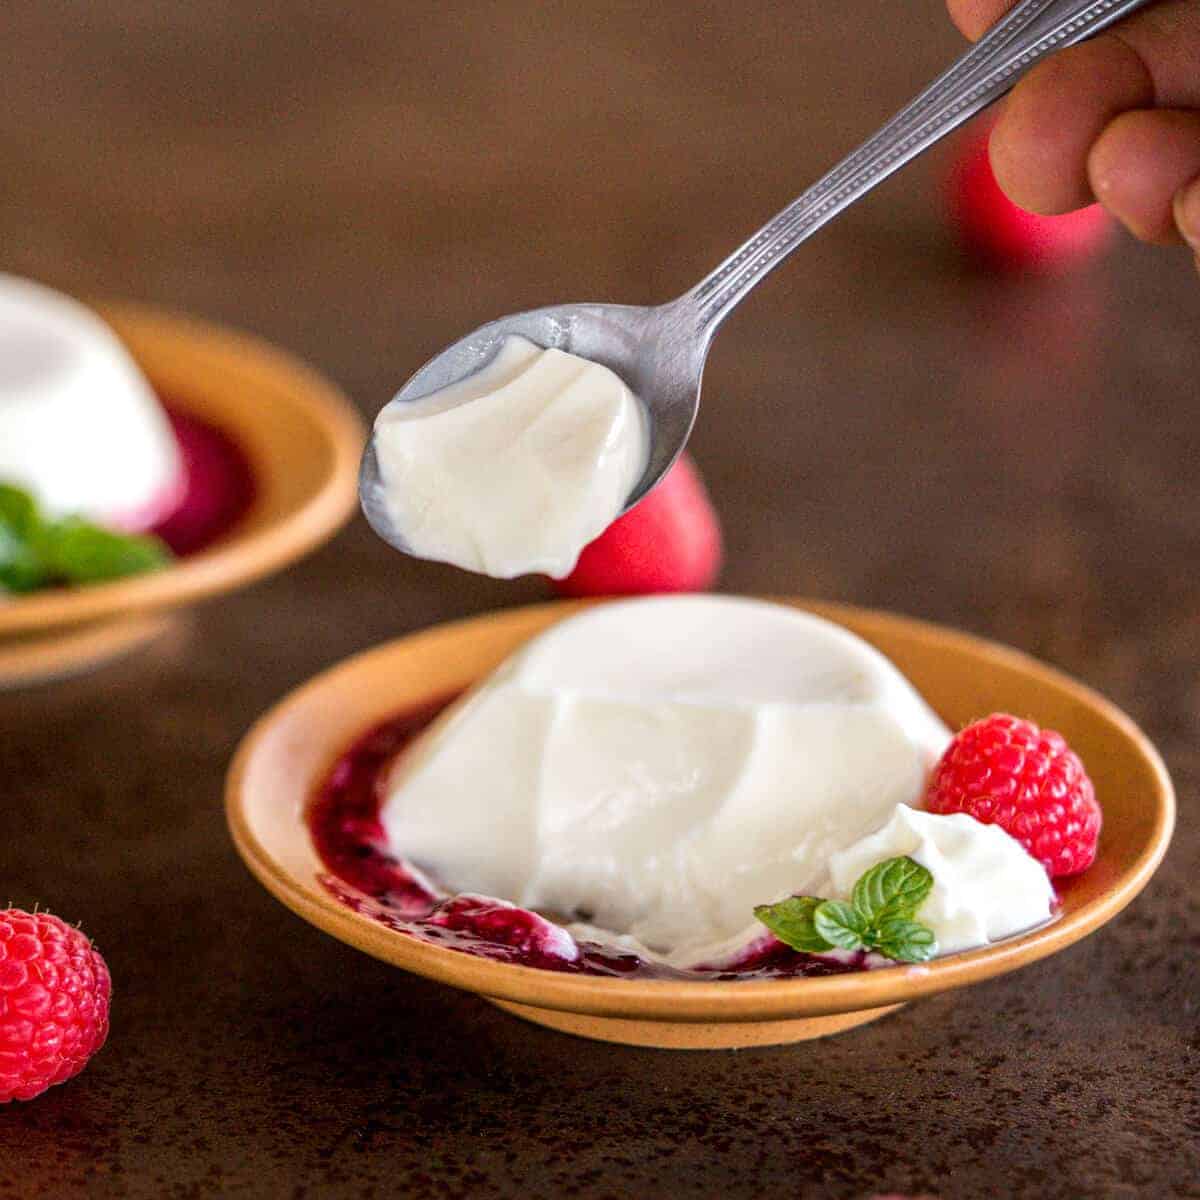
                When unmolded, this panna cotta holds its general shape, but gravity will bring it down slightly into a rounded version of its molded self. When you achieve that, you end up with a light dessert with just the right texture.

                Customizing the recipe

                While I think I’ve found the way to make the perfect panna cotta, it’s perfectly fine to customize the recipe to suit your taste.

                Different flavors

                My favorite way to make panna cotta is to leave it simple, adding only touch of vanilla extract or rose water. They both add a delicate flavor that complements fresh berries well.

                Rose and vanilla

                Rosewater adds a fragrant sweetness that makes it the perfect dessert for a special Valentine’s Day dinner. Vanilla flavored panna cotta is also spectacular, though, and either can definitely be enjoyed year-round.

                Fruity panna cotta

                While I normally use the fresh berries as a garnish, some people add some fruit puree directly to the cream mixture. While I haven’t personally tried it (yet), it’s an option for fruit lovers.

                Coffee flavored

                For coffee lovers, try adding a bit of coffee to the mixture. (The easiest way is probably by dissolving an instant coffee directly into the cream.)

                Chocolate

                I imagine that chocolate panna cotta would also be delicious. It’s easy enough to add a bit of cocoa powder to the mixture to give it a try. Layering chocolate and vanilla panna cottas would also make for a fun dessert.

                Caramel

                To make a caramel panna cotta, add some melted sugar to the bottom of the molds before adding the cream mixture. For directions, see my coconut flan recipe, following the instructions for adding the sugar to the molds.

                Using other sweeteners

                By now, you probably know that I rarely use white sugar (other than when making kombucha). I try to use unrefined sweeteners when possible instead.

                While experimenting with different panna cotta recipes, though, I have to admit that I preferred panna cotta made with sugar vs. honey or maple syrup. While either made a delicious dessert, they also overpowered the delicate flavors a bit too much for my taste.

                Plus, I love the bright white color of a panna cotta made with white sugar.

                Making a low carb/keto panna cotta

                I haven’t experimented with making panna cotta with other low carb type sweeteners, but I imagine they would work fine. You could probably very easily make a keto panna cotta with mostly cream and a low carb sweetener like erythritol.

                You, of course, are free to change it up and use whatever sweetener you prefer. It will still be delicious, but keep in mind that making substitutions can change the color and flavor. (It’s probably less noticeable if you are making a flavored panna cotta like the coffee or chocolate ones.)

                As for the amount of sweetener to add?

                I added just enough sugar to lightly sweeten the creme mixture. Feel free to add more or less sugar to suit your own tastebuds.

                Making it dairy-free

                You can make a dairy-free panna cotta by using coconut cream and coconut milk instead of cow’s milk.

                I have made a paleo strawberry cream pie in the past using the same idea. It uses a combination of the thickening of the canned coconut milk and the gelatin to get a smooth consistency.

                In reality, the pie filling is basically a dairy-free strawberry panna cotta. So, take a look at that recipe and modify it to suit your taste.

                Different toppings

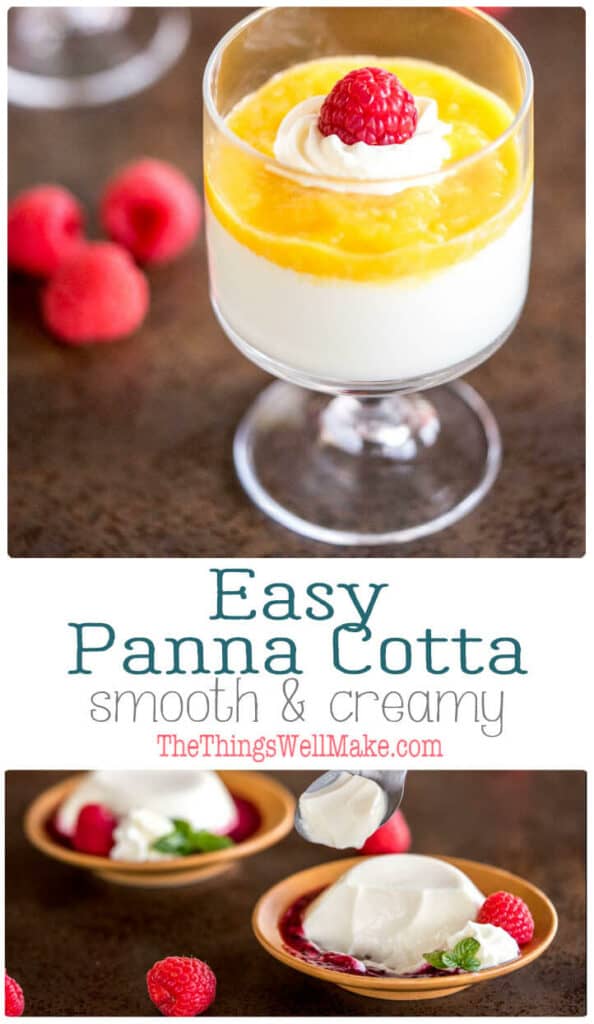
                As I stated earlier, panna cotta is commonly served with fruit or with fruit purees. Sometimes the fruit purees are layered over the panna cotta. Other times, they are poured over and around the panna cotta.

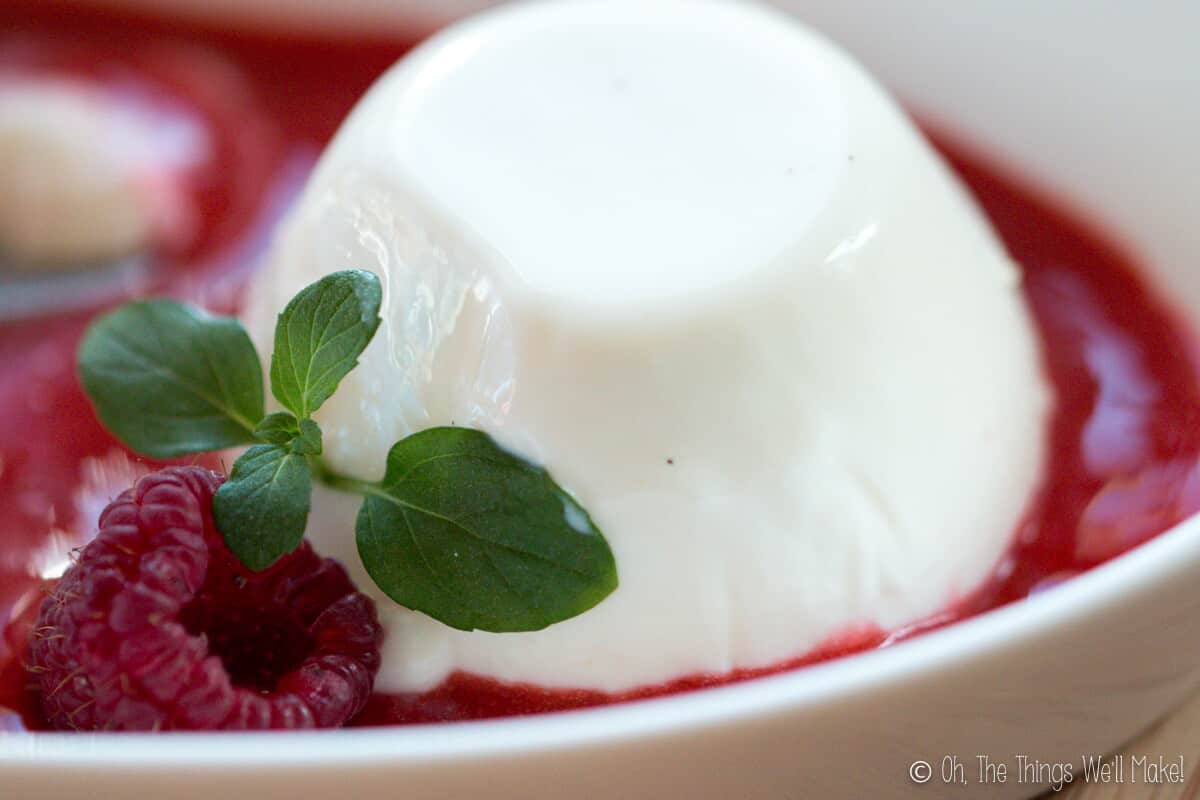
                I love using fresh berries or using a berry puree to garnish mine.

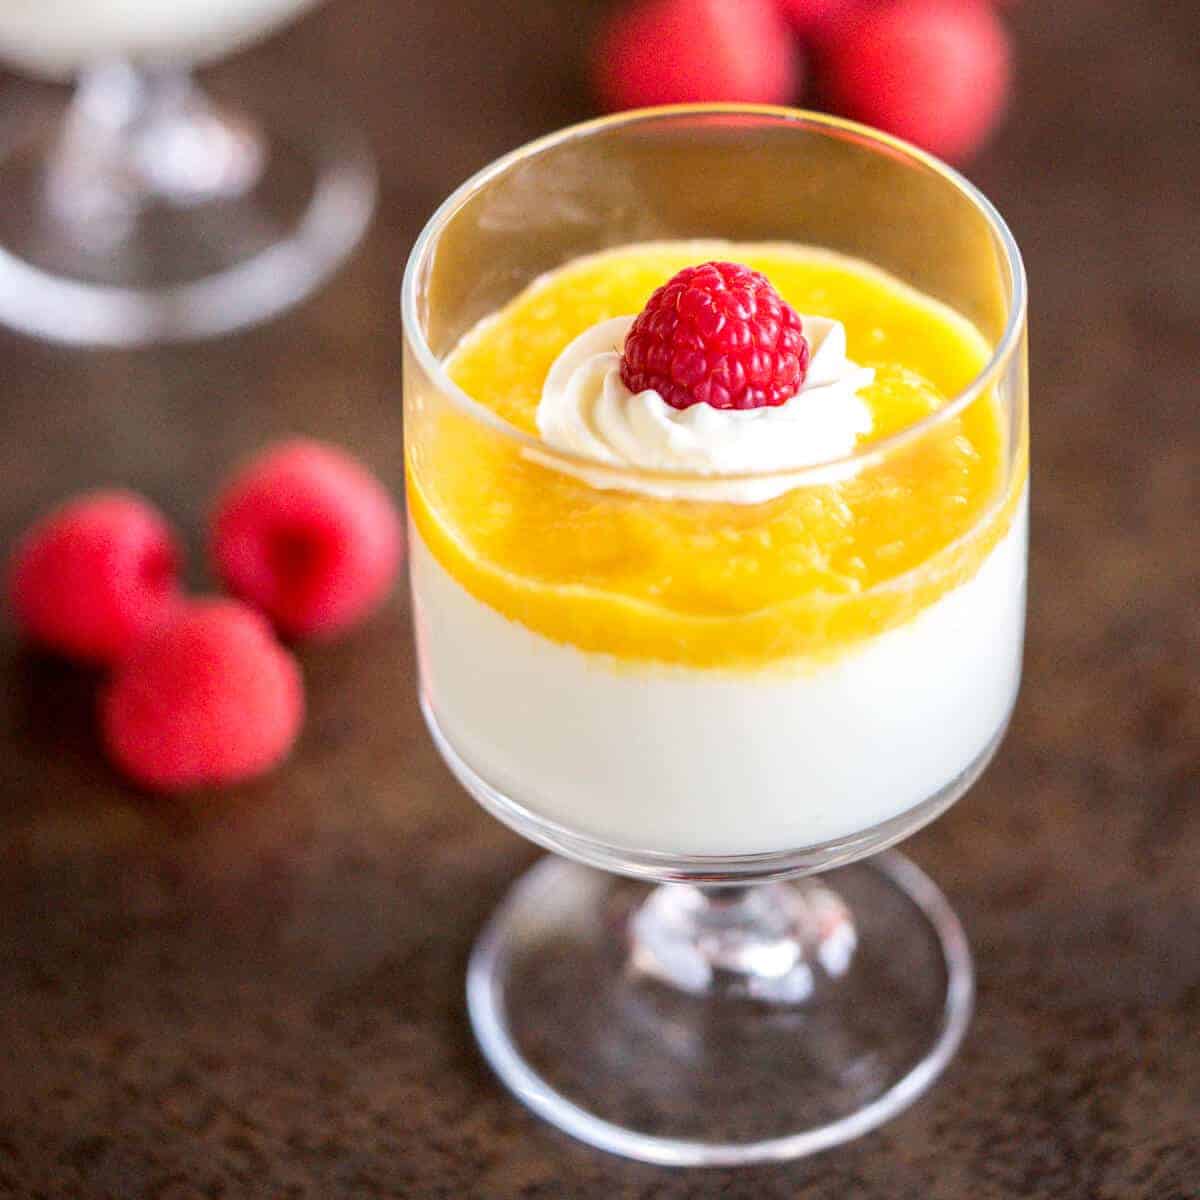
                Tropical fruits like pineapple and mango also combine really well with panna cotta. The last time I made it, I covered it with a mango puree. It was delicious.

                For chocolate or coffee panna cotta, consider garnishing it with a chocolate sauce or caramel.

                Panna cotta serving ideas

                There are several ways to present your homemade panna cotta.
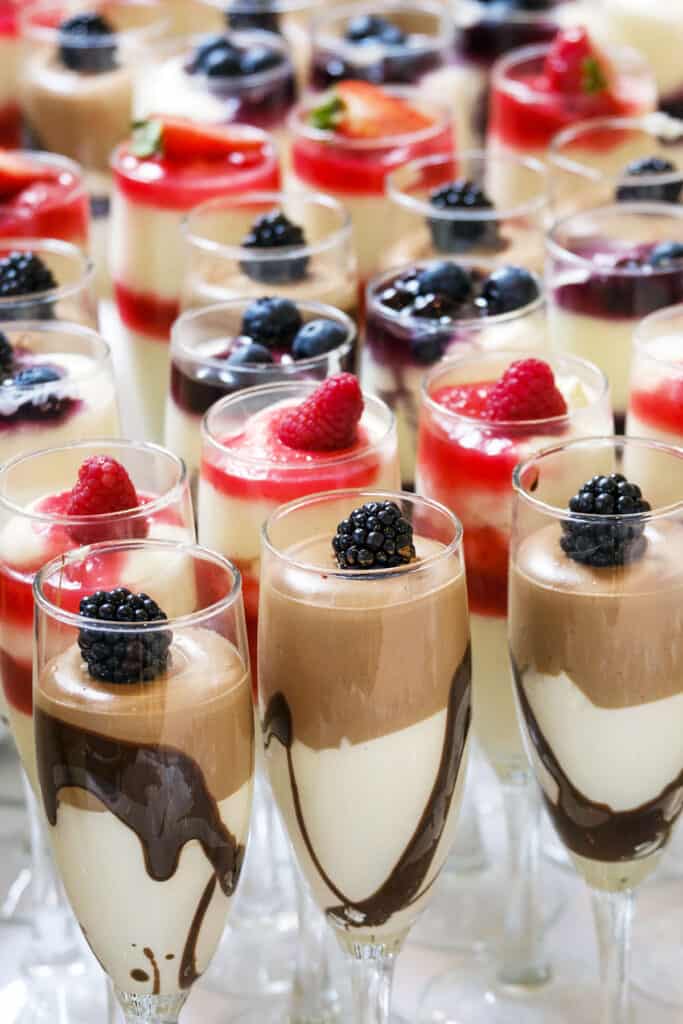
                In a cup

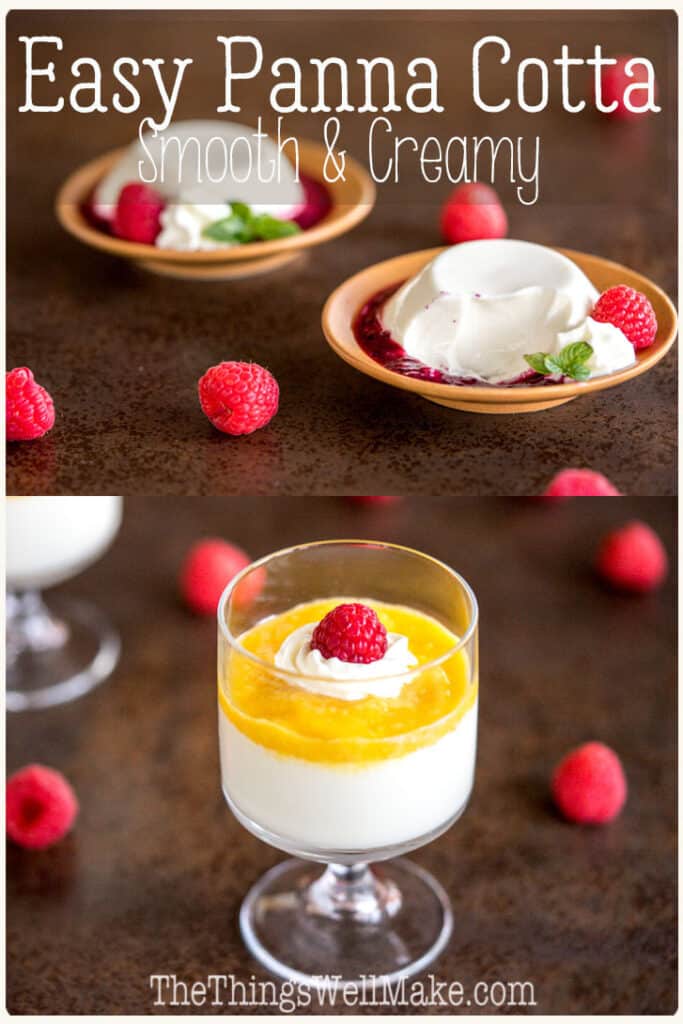
                The easiest way to serve it is probably in decorative glasses. Rather than needing to worry about unmolding the panna cotta, you can just serve the dessert in the same glass in which you set it.

                Choose either decorative low glasses, or glasses with stems like wine glasses, champagne glasses or those meant for cocktails.

                When making panna cotta in glasses, you can make pretty layered desserts by covering the panna cotta with fruit purees or layering different colors of panna cotta (achieved by adding another flavor to one of the batches).

                When layering panna cottas, make sure to allow the bottom layer to set before pouring on another layer. You can speed up the setting process by placing the dessert in the freezer for a short time, until set.

                • Homemade panna cotta in a glass jar surrounded by raspberries
                • Overhead view of a glass of homemade panna cotta in front of another one, both garnished with mango puree and raspberries.

                Panna cotta molds

                If you prefer serving the panna cotta on a plate, it can be made in molds and then inverted onto the plate.

                I’ve used both flan or custard molds and silicone muffin tins. While both work quite well, it’s easier to handle individual molds.

                panna cotta mixture in aluminum flan molds and silicone heart shaped molds

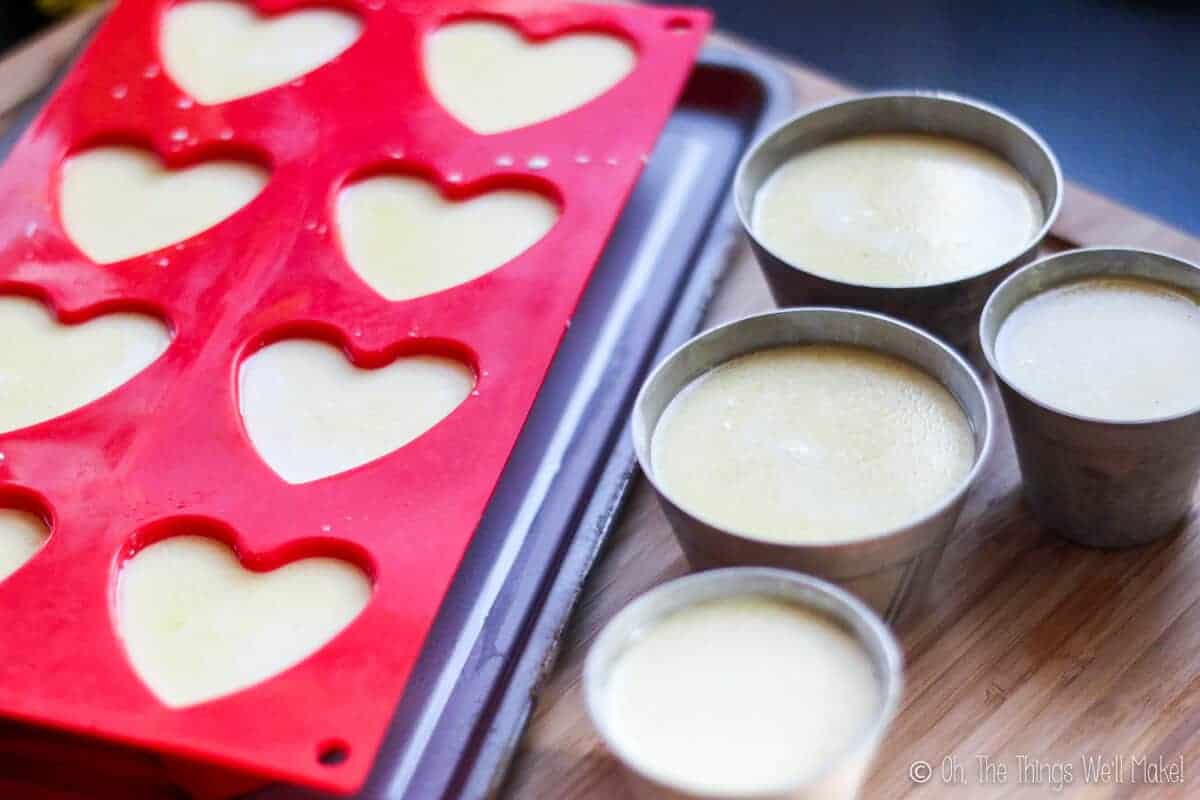
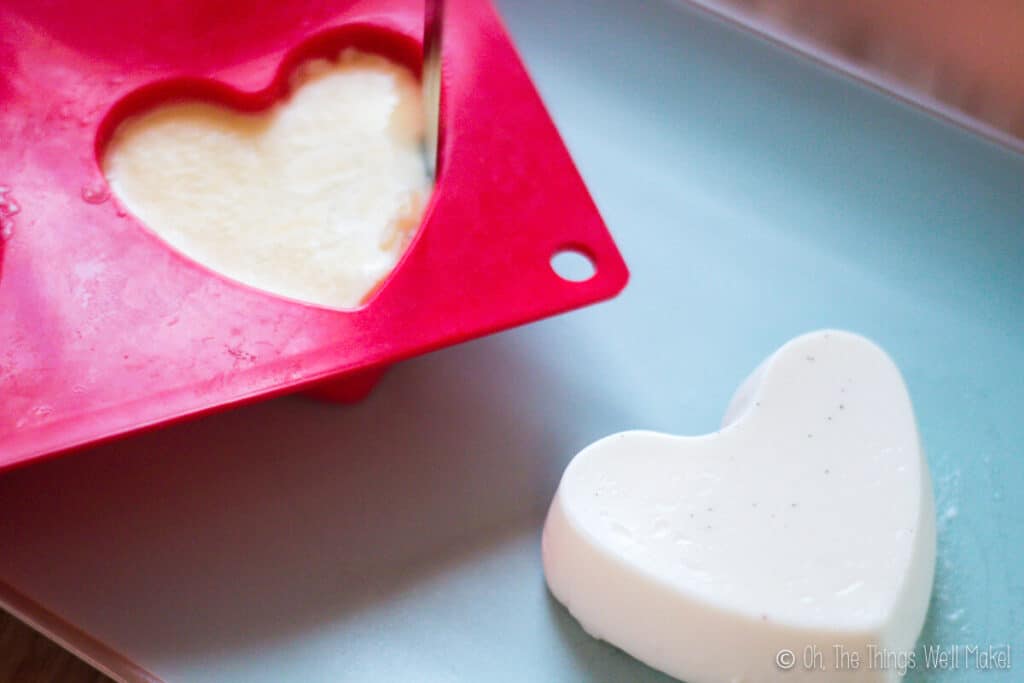
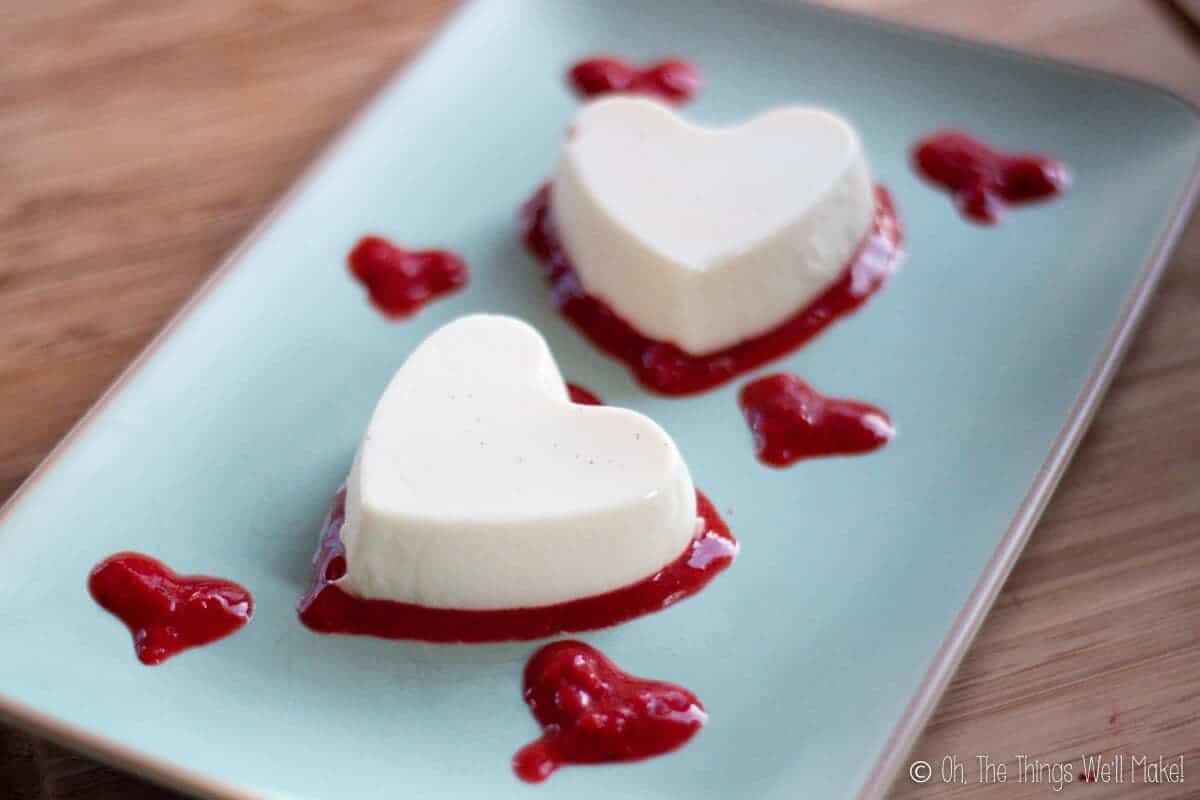
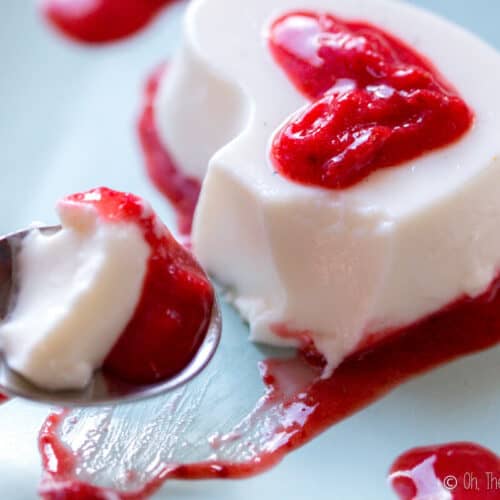
                Valentine’s Day panna cotta

                To make a special dessert for Valentine’s day, I chose a heart-shaped muffin tin. I also used rose water to give it a delicate floral flavor.

                I then decorated it all with a strawberry puree. I piped the red mixture around the bottom edge of the desserts and also piped hearts on and around the panna cotta.

                Scooping up a heart-shaped homemade panna cotta with strawberry puree on a spoon

                Tip

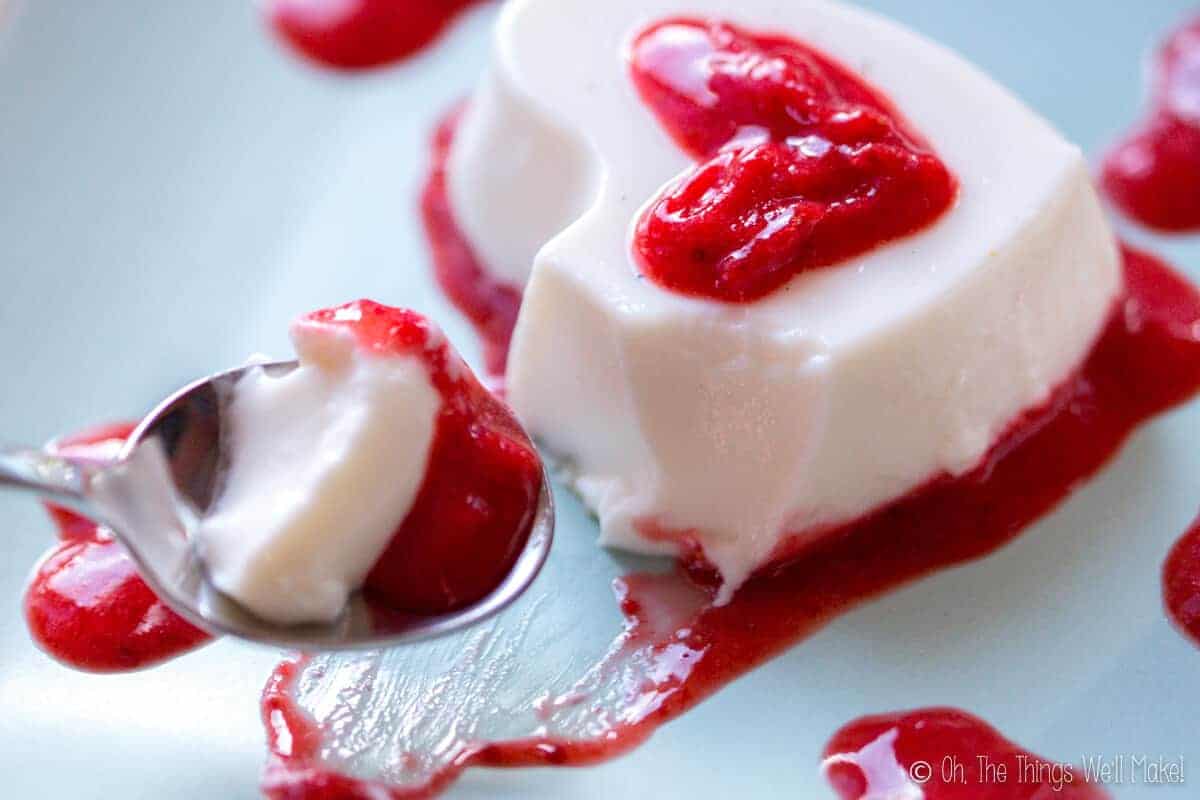
                Keep in mind that it’s a bit trickier to unmold each panna cotta when they are all together in the same mold (as with muffin pans). If you can find individual molds, they are easier to handle.

                How to make panna cotta

                Making panna cotta couldn’t be much simpler.

                Ingredients

                • Heavy cream
                • Whole milk
                • Gelatin
                • Rose water, vanilla extract, coffee, hot cocoa, or other liquid
                • Sugar (or other sweetener)
                • Optional: Fruit or other garnishes

                Preparation

                Soften the gelatin

                To soften the gelatin, mix it with either water, vanilla extract or rose water, depending on the flavor you want to add, if any. (You can also use coffee or hot chocolate to make either a coffee or chocolate-flavored panna cotta.)

                I used one tablespoon of gelatin with 2 tablespoons of rose water. If using vanilla extract, consider adding 1-2 teaspoons of vanilla extract and having the rest of the 2 Tablespoons be water.

                • gelatin granules in a bowl with water
                • a pan filled with a cream mixture inside a bowl of ice.

                Dissolve the gelatin

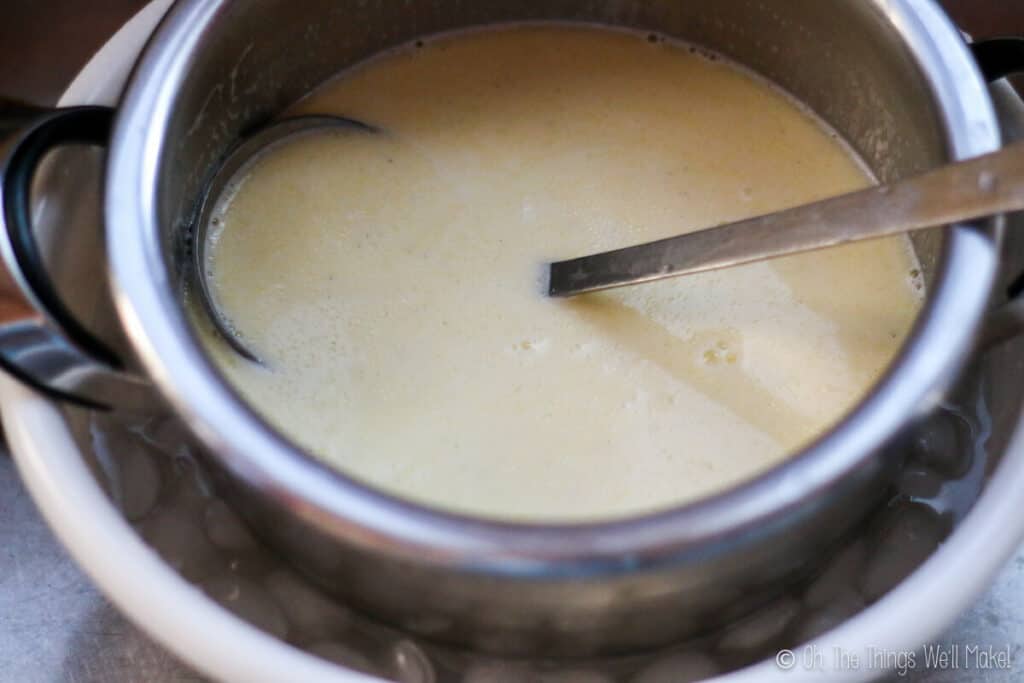
                Add the cream, milk, and sugar to a pan over low heat. Mix them together and add the softened gelatin. For each tablespoon of gelatin, I used 2.5 cups of cream and 1.5 cups of milk. I used around 1/4 cup sugar, but I don’t like overly sweet desserts. (Adjust the amount of sweetener to taste.)

                Continue to heat and stir until the gelatin has fully dissolved.

                Setting the gelatin mixture

                Pour the gelatin mixture into greased molds or decorative glasses. Then, place them in the refrigerator for several hours, until set.

                Unmold the panna cotta

                If using custard molds or other molds, you’ll want to unmold the panna cotta onto a dessert plate. To keep the dessert from sticking, you can take a knife and run it between the set dessert and the mold to release it.

                • Removing a heart-shaped panna cotta from heart-shaped silicone muffin tins
                • Overhead view of one homemade panna cotta in a custard mold and another that hasn't been unmolded yet.
                • Unmolding a homemade panna cotta from an aluminum custard mold.

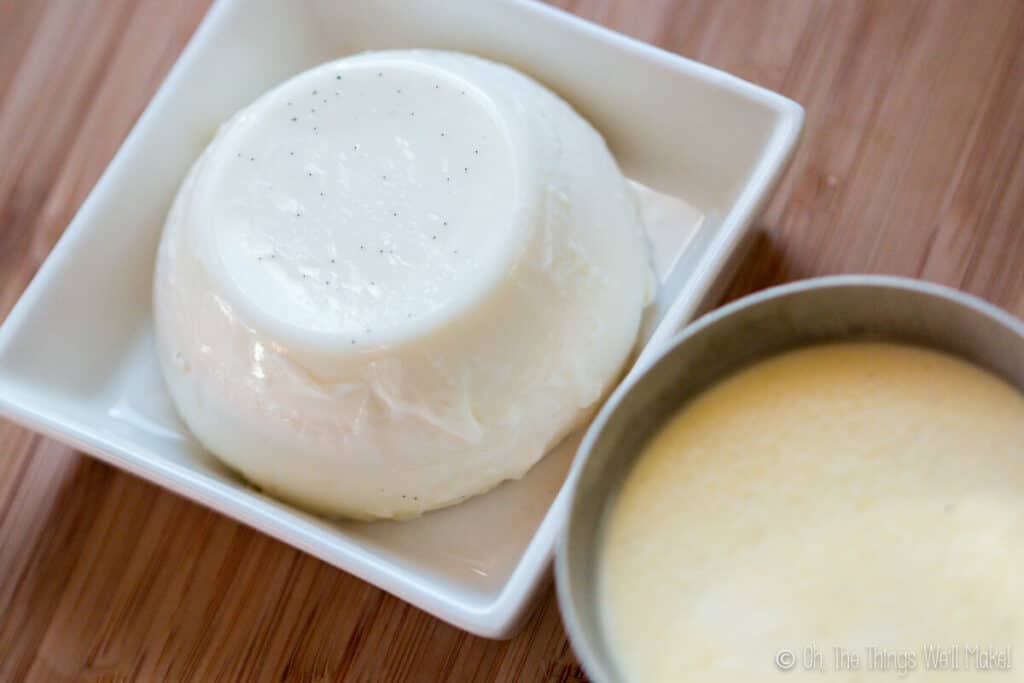
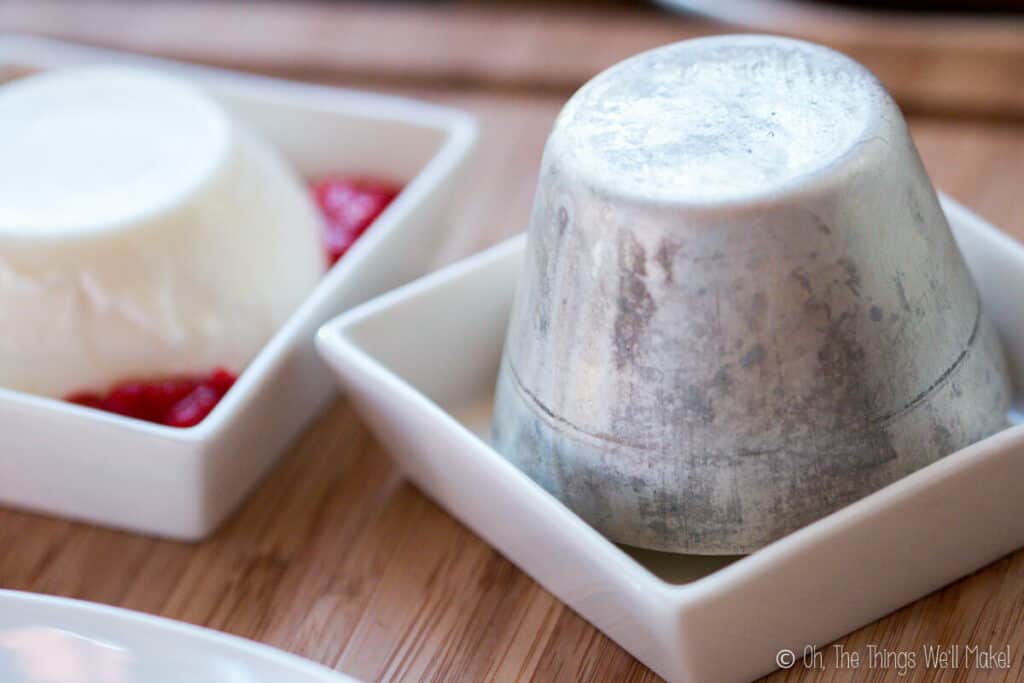
                Using a knife can damage the smooth outer surface, so you may prefer warming the mold for a few seconds by placing it in hot water or running warm water over the bottom. Don’t leave the mold in hot water for too long or the panna cotta will melt.

                After a few seconds, place a plate over the mold and flip it over onto the plate. If it continues to stick, warm the mold again before flipping again.

                Garnishing the panna cotta

                Once your dessert is set, you can garnish it with fresh fruit or with a homemade fruit puree. To make a puree, just blend some fresh fruit in a blender. You can add a bit of water, as needed, to thin the mixture. You can also sweeten it more, as needed.

                • a creamy panna cotta on a plate garnished with a berry puree, raspberries, and fresh mint leaves
                • Decorating a homemade creamy panna cotta by piping a berry puree around the edges of the bottom.
                • Two heart-shaped panna cottas on a blue plate, garnished with red hearts made of strawberry puree.
                • Overhead view of a glass of homemade panna cotta in front of another one, both garnished with mango puree and raspberries.

                Garnishing panna cotta made in decorative glasses is as easy as pouring a layer of fruit puree over it.

                Panna cotta that has been unmolded onto a plate can be garnished by pouring our piping the puree onto the plate around the dessert.

                Finishing touches can include adding fresh berries, whipped cream, and/or mint leaves.

                Watch me make panna cotta

                Panna Cotta Recipe

                Craving more?Subscribe to my newsletter for the latest recipes and tutorials!
                Scooping up a heart-shaped homemade panna cotta with strawberry puree on a spoon

                Creamy Panna Cotta

                This smooth and creamy panna cotta has the perfect consistency and almost melts in your mouth. It’s a light dessert that’s easy to make yet sure to please.
                4.58 from 7 votes
                Print Pin Rate
                Prep Time: 10 minutes
                Cook Time: 10 minutes
                setting time: 4 hours
                Total Time: 4 hours 20 minutes
                Servings: 8 1/2 cup servings
                Calories: 314kcal
                Author: Tracy Ariza, DDS

                Ingredients

                • 2 Tbsp. rose water (Or 1 Tbsp. vanilla extract and 1 Tbsp. water)
                • 1 Tbsp. gelatin
                • 2 1/2 cups heavy cream
                • 1 1/2 cups whole milk
                • 1/4 – 1/3 cups sugar

                Instructions

                • Mix together the gelatin granules with the rose water or the vanilla extract and water in a small bowl to help soften them.
                • If using molds, grease them with a mild flavored oil. If you prefer not to use molds, you can make the panna cotta directly in decorative glasses or bowls for serving directly without unmolding.
                • Mix the milk, cream, and sugar in a small saucepan over medium heat.
                • Add the gelatin and rose water mixture, and keep stirring over medium heat until the gelatin and sugar have dissolved.
                • When the gelatin has completely dissolved, remove from the heat. Allow the mixture to cool. You can speed up the process by placing the pan over a bowl full of ice water.
                • Pour the cooled mixture into the prepared molds. Place the molds into your refrigerator for several hours or overnight.
                • Once set, the panna cotta is ready for serving. If made in decorative glasses, garnish as desired and serve immediately.
                • For panna cotta made in bowls, unmold it onto a plate. This can be done by slipping a knife between the panna cotta and the edge of the mold, and sliding it around to help release it. You can also place the mold in hot water for a few seconds to help release it from the mold.
                • Place a plate over the mold and flip the panna cotta onto a plate. If it doesn't release from the mold, place the mold in warm water for a few more seconds before trying again. (Don't leave it in too long or it will melt the panna cotta.)
                • Decorate the panna cotta with a fruit puree or other sauce of your choice, or serve it plain.
                • Serve and enjoy!

                Notes

                Other flavors of panna cotta can be made my mixing the cream with coffee, chocolate, or fruit purees.
                You can make a caramel panna cotta by melting sugar and pouring it into the bottom of the molds before adding the cream mixture to the molds. This is similar to how one makes flan.
                You can use individual molds like custard molds or use muffin trays for molding the dessert. Keep in mind that it is easier to unmold them when individual molds are used.
                For a lighter panna cotta, use more milk and less cream. For a creamier panna cotta, use more cream and less milk.
                The recipe can be made low carb by using a low carb sweetener instead of the sugar. Other sweeteners like honey or maple syrup can also be used, but they may affect the color and/or flavor of the finished dessert.
                 
                Course Desserts
                Cuisine Italian
                Keyword gelatin, panna cotta
                Other Diets Gluten free
                Tried this recipe? Tag me today!Mention @thethingswellmake or tag #thethingswellmake!
                Serving: 0.5cups | Calories: 314kcal | Carbohydrates: 10g | Protein: 4g | Fat: 29g | Saturated Fat: 17g | Cholesterol: 106mg | Sodium: 51mg | Potassium: 116mg | Sugar: 8g | Vitamin A: 1165IU | Vitamin C: 0.4mg | Calcium: 100mg

                This post was originally published on January 29, 2015. It was rewritten with clearer instructions and new ideas for making the dessert in January of 2020. New photos and video were also added.

                If you enjoy creamy desserts, why not also try one of these recipes?

                Coconut Flan Recipe

                Overhead view of a spoonful of chocolate mousse on top of a jar full of the same mousse with pieces of chocolate scattered around

                Two Ingredient Easy Chocolate Mousse Recipe

                Overhead view of a paleo strawberry cream pie with one slice cut from it, ready to be removed with a spatula

                Easy, No Bake, Paleo Strawberry Cream Pie

                Category: Desserts & Sweets, Valentine's Day

                About Tracy Ariza, DDS

                Tracy Ariza, B.A., D.D.S., left dentistry and the United States to found Oh, The Things We’ll Make!, writing to you from the Spanish Riviera. She loves making things herself in order to keep control of what goes in them. While far from perfect, she strives each day to live a healthier, more sustainable lifestyle.

                Previous Post: « two chocolate-covered strawberry hearts in a jar next to a whole strawberry and a heart-shaped strawberry on a skewer ready for dipping in chocolate. Chocolate Covered Strawberry Hearts
                Next Post: Homemade Fortune Cookies (Gluten-free, Grain-free) Overhead view of several homemade fortune cookies. One has been opened to show a fortune that reads "You are fortunate to have found thethingswellmake.com". »

                Reader Interactions

                Comments

                1. Melissa Shumaker

                  August 30, 2022 at 8:23 PM

                  I didn’t have all the cream called for so I substituted about 1/2 cup of cream for buttermilk. I also did 1.5 teaspoons of vanilla and 1/2 teaspoon of almond extract. So delish!!

                  Reply
                2. Aurora

                  June 12, 2020 at 8:34 AM

                  Should I make any special adjustments if I’d like to half the recipe?

                  Reply
                  • Tracy Ariza, DDS

                    June 13, 2020 at 7:49 AM

                    Hi Aurora,
                    No. Just halve all of the ingredients and you should be fine.
                    There is a slider that allows you to make adjustments more easily. If you hover over where it says 8 servings, a slider bar should pop up and allow you to change it to 4 instead.

                    Reply
                3. Nadia

                  April 14, 2018 at 5:24 PM

                  Is it 1/3 to 1/4 tablespoons sugar or 1/3-1/4 cup?

                  Reply
                  • Tracy Ariza

                    April 14, 2018 at 7:42 PM

                    Hi Nadia,
                    Oh, wow- Sorry about that- You’re right! It’s cups. I just updated the recipe.
                    Thanks for alerting me to the problem.

                    Reply
                4. zendegy

                  May 28, 2017 at 9:55 PM

                  This looks just amazing. I am going to have to try it, along with several other recipes on your blog that have intrigued me. It’s a beautiful blog and I’m enjoying all the wonderful information!!

                  Reply
                  • Tracy Ariza

                    May 28, 2017 at 10:06 PM

                    Thanks so much!
                    I really hope you enjoy them. 🙂

                    Reply

                Leave a Reply Cancel reply

                Your email address will not be published. Required fields are marked *

                Recipe Rating


                Sidebar

                Search

                • Email
                • Facebook
                • Instagram
                • Pinterest
                • Twitter
                • YouTube

                Hello, I’m Tracy!

                I love making my own natural products like soaps and lotions and my own pantry items like yogurt and salad dressings.
                Why do I do it? Sometimes to save money, sometimes because it's healthier, but I always love having control of the ingredients!​
                Oh, the things we'll make!...

                More about Tracy

                I am a participant in the Amazon Services LLC Associates Program, an affiliate advertising program designed to provide a means for us to earn fees by linking to Amazon.com and affiliated sites.

                Featured on Buzzfeed, Lifehacker, Fitness, Shape, Country Living, Healthline, Redbook, Redfin

                Closeup of 4 bars of homemade soap. Two of them have been wrapped in brown paper and wrapped with ribbons. One soap is wrapped with red ribbon and the other with white ribbon.

                Making an Easy, Basic Beginner Soap, and Then Making it Fun!!

                Homemade prawn crackers on a plate in front of uncooked homemade prawn crackers and a roll of prawn crackers dough.

                Prawn Crackers from Scratch

                Impress your friends and save money by making your own soy sauce from scratch. Today we'll learn how to make a homemade shoyu, a fermented Japanese soy sauce made from soybeans and wheat berries. #shoyu #soysauce

                How to Make Soy Sauce (Homemade Shoyu)

                Two bottles of a homemade conditioner next to a wooden comb and a washcloth.

                Easy DIY Hair Conditioner for Natural Hair

                A small glass jar filled with an emulsified sugar scrub with a wooden spoon in it.

                Easy Emulsified Sugar Scrub

                Over head view of a spoon full of tomato paste over a jar full of it. A couple of fresh tomatoes lay next to the jar.

                Easy Homemade Tomato Paste Recipe

                Featured on Buzzfeed, Lifehacker, Fitness, Shape, Country Living, Healthline, Redbook, Redfin

                White logo for Oh, The Things Well Make! website

                Copyright © 2023 Tracy Ariza · Disclaimers and Disclosures · Privacy Policy · Cookie Policy