• Skip to main content
  • Skip to header left navigation
  • Skip to header right navigation
  • Skip to site footer
es_ES Español
  • About
    • Meet Tracy!
    • Contact Me
    • Disclaimers & Disclosures
    • Terms and Conditions
    • Cookie Policy
    • Privacy Policy
  • Holidays
    • New Years Eve
    • Valentine’s Day
    • St. Patrick’s Day
    • Easter
    • Fourth of July
    • Halloween
    • Thanksgiving
    • Christmas
  • es_ES
Oh, The Things We'll Make!

Oh, The Things We'll Make!

Make it yourself so that you control the ingredients!

  • Recipes
    • Appetizers & Snacks
    • Soups & Salads
    • Breakfast
    • Lunch & Dinner
    • Desserts & Sweets
      • frozen treats
    • Breads & Wraps
    • MIY Pantry Basics
    • Condiments & Sauces
    • Beverages & Smoothies
    • Story Archives
  • Make it Yourself
    • Arts & Crafts
    • Face & Body
      • Cleansers, Soaps, & Gels
      • Deodorants
      • Hair
      • Skin Care
      • Oral Care
      • Baby & Toddler Care
    • Home & Garden
      • Cleaning & Laundry
      • Garden & Hens
    • Soap Making
    • Upcycling
  • About
    • Meet Tracy!
      • More About Me
    • Contact Me
    • Disclaimers & Disclosures
    • Cookie Policy
    • Privacy Policy
  • Recipes
    • Appetizers & Snacks
    • Soups & Salads
    • Beverages & Smoothies
    • Breakfast
    • Lunch & Dinner
    • Desserts & Sweets
      • frozen treats
    • Breads & Wraps
    • Condiments & Sauces
    • MIY Pantry Basics
    • Story Archives
  • Make it Yourself
    • Arts & Crafts
    • Natural Face & Body
      • Cleansers, Soaps, & Gels
      • Natural Skin Care
      • Natural Hair care
      • Oral Care
      • Deodorants
      • Baby & Toddler Care
    • Soap Making
    • Home & Garden
      • Cleaning & Laundry
      • Garden & Hens
    • Photography
    • Upcycling
  • Holidays
    • New Years Eve
    • Valentine’s Day
    • St. Patrick’s Day
    • Easter
    • Fourth of July
    • Halloween
    • Thanksgiving
    • Christmas
es_ES Español
A homemade cloth chalkboard heart with "Happy Valentine's Day!" written on it. It's surrounded by homemade chalk and next to a folded chalkboard.

Portable, Foldable Chalkboard Heart – The Perfect Valentine!

Last Modified: May 17, 2021 // by Tracy Ariza, DDS // January 22, 2020 I may receive a commission if you purchase through links in this post. Learn more here.

es_ES Español

Jump to Tutorial Print Tutorial
Kids will love this portable, foldable chalkboard heart. It's the perfect Valentine for your favorite little artist! How to quickly sew up a portable, foldable chalkboard heart, complete with its own homemade felt eraser. It begins as a heart, and folds into an envelope. #thethingswellmake #miy #valentinesday #valentinescrafts #craftsforkids #valentinesforkids #kidscrafts #chalkboard #chalkboardfabric #chalkboardart #valentines

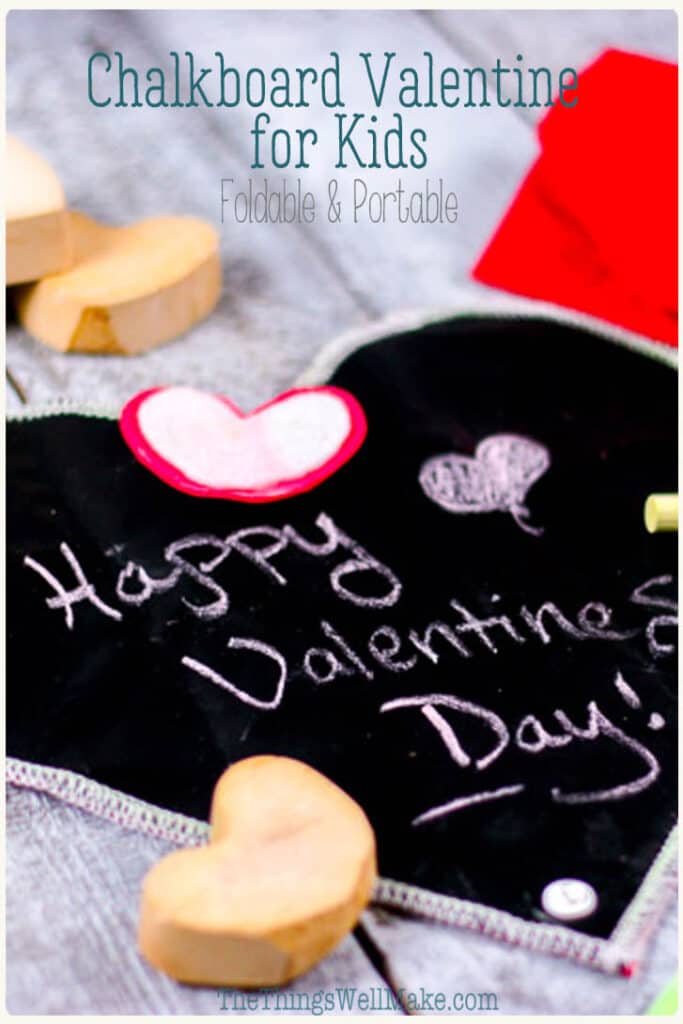
Kids will love this portable, foldable chalkboard heart. It’s the perfect Valentine for young artists on the go.

Two foldable chalkboard hearts placed on a wood grey surface. One folded shut placed on top of an open one that has “Portable Hearts Chalkboard” written on it.
Pin this post for later!

The other day I was playing with making my own sidewalk chalk. Because we’re nearing Valentine’s Day, I couldn’t help but make heart-shaped chalk.

While I made and played with my homemade chalk outside in the cold, it dawned on me…

Wouldn’t it be great to make a Valentine’s Day chalkboard? Something that kids could use inside and draw and erase, and play with over and over again.

Making a Cloth Chalkboard

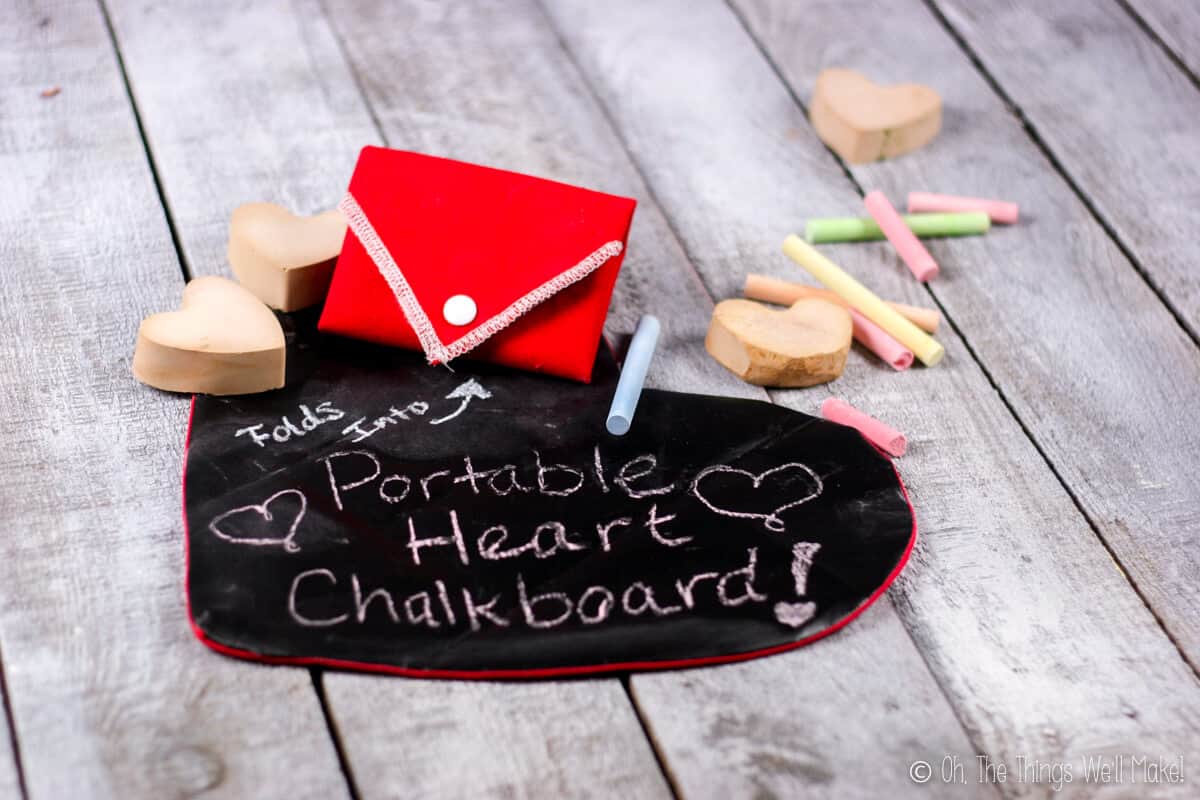
After a bit of planning, I decided to make a cloth chalkboard. I figured a cloth chalkboard would be much more portable. It’s something that kids could bring with them from place to place without taking up a lot of space.

I remembered having seen some foldable Valentines online. They were paper hearts that folded into what looked like a cute little envelope.

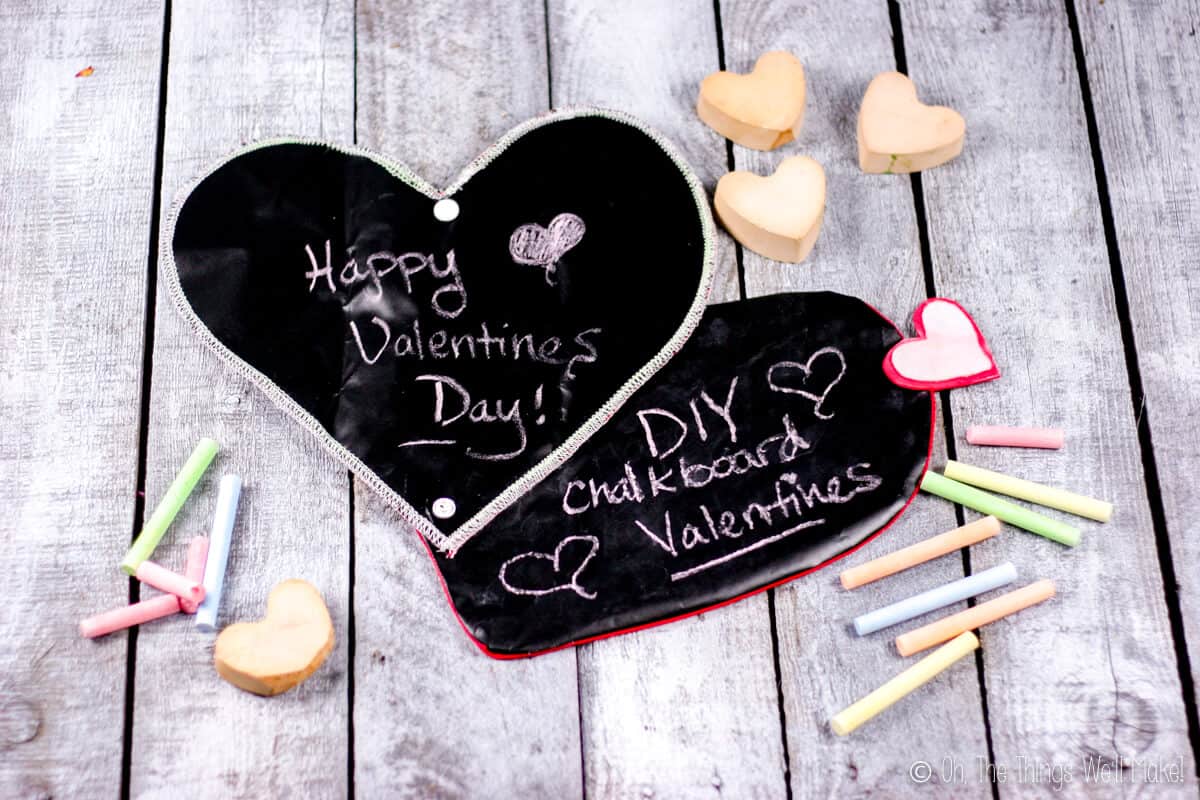
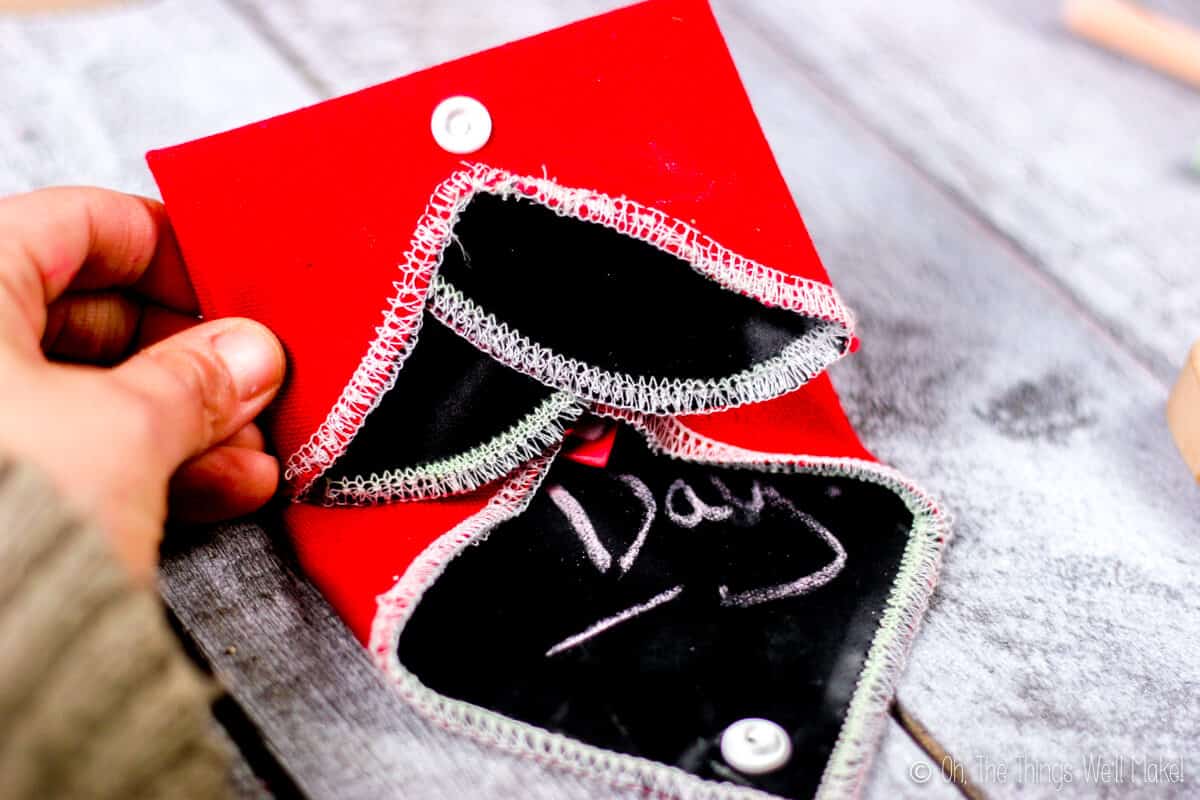
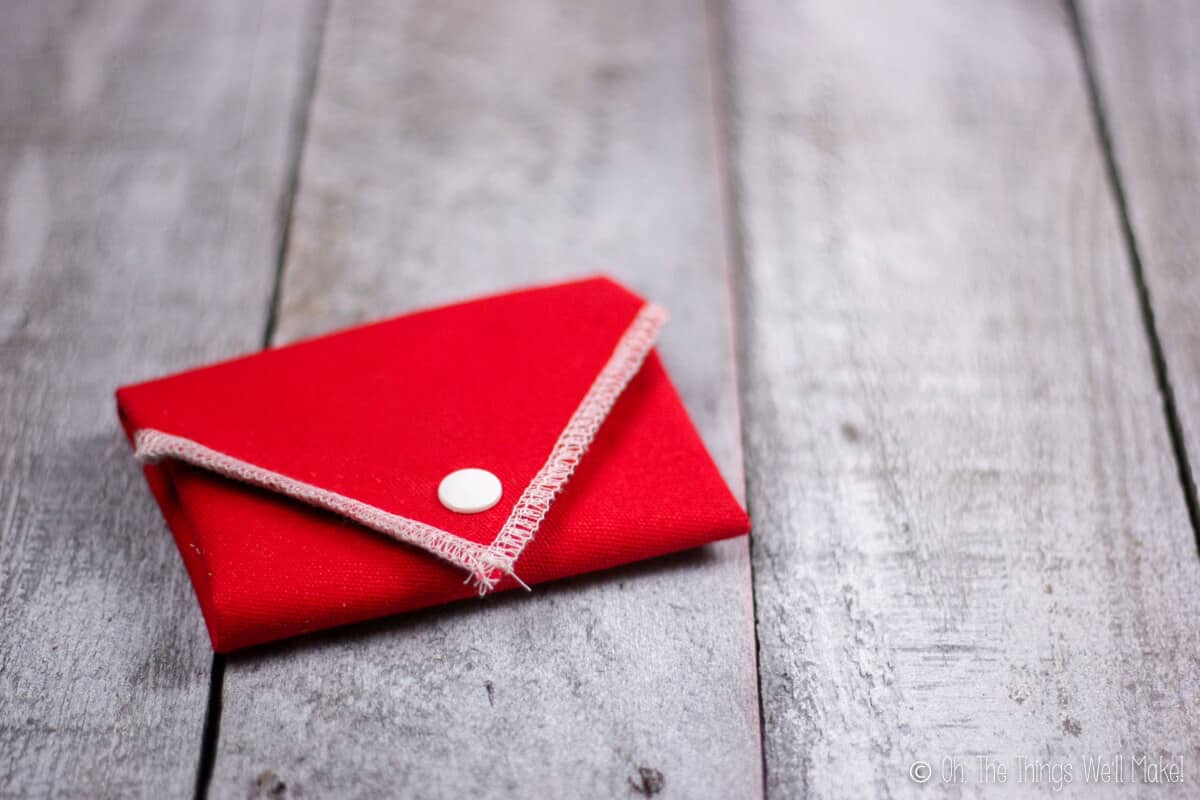
I decided to adapt that idea to make a foldable heart chalkboard made of chalkboard fabric. When you fold it up, you can even store some chalk and a small eraser inside.

Chalkboard heart with the right side folded to the center over four pieces of chalk and heart shaped eraser.
You can fold the heart over the chalk and eraser for easy carrying.

To make the cloth chalkboard, I used the same method that I used to make sandwich wraps. This time, though, instead of a square, it’s slightly trickier to sew because it’s in a heart shape for Valentine’s Day.

Make a heart-shaped pattern.

First, you’ll want to make a pattern. I made my pattern by cutting a heart shape out of wrapping paper. I used wrapping paper because it was larger than the “normal,” letter-sized paper.

To cut a symmetrical heart shape from paper, fold the paper in half vertically. Then cut half of a heart shape with the center being along the edge.

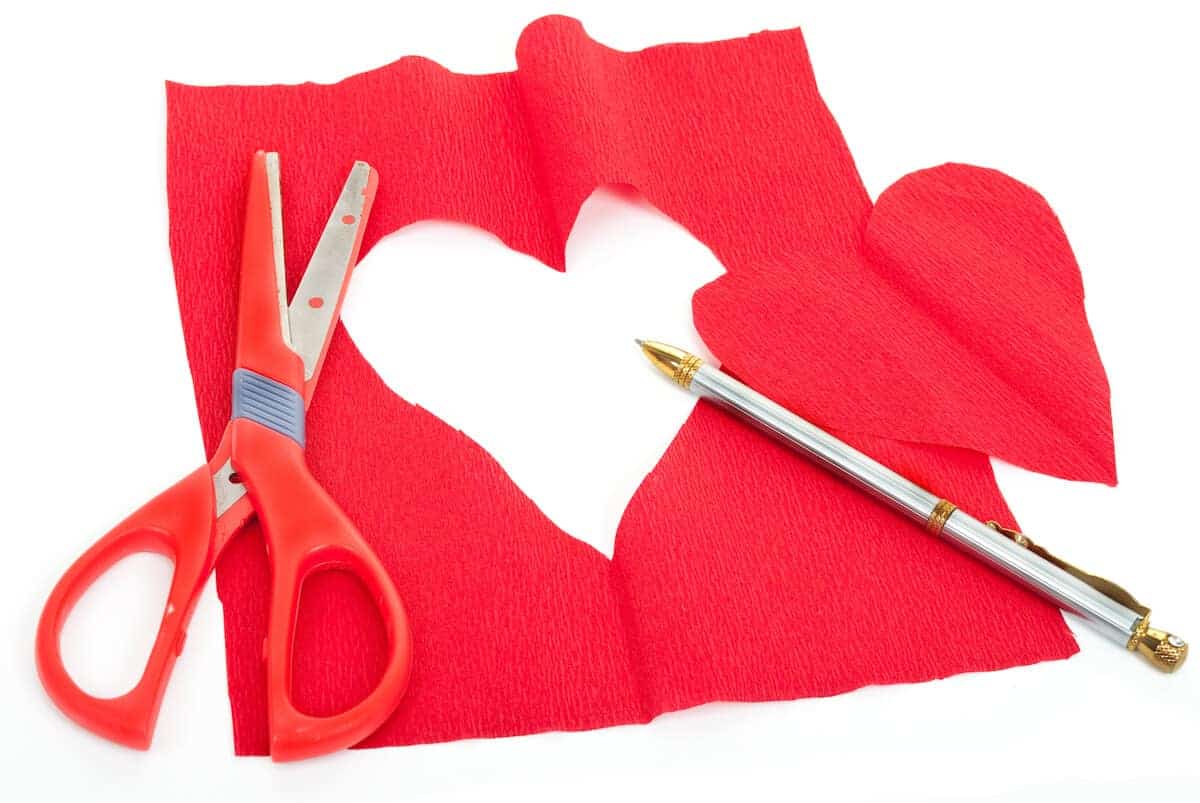
I adjusted the size by folding it over several pieces of chalk. I wanted to make a size that would fold just as I was envisioning. It ended up being just under a foot (12 inches/30cm) at the widest and tallest points.

Tracy’s Tip

It is difficult to sew sharp v-shapes, especially when using a stiff fabric like chalkboard fabric. When designing the heart shape, making softer shapes will make your sewing easier later on.

Cut two hearts out of fabric.

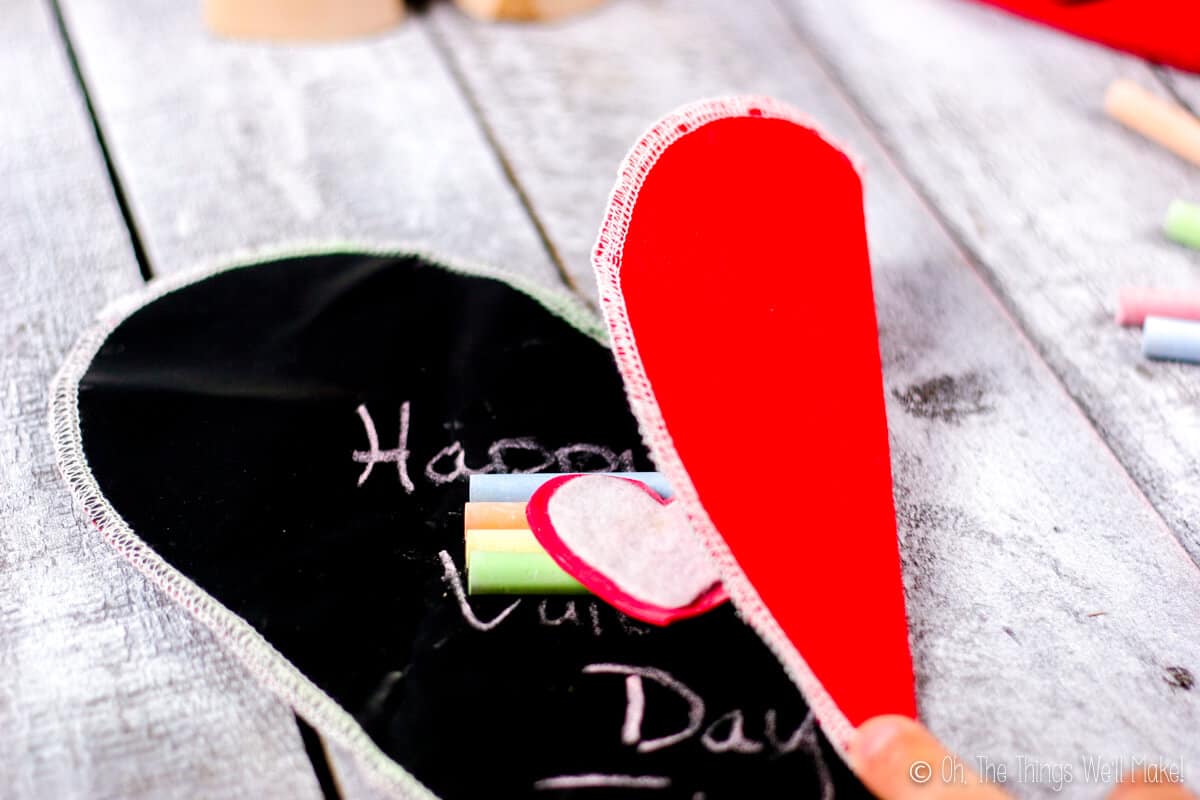
Once you’ve cut your pattern to the right size, cut two fabric hearts from that pattern. Cut one heart from the chalkboard fabric and the other out of whatever fabric you want on the outside/back of the chalkboard.

Sew together the 2 fabric hearts.

To sew it up, there are two ways of doing it.

The Serger Method

If you have a serger (overlock sewing machine), use it! The easiest method is probably to put the two cloth hearts together, right sides out, and serge around the outside border of them.

I will warn you…It is tricky to sew together the fabric at the top center v-point. If you make that v-shape less pronounced, it makes for much easier sewing in that area. I made mine too sharp and ended up touching up that area with a finishing seam on my regular sewing machine.

Using a Regular Sewing Machine

If you don’t have a serger, you can still make this pretty easily with a regular sewing machine. To get finished edges, we’ll be sewing it differently.

Place the two heart fabrics together, right sides facing each other. Sew around the edges, leaving a small space to flip your heart right-side-out afterward.

I would recommend leaving the open space along one of the straight sides of the heart, rather than at the top where it’s curvy. That makes it easier to close the seam up later on.

Once you flip the fabric right side out, sew up the open space in the seam. To give a nice, finished look, sew all the way around the edge of the entire project, very near the edge. If you fold the edges of the fabric under at the open part, they’ll get caught into that seam, and you’ll close it up quite easily and attractively.  If you do it correctly, it won’t look different from the rest of the seam.

Two heart chalkboards, one made with a serger above a heart chalkboard made with a regular sewing machine.
Heart chalkboard made with a serger above a heart chalkboard made with a regular sewing machine.

I started to make a second chalkboard using this method, to make sure that it would work out well. I was in a hurry to take my photos and didn’t finish it with the seam running all the way around the outside. You can still get an idea of how the chalkboards look when made using the different methods above.
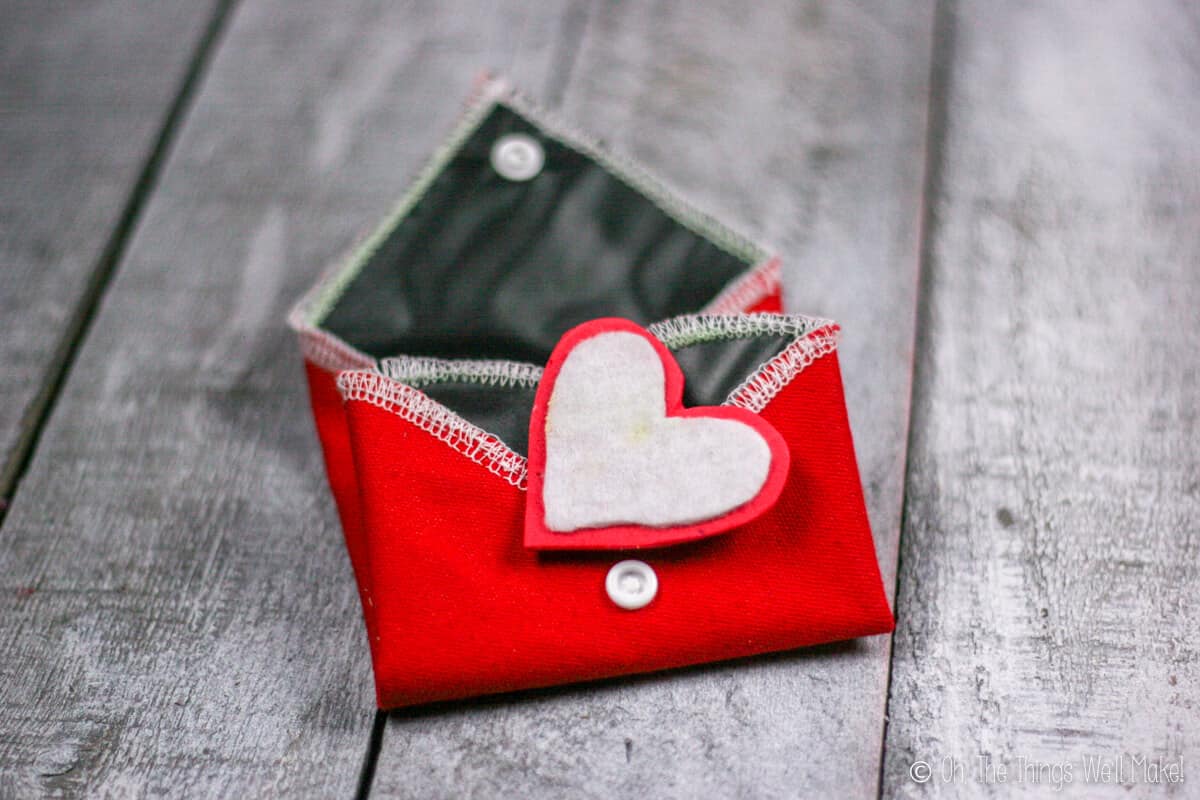
Making your closure

Just like with the sewn sandwich wraps, you can make the closure with either an elastic band or some plastic snaps. I had bought a lot of plastic snaps for other projects a while back and found those to be the quickest, easiest way for me. Plus, they look pretty cute, don’t you think?

To calculate where I needed to add the snap, I just folded up my chalkboard heart and marked where I thought the ideal place would be for my snap and placed it there.

Heart chalkboard with four pieces of colorful chalk and a heart shaped chalkboard eraser in the center, placed on a grey wood surface. Surrounding the chalkboard are heart shaped wood blocks, a closed heart chalkboard, and four pieces of colorful chalk.

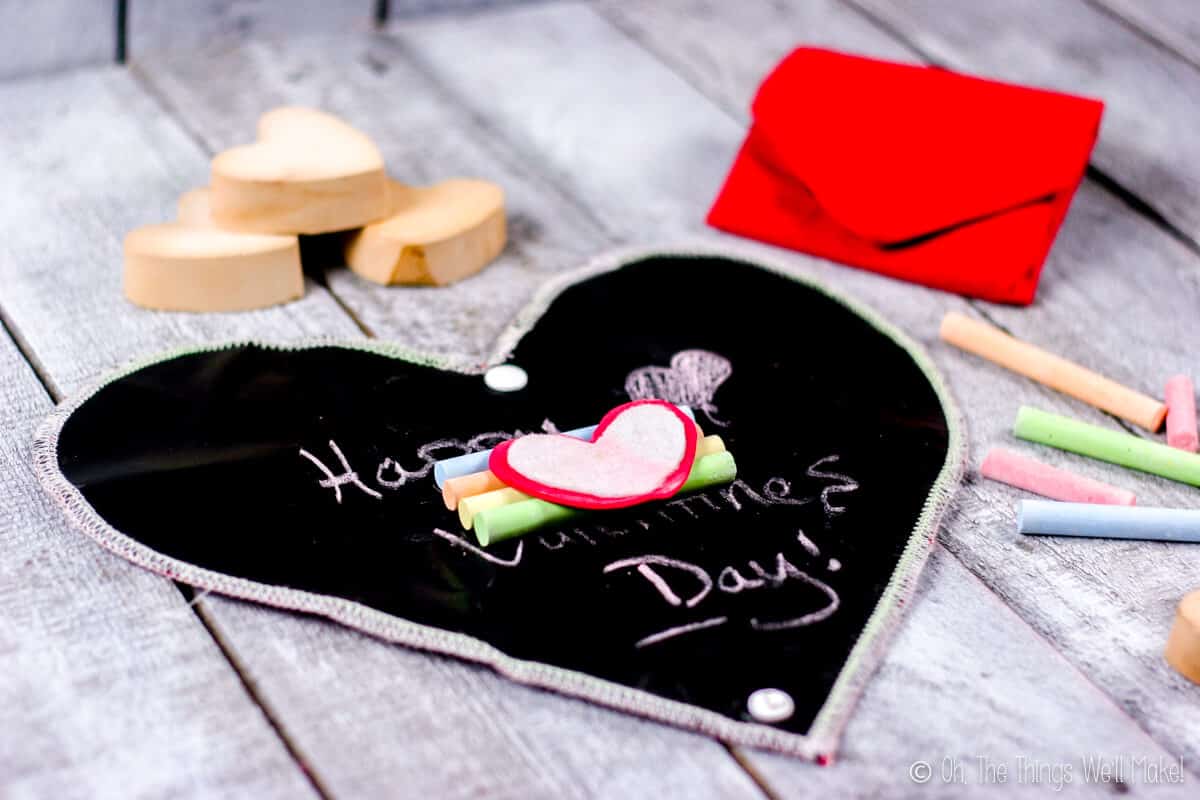
Once your snap is in place, you are all set. You can wrap up some pieces of chalk, the little heart eraser, and snap it all together for your favorite little Valentine. I hope they love it!

Sewing tips and tricks

When working with the chalkboard fabric, be careful with where you use pins. Puncturing the fabric can leave a permanent mark. I suggest using clothespins to keep everything together and avoid that problem.

Also, depending upon the chalkboard fabric you use, an iron may melt it. Chalkboard fabrics tend to be a synthetic plastic-based fabric. So, rather than ironing it, it may be best to smooth everything out with your hands as best as you can. It tends to hold its shape pretty well anyway.

Make a heart-shaped Chalkboard eraser

To finish off the project, I decided to make a little heart eraser using craft foam and felt.

Folded up chalkboard heart with felt and craft foam eraser on top.
The eraser was made from a felt heart glued onto a craft foam heart.

To make a heart-shaped eraser, cut a small heart out of felt. Cut another heart, just slightly larger than the felt heart, from craft foam. Glue them together, and your eraser is ready to use!

If you’re worried about losing the eraser, consider gluing one end of some cording between the felt and craft foam. Sew the other end into the seam of the chalkboard. That way the eraser will stay connected to the chalkboard and won’t get lost.

How to fold the chalkboard heart closed

1. Fold both sides of the chalkboard heart over the chalk and eraser in the center.

Close up of a folded heart chalkboard on a grey wood surface, surrounded with heart shaped wood blocks, a closed heart chalkboard, and four pieces of colorful chalk.

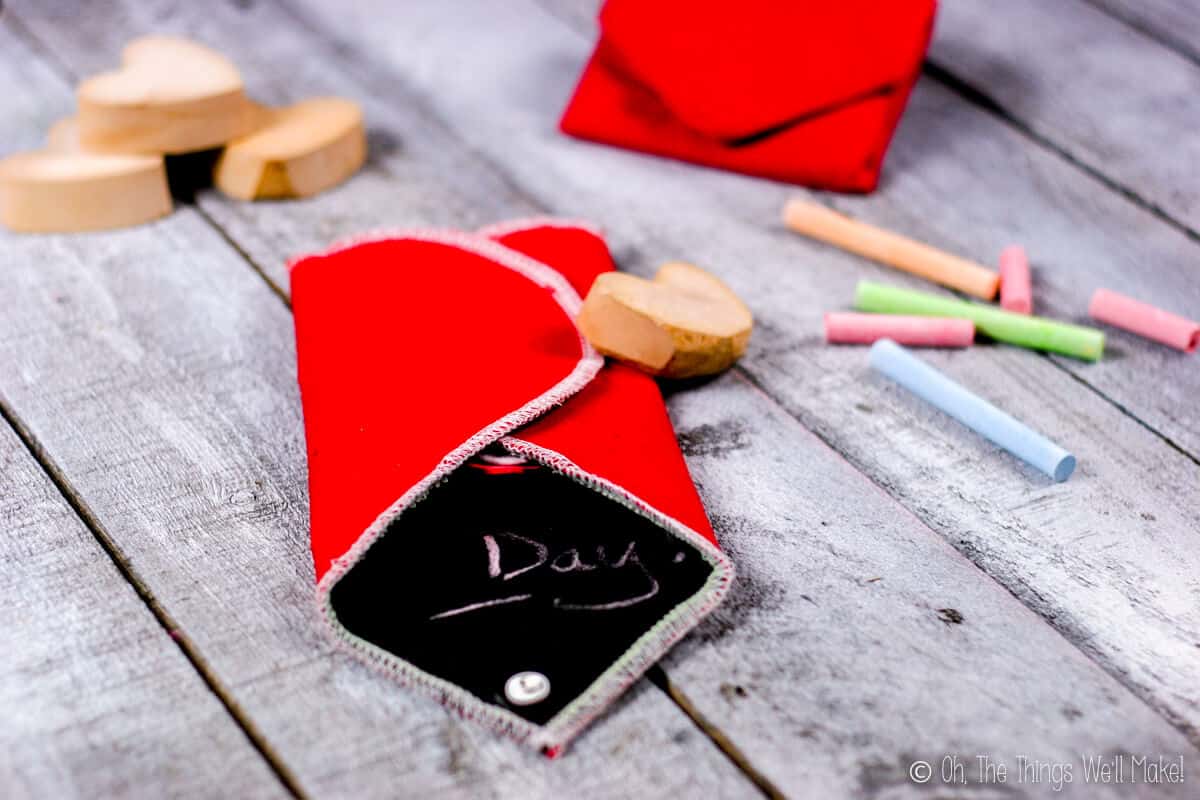
2. Fold the top part of the heart over the center portion.

Close up of a folded chalkboard heart (sides and top) where the bottom with the snap is left open

3. Fold the bottom point up over the center and snap it together.

Close up of a folded heart chalkboard. Sort of looks like an envelope when closed.
Looking to make more?Subscribe to my newsletter for the latest projects (and recipes)!
A homemade cloth chalkboard heart with "Happy Valentine's Day!" written on it. It's surrounded by homemade chalk and next to a folded chalkboard.

Heart-Shaped Foldable Chalkboard

Kids will love this portable, foldable chalkboard heart. It's the perfect Valentine for young artists on the go.
5 from 2 votes
Print Rate
Prep time: 15 minutes
Active time: 20 minutes
Total time: 35 minutes
Author: Tracy Ariza, DDS

Equiment

  • Sewing Machine

Materials

  • 1 piece chalkboard fabric
  • 1 piece decorative fabric for outside/back

Instructions

Prepare the fabric

  • Make a pattern by cutting out a heart shape from wrapping or tissue paper. Make the paper pattern just slightly larger than the size you want your finished chalkboard to be. (If you want to be able to fold the chalkboard over some chalk to hold it inside, practice with the chalk you plan on using. Adjust the size of the heart as needed.)
  • Cut two fabric hearts using the paper pattern as a guide. One should be cut from a chalkboard fabric. Cut the other from a fabric that you want to use on the other side/outside of the chalkboard.

Using a serger

  • Place the fabric hearts together with the right sides facing out (wrong sides together). Using an overlock machine (serger), sew around the edges all the way around the heart.

Using a regular sewing machine

  • Place the fabric hearts together right sides together (wrong sides facing out). Sew around the edges of the hearts, leaving an open area around 3 inches long on one of the straight edges of the hearts.
  • Reach in through the open space and pull the hearts right side out.
  • Fold down the edges of the open space, and sew across them to close up the gap. To finish the edges of the chalkboard, sew all the way around the heart a few millimeters from the edges.

Folding the chalkboard

  • To fold the chalkboard into an envelope shape, fold it in thirds, folding in either side over the center. (You can place chalk pieces in the center to hold them in place.)
  • Fold the top of the heart down over the center.
  • Fold up the bottom v over the rest of the folded heart.

Adding a closure

  • With the heart-shaped chalkboard folded into an envelope, plan where you want your closure to be. You can use plastic snaps on both the bottom point and the center top. If you prefer to close it with an elastic band, sew a loop of elastic to the bottom point of the heart. The loop should be just large enough to fit over the folded chalkboard to keep it shut.

Notes

You can make a cute heart-shaped eraser by cutting out a small heart from felt. Cut a slightly larger heart from craft foam and glue the hearts together. 
If you’d like the connect the eraser to the chalkboard, glue one end of a piece of cording between the felt and craft foam. Sew the other end of the cording into one of the seams of the chalkboard heart. 
Tried making this? Tag me today!Mention @thethingswellmake or tag #thethingswellmake!
Category: sewing, Valentine's Day

About Tracy Ariza, DDS

Tracy Ariza, B.A., D.D.S., left dentistry and the United States to found Oh, The Things We’ll Make!, writing to you from the Spanish Riviera. She loves making things herself in order to keep control of what goes in them. While far from perfect, she strives each day to live a healthier, more sustainable lifestyle.

Previous Post: « A variety of homemade holiday lick-and-stick stamps- some for Halloween, some for Valentine's Day, and some for Christmas. Some have been stuck to envelopes. Fun to Make Holiday Gelatin Postage Stamps (Lick and Stick)
Next Post: Heart-shaped Homemade Sidewalk Chalk Overhead view of several pieces of homemade sidewalk chalk in three bright colors: pink, blue, and yellow. »

Reader Interactions

Comments

  1. Courtney @ Family Gone Healthy

    February 6, 2014 at 3:58 PM

    These look really cute! My daughters and their friends would love them.

    Reply
  2. linda spiker

    February 6, 2014 at 3:38 PM

    This is adorable! What a cute and creative idea!

    Reply

Leave a Reply Cancel reply

Your email address will not be published. Required fields are marked *

Recipe Rating


Sidebar

Search

  • Email
  • Facebook
  • Instagram
  • Pinterest
  • Twitter
  • YouTube

Hello, I’m Tracy!

I love making my own natural products like soaps and lotions and my own pantry items like yogurt and salad dressings.
Why do I do it? Sometimes to save money, sometimes because it's healthier, but I always love having control of the ingredients!​
Oh, the things we'll make!...

More about Tracy

I am a participant in the Amazon Services LLC Associates Program, an affiliate advertising program designed to provide a means for us to earn fees by linking to Amazon.com and affiliated sites.

Featured on Buzzfeed, Lifehacker, Fitness, Shape, Country Living, Healthline, Redbook, Redfin

Closeup of 4 bars of homemade soap. Two of them have been wrapped in brown paper and wrapped with ribbons. One soap is wrapped with red ribbon and the other with white ribbon.

Making an Easy, Basic Beginner Soap, and Then Making it Fun!!

Homemade prawn crackers on a plate in front of uncooked homemade prawn crackers and a roll of prawn crackers dough.

Prawn Crackers from Scratch

Impress your friends and save money by making your own soy sauce from scratch. Today we'll learn how to make a homemade shoyu, a fermented Japanese soy sauce made from soybeans and wheat berries. #shoyu #soysauce

How to Make Soy Sauce (Homemade Shoyu)

Two bottles of a homemade conditioner next to a wooden comb and a washcloth.

Easy DIY Hair Conditioner for Natural Hair

A small glass jar filled with an emulsified sugar scrub with a wooden spoon in it.

Easy Emulsified Sugar Scrub

Over head view of a spoon full of tomato paste over a jar full of it. A couple of fresh tomatoes lay next to the jar.

Easy Homemade Tomato Paste Recipe

Featured on Buzzfeed, Lifehacker, Fitness, Shape, Country Living, Healthline, Redbook, Redfin

White logo for Oh, The Things Well Make! website

Copyright © 2023 Tracy Ariza · Disclaimers and Disclosures · Privacy Policy · Cookie Policy

We use cookies to ensure that we give you the best experience on our website. If you continue to use this site we will assume that you are happy with it.Ok