

Making an Easy, Basic Beginner Soap, and Then Making it Fun!!
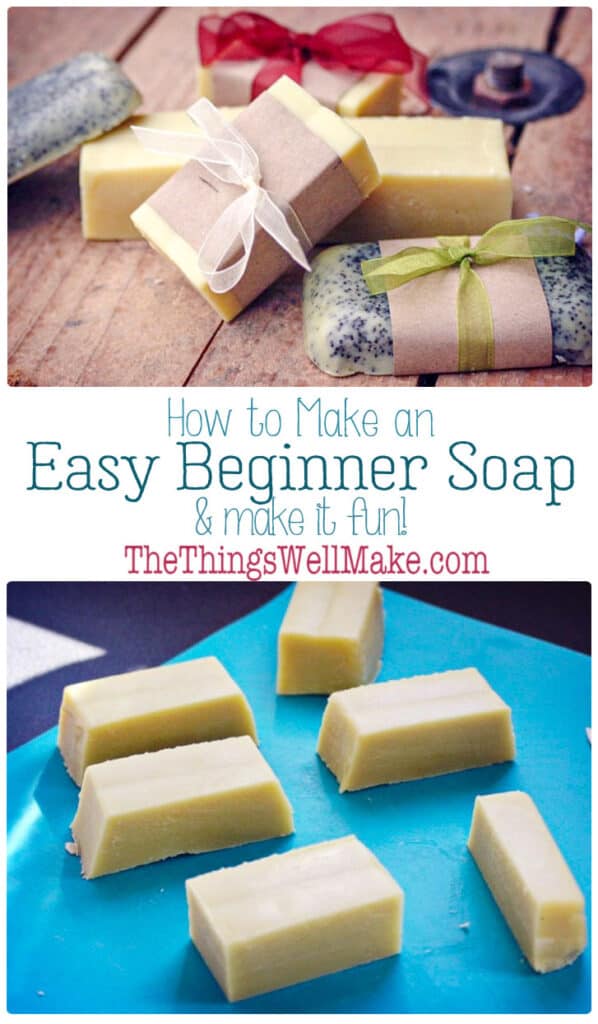
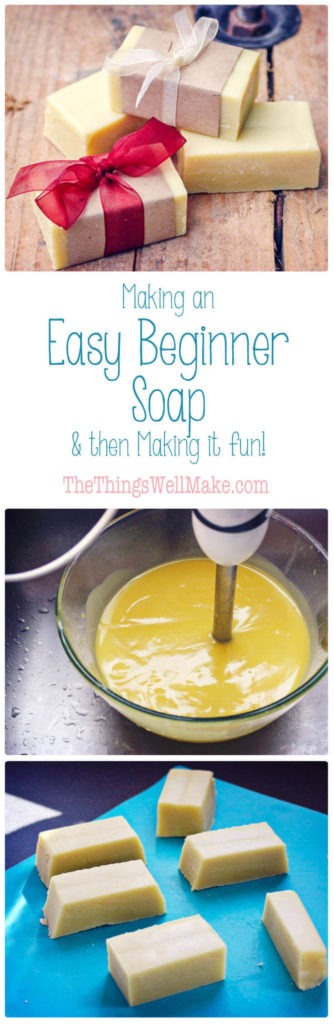
Making soap for the first time may be intimidating, but isn’t difficult. This quick and easy beginner soap recipe comes with fun ideas for personalizing it by adding exfoliants, essential oils, etc.

You know when you get really excited about making something…
Then it flops?
That was me making soap for the first time.
Growing up, I was always interested in making things. I loved being outside in the garden, and growing herbs in every little spare area of the garden. My mom didn’t appreciate my spearmint overtaking the rest of her garden quite as much as I did, but she still allowed me to explore my creativity.
One of the books at home that I loved was a book about making your own soaps and perfumes. I followed a few of the recipes, but didn’t really have much luck with them. I tried making a rose petal perfume, but it made a brown liquid that went bad right away.
Looking back, that book probably wasn’t as great as I remember it being. 😉
My first attempt at making homemade soap
The worst disaster, though, was when I tried to make soap.
The book shared ways to be frugal. It explained how to clean used cooking oil for making soap. For some reason, I decided that I would recycle oil that very first time I made soap. I mean, reuse, recycle, right?!?!?
Refining the oil was a horrible, messy process, and I don’t know what sort of quality fat I ended up with. I proceeded, though, and continued to make my soap, excited, hopeful, and optimistic. It looked like soap, so I must have reached success, right?
But, no! It stung every time I used it!
Years later, I think I know what the problem was…
I probably refined an unknown mixture of vegetable oils. Unless you know which oil you are using, you can’t just use the same amount of lye for all oils and expect the soap to turn out the same. Plus, the typical light vegetable oils like corn oil or canola oil, just don’t make very good soaps on their own. (You can use them in smaller percentages in soaps with other oils like olive oil and coconut oil.)
I thought that maybe it was because I didn’t let it sit or “cure”. In fact, years later, I don’t even remember the book mentioning that you should let your soap cure; it probably did; I probably had. Either way, though, had I made the soap right, it shouldn’t have stung days later.
By that point, the saponification process, the chemical reaction which turns lye and oil into soap, would have finished. More likely, my soap used too much lye for the amount of (low quality) oil I was using. I ended up throwing most of my soap away, only to find a bar, years later. It was covered with brown spots (aka. “dreaded orange spots” in soapmaking). While it lathered up and no longer stung my skin, it still wasn’t a great soap. So, I (sadly) threw it away.
Part of me had been wanting to try making soap again, but part of me was held back by my not-so-stellar first experience with soap making.
Trying to make homemade soap. Again.
When I first wrote this post in 2013, I had bought lye with the intention of making soap again. The bottle of lye sat in my kitchen, unused, for weeks (months?). When I finally sat down to find a good recipe for it, I became overwhelmed!
I couldn’t find any easy, straight recipes for making soap. Instead, I was led to various lye calculators that would help me formulate my own soap recipe.
Normally I love this sort of experimentation, but being a newbie with soap making, I just wanted somebody to tell me exactly what to do; just this once!
To be honest, seeing that most of the calculations and recipes were calculated in ounces really intimidated me too. Although, after being in Spain for many years now, I still weigh myself in pounds and not kilos, I much prefer seeing these sorts of things in grams than ounces.
Are they weight ounces? Fluid ounces?!?!?!?
I searched the web in Spanish, hoping to find some good soap recipes in grams, and I did!
I made my second soap from a recipe on a Spanish blog, and I have been playing with the concentrations ever since.
Ar first I was going to make a pure Castile soap.
What is Castile soap?
In the eyes of a purist, Castile soap uses olive oil as the only oil in the recipe. After much experimentation, I now have several Castile soap recipes up on the blog. If you prefer, you can make my pure Castile bar soap or my homemade liquid Castile soap. The problem with a pure Castile bar soap, though, is that some people find it slimy and wish it had more lather.
The term “Castile soap” has, over the years, expanded to include other soaps made with only vegetable oils. Coconut oil is often added to improve lather, and other oils may also be added to give the soap other properties. (Soaps made with only coconut oil are very cleansing and provide a great, bubbly lather, but they can be drying on the skin.)
Soaps made with only olive oil tend to be very conditioning soaps. Olive oil is great for making soaps for face and body for that very reason. The problem with olive oil in soap is that it isn’t considered to be as “cleansing,” nor does it make a bubbly lather. They lack that squeaky-clean feeling given by coconut oil soaps.
I had bought a liter of olive oil to make soap earlier that morning, but I decided that my husband wasn’t going to be impressed with a soap that wouldn’t lather much…
So, I decided to make a modified Castile soap, a soap that not only uses olive oil, but that also uses coconut oil.
For more information about how different oils work in soap making, check out my post about the best oils in soap making.
Why this combination for an easy, beginner soap?
Why did I formulate this soap the way I did to make it a great, customizable basic beginner soap?
A mild, conditioning soap
This soap is a conditioning soap that is perfect for the face and body!
There are lye calculators online that will help you to formulate a recipe for a balanced bar of soap. They will give you an idea about how cleansing vs. conditioning a soap will be, what type of lather it will give, etc. This soap falls on the conditioning end of the spectrum.
For more information about how and why to use a lye calculator, check out my post about how to adjust and formulate soaps with one.
If you based this recipe just on the prediction of one of those calculators, you’d say that this soap could be improved by increasing its cleansing qualities, and it could use more bubbles.
In practice, though, I find this soap to be great! I don’t have a problem with this soap leaving a greasy residue, and it feels perfectly cleansing to me. It also gives me lather from the beginning. (Some soaps, like the pure Castile soap, need to cure for longer first.)
I’m not the only one who likes using a conditioning soap for face and body. A lot of people prefer using a pure Castile soap, made with only olive oil. Pure Castile soap falls further down the conditioning/less lather/less cleansing end of the spectrum, though, and many people don’t like it because they find it “slimy” or not cleansing enough.
It’s simple to make
Not only are the ingredients simple to find, but there aren’t a lot of them. I purposely didn’t want to use a lot of different oils in this soap because seeing too many ingredients is enough to scare off beginner soap makers!
Olive oil and coconut oil are both oils that should be relatively simple for anybody to find. Plus they are some of the more economical oils that are good for making soaps.
This soap also has a long working time once you’ve reached trace. “Trace” refers to the stage in soap making when the oils and the lye have begun to emulsify and the chemical process of saponification (becoming soap) begins.
Some soaps, like my coconut oil laundry soap, move from thickening to solidifying very quickly, leaving little time for personalizing your soap with essential oils, colorants, or exfoliants. This soap recipe has a longer working time that will allow people to have fun adding ingredients to their soaps.
I had considered adding more coconut oil to this soap. That would make for a quicker soap to make. It would also give more lather and a really squeaky clean feeling afterward! The problem with that is that coconut oil greatly reduces the working time. I was afraid that first-time soap makers would stress if their soap hardened too quickly.
For those who want more lather and more cleansing, check out my modified beginner soap recipe in the notes section of the recipe card below.
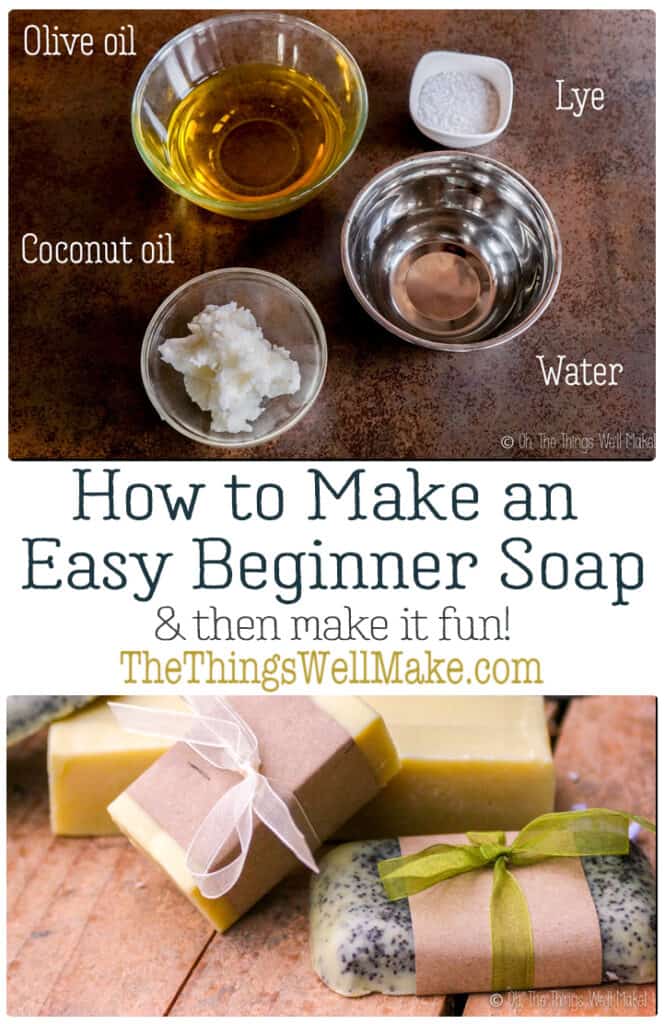
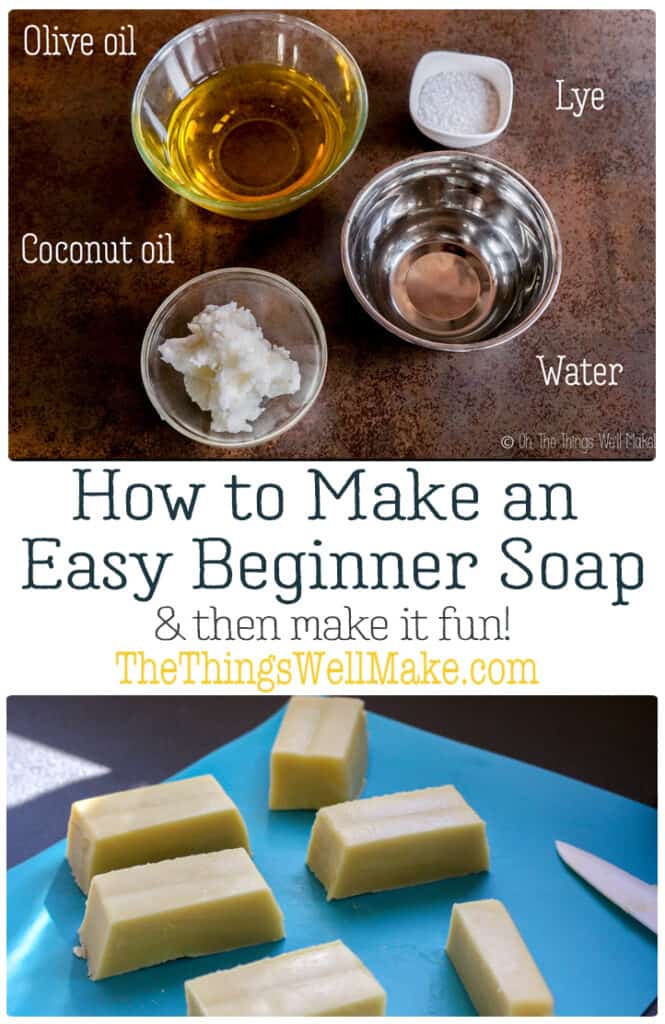
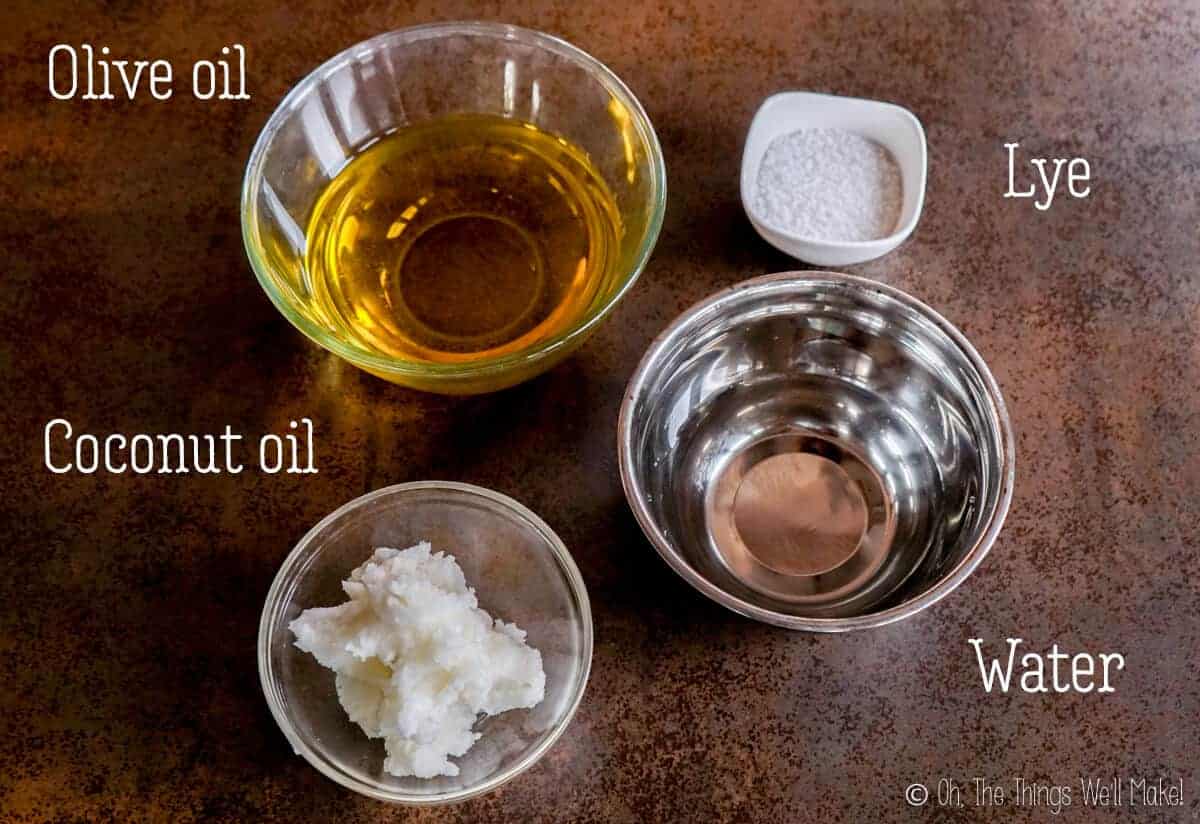
Ingredients
As I just mentioned, the ingredients for this soap are very simple. It uses only two oils: olive oil and coconut oil. Other than that, you only really need a lye solution that is made by combining lye with water.
I suggest you use distilled water to make the lye solution. That helps avoid having issues with any impurities that you may have in the water you’re using. If you did have problems later on, knowing you’ve used distilled water helps rule out any possible issues with the water.
That said, in most cases filtered water should be fine to use.
Other than that, all other ingredients are purely optional. To add a scent to the soap, consider adding essential oils or fragrance oils. Essential oils are more natural, but their scent is more subtle and doesn’t last as long.
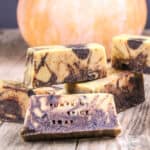
For coloring the soap, you can use iron oxides and/or micas. There are also special colorants sold specifically for soap. You can experiment with adding clays or spices for color too. In my easy pumpkin spice soap, I have used paprika or achiote to add an orange color to the soap. I then add a swirl effect with brown spices like cinnamon and clove. (They also add some fragrance.)
You can also add exfoliants or other ingredients to really personalize the recipe. Check out some ideas below.
Procedure
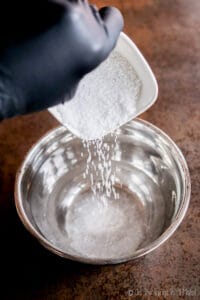
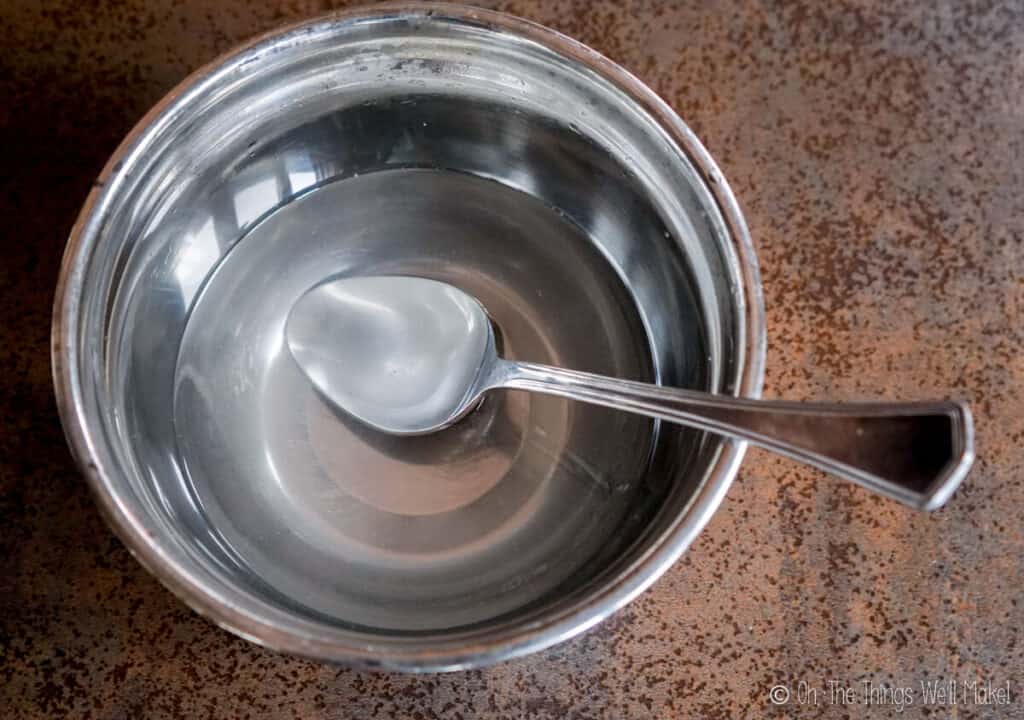
Making soap is really very easy. All you have to do is to mix a lye solution by mixing the lye with water. (Pour the lye into the water and not the other way around. See the safety warnings below for more information!)
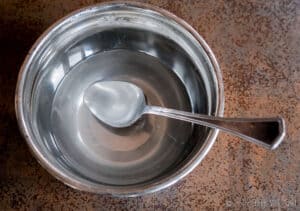
Mixing the lye solution
The lye mixture will get cloudy and warm at first and then it will clear up and start to cool.

Pouring the lye into the water 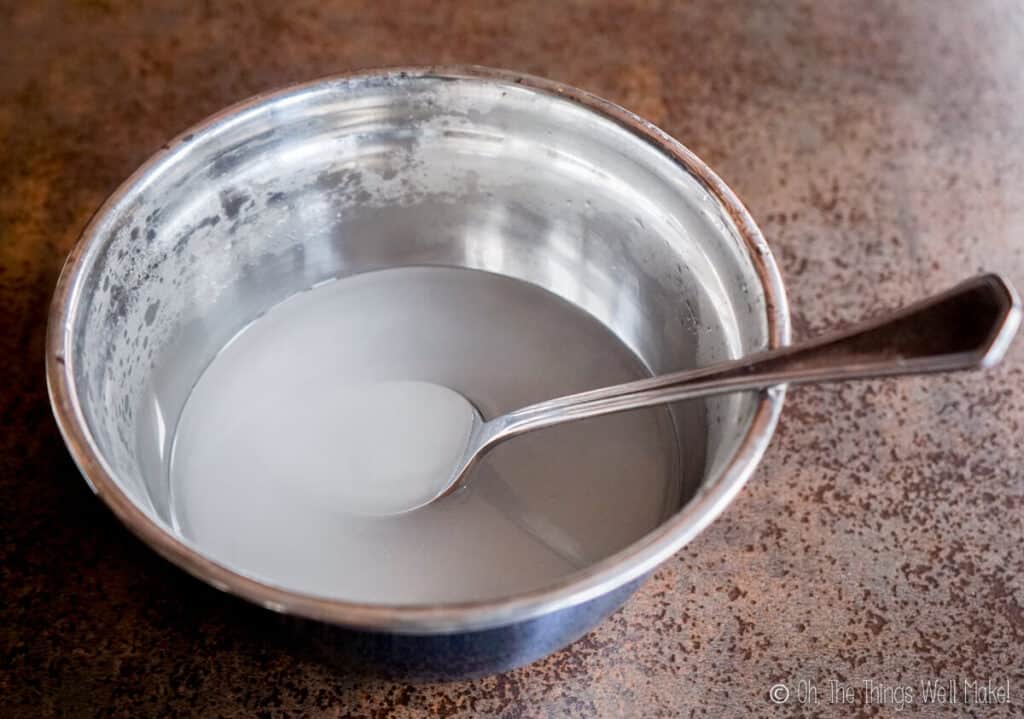
The lye mixture is cloudy at first 
The lye solution after clearing up
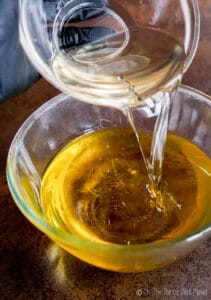
Preparing the oils
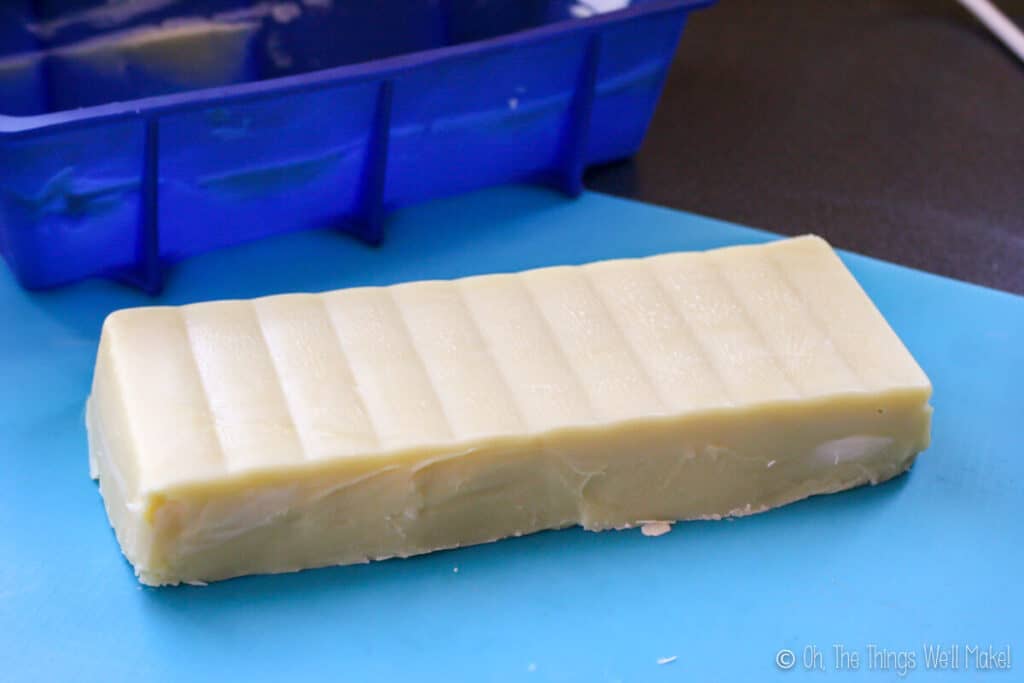
Once the lye solution is ready, prepare the oils. Weigh out the oils and melt the coconut oil if it’s in a solid state.
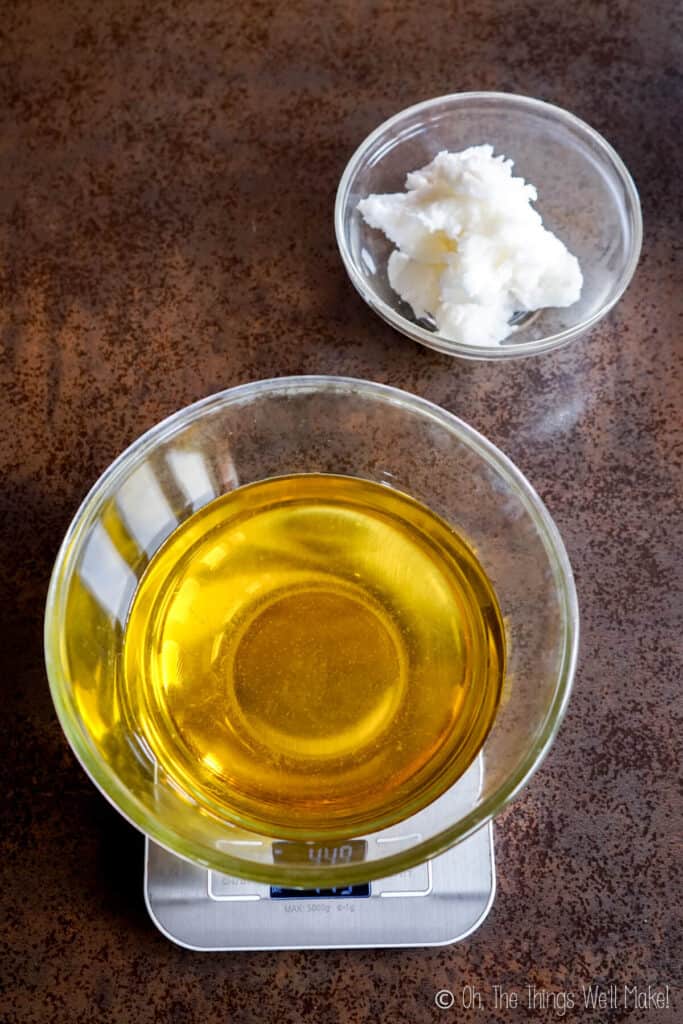
Weigh out the oils 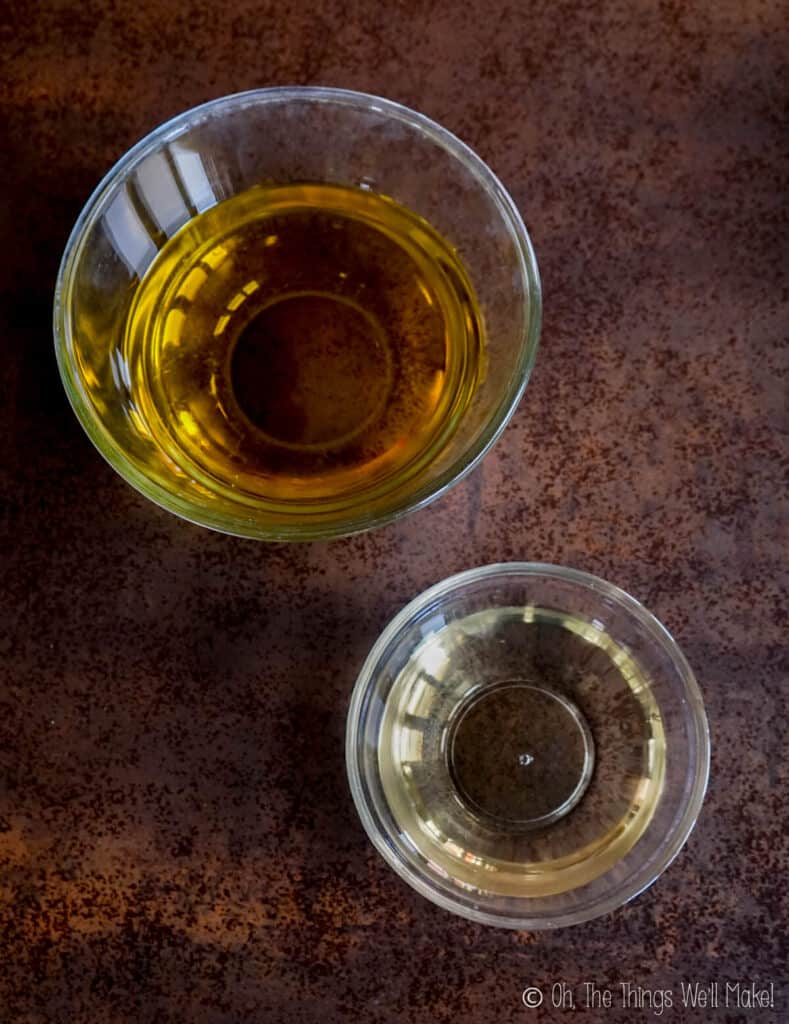
Melt the coconut oil. 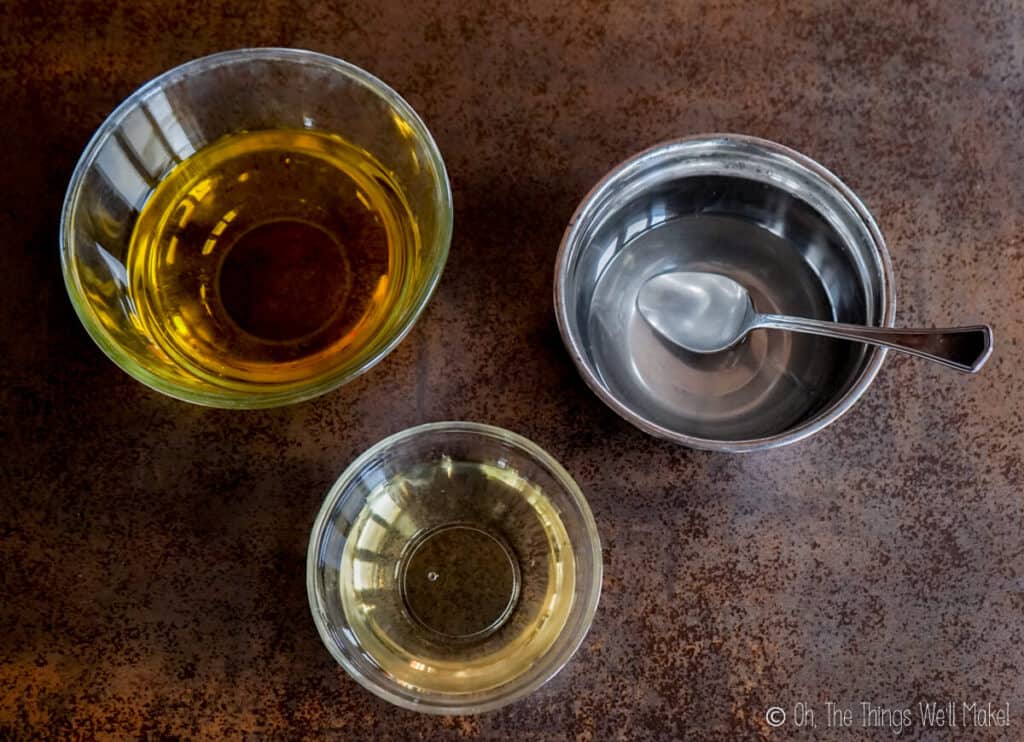
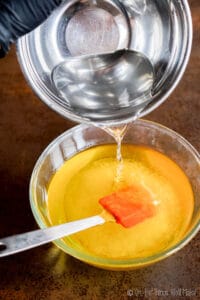
The oils and lye solution
Blending everything to “trace”
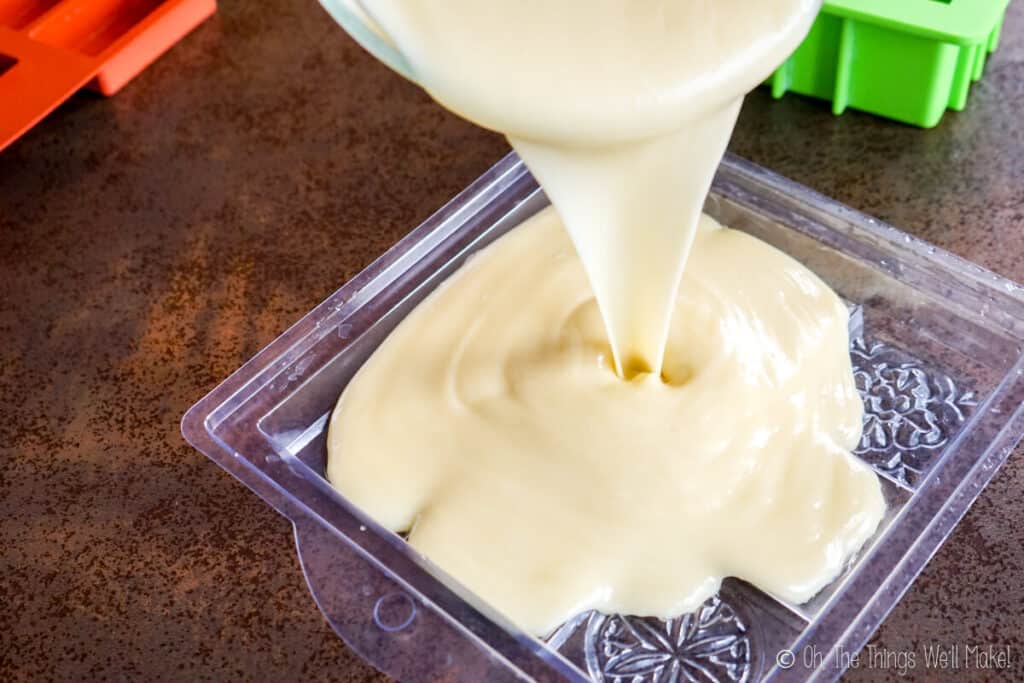
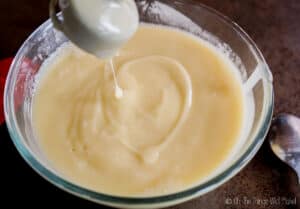
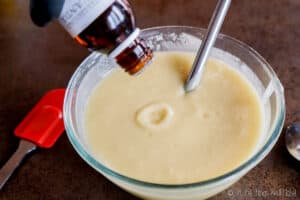
After combining the oils, pour the lye solution into the oil mixture. Then, blend them with an immersion blender until they become emulsified. It will first look like a thin, creamy sauce. It will then get thicker, more like a thin mayonnaise.

Mix the oils together 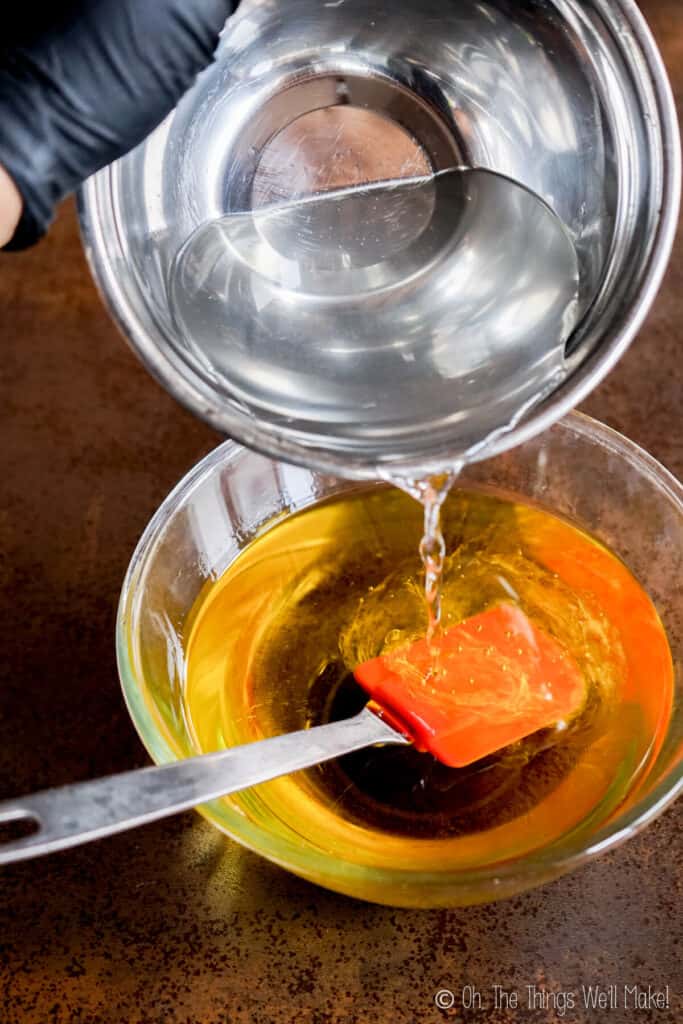
Pour the lye solution into the oils 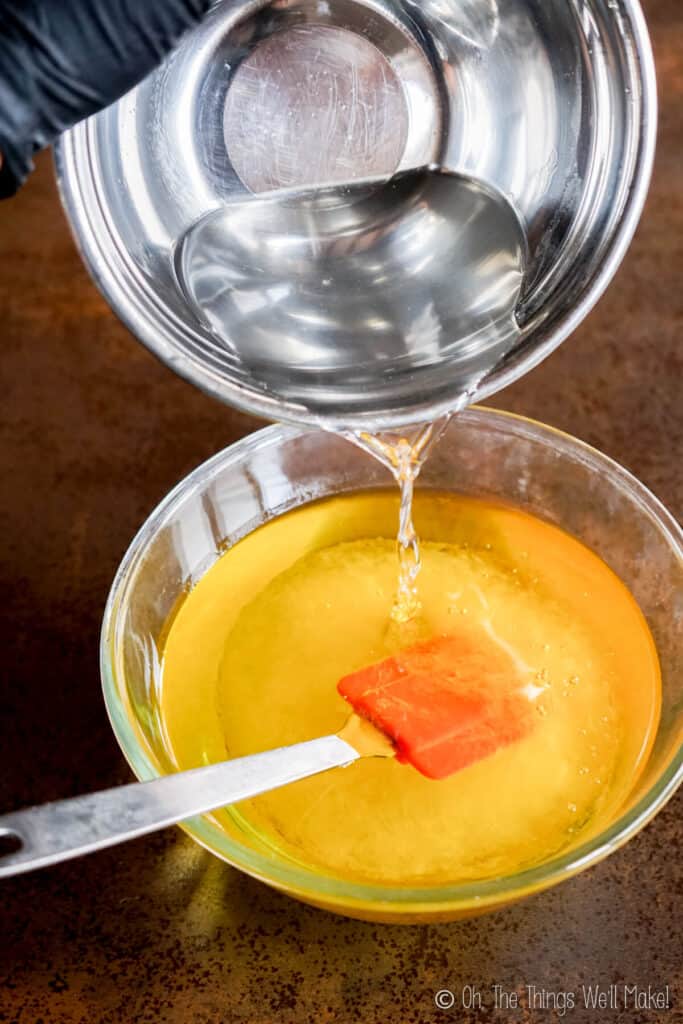

The point when the ingredients have emulsified enough to no longer separate is called “trace” in soapmaking. Once you’ve reached that point, the chemical reaction will continue to completion of the soap even if you stop mixing.
It’s called trace because you can usually leave a mark on the surface when you drizzle a small amount of the mixture over the surface.

Adding other ingredients
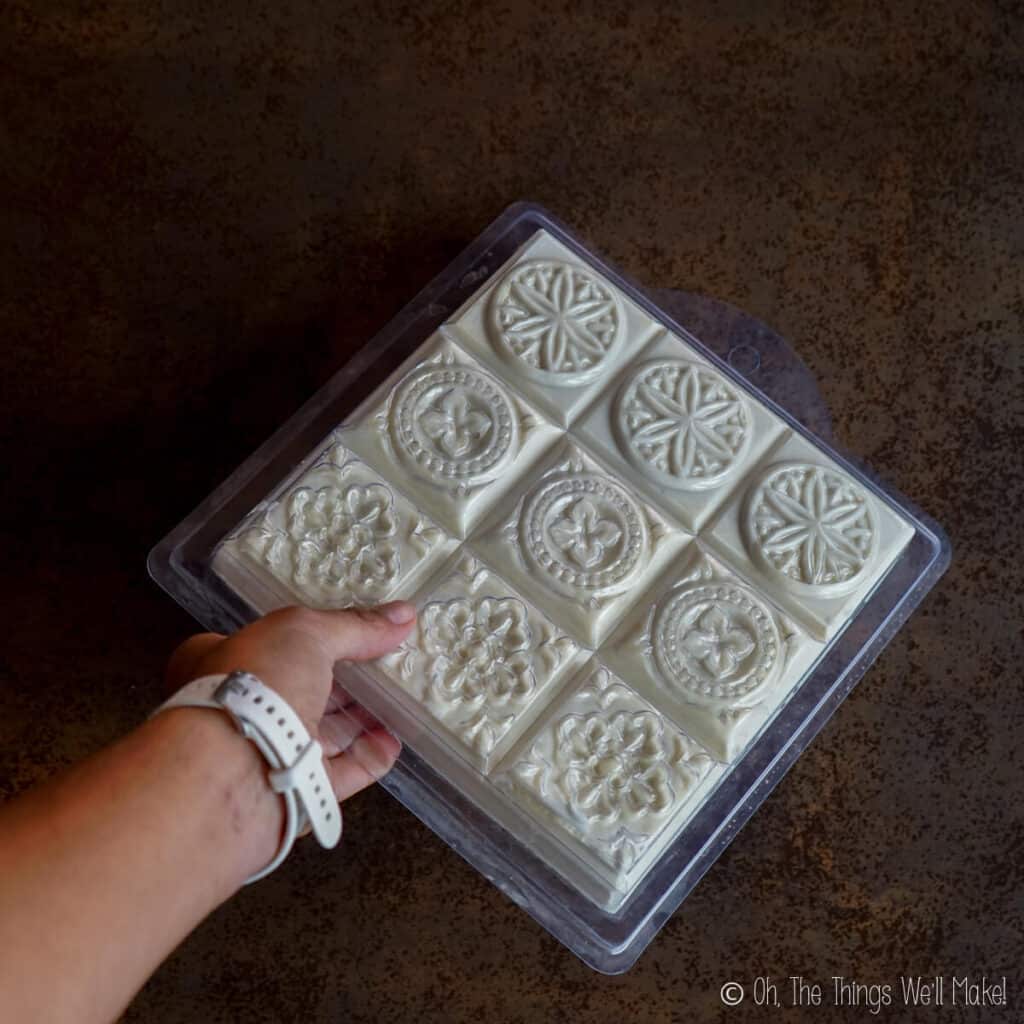
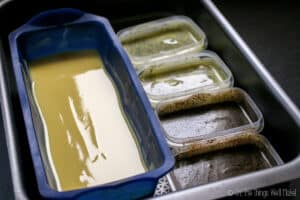
Once you’ve reached trace, you can add scents, colorings, exfoliants, and other ingredients to personalize your soap. After you’ve blended everything together, you can pour the mixture into a soap mold.

Soap molds
While you can buy special soap molds, you can also use other materials that you likely already have at home. My favorite molds for making soap are silicone molds. Silicone loaf pans are great for making a block of soap that can later be cut into bars.


Plastic food storage containers also work well. You can also repurpose certain types of food packaging like milk cartons.
For round soaps, you can even use PVC tubing. I show how to do it in my post about how to make a peppermint candy soap.
Peppermint Soap

Avoid using metal molds as the metal may react with any lye that may remain in the soap during the first hours/days. If you really want to use a metal mold, make sure to line it.
Wooden molds will also need to be lined with parchment or wax paper or with plastic wrap. Some wooden molds are sold with a silicone lining for easy use and cleanup.
Allow to set
Once the soap mixture has been poured into the mold, place it in an area where it will be left untouched overnight.
This soap has a lot of olive oil in it, so it takes a bit longer to harden than a soap with 100% coconut oil would. I suggest waiting until at least the next day to try to unmold the soap.
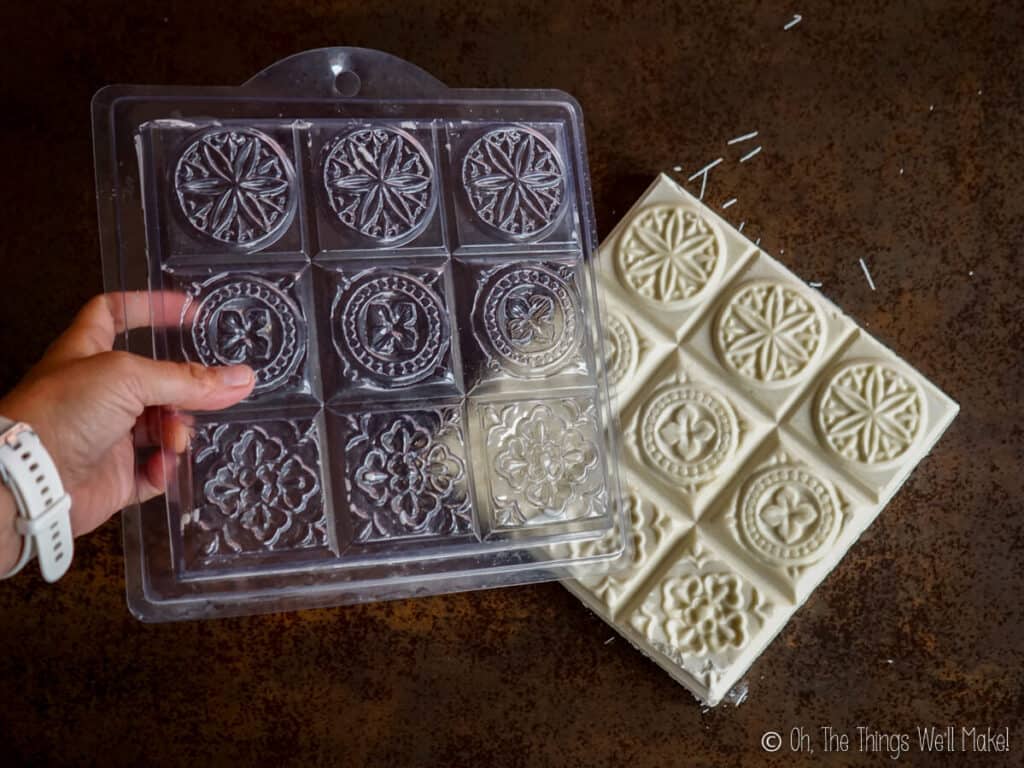
When ready to unmold it, press on it and check for firmness. Pull apart the sides of the mold from the soap (is using a flexible mold). If using a rigid mold, consider freezing the soap in the mold to make the removal easier. Freezing will slightly shrink the soap as well as harden in slightly.
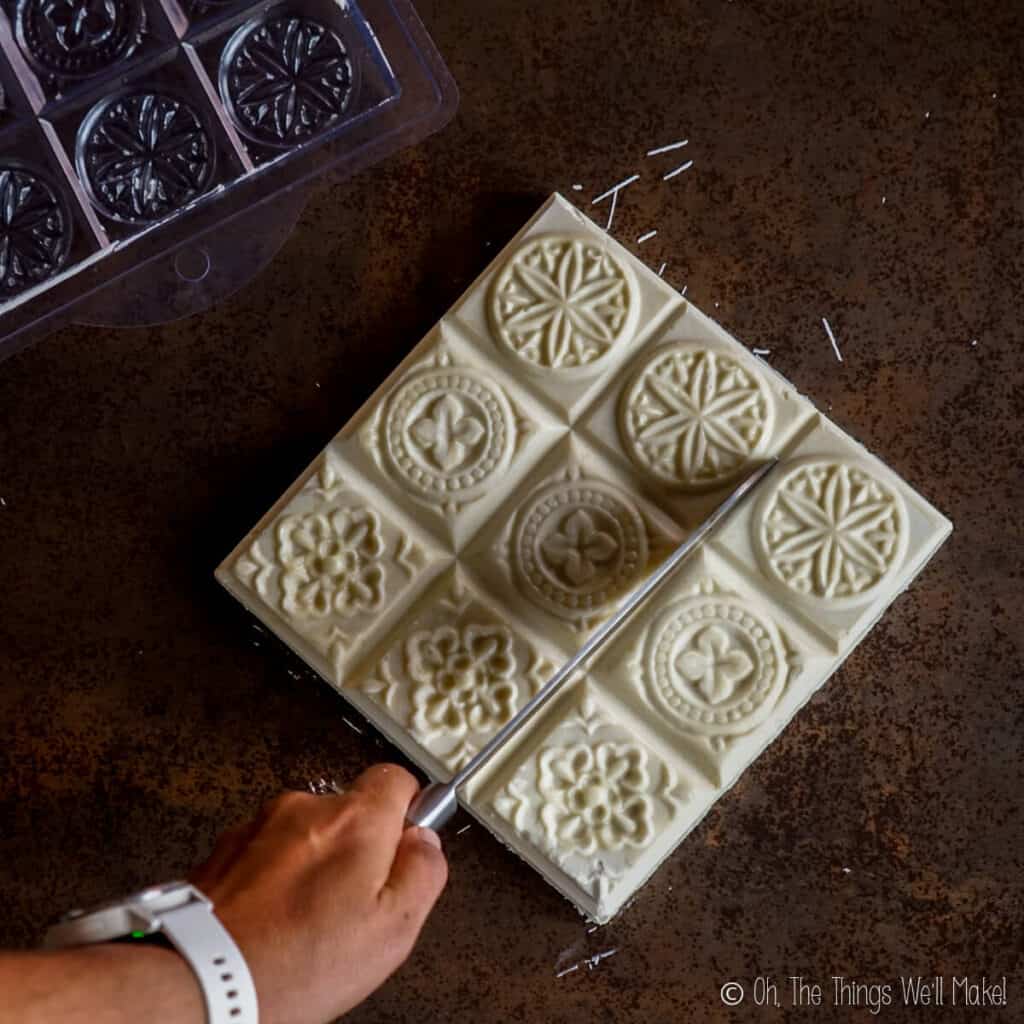
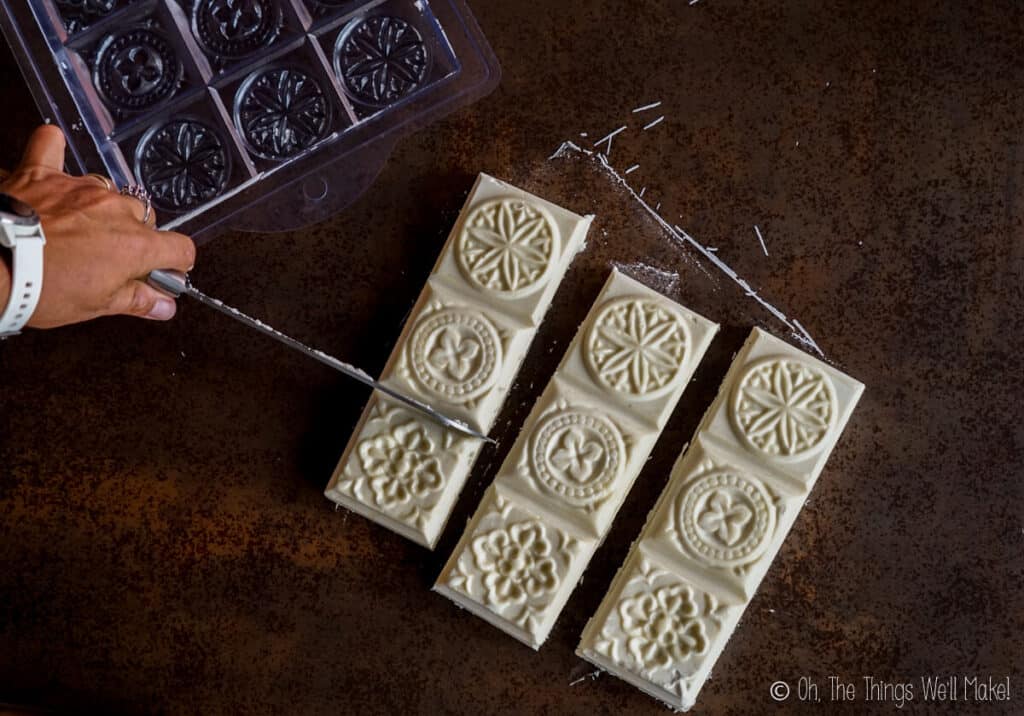
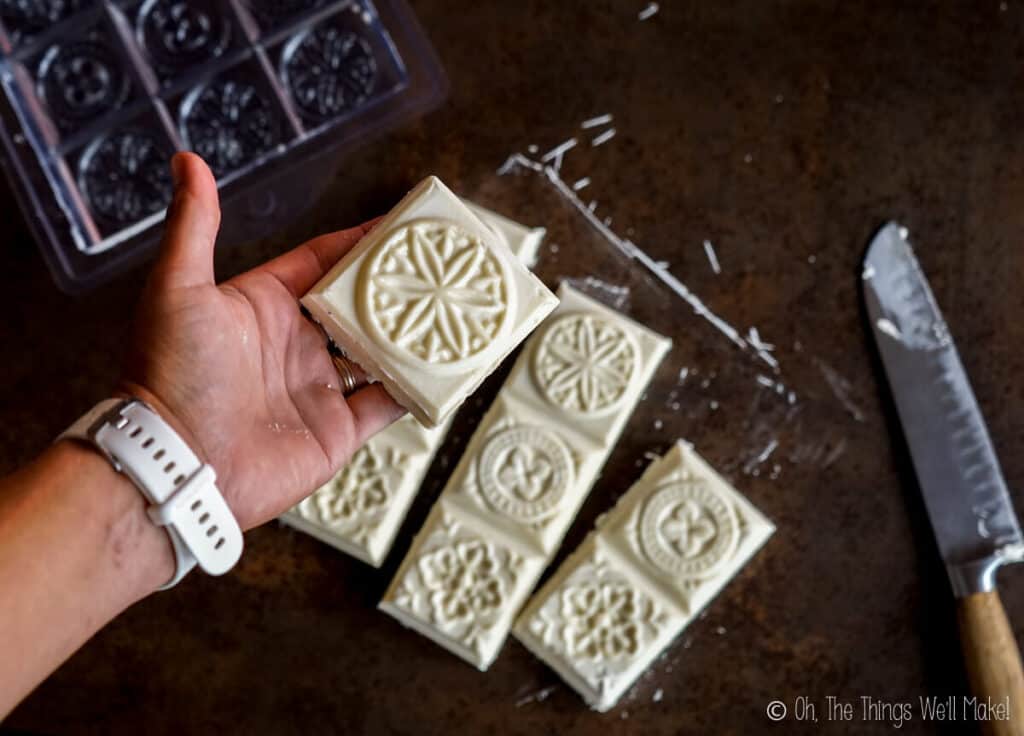
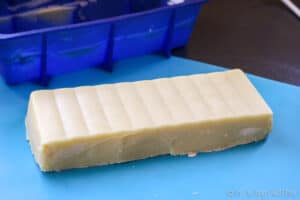
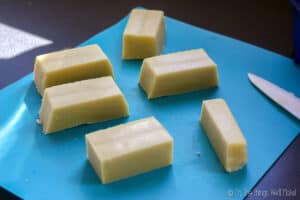
Cut into bars
If you used a loaf pan or other large mold, now is the time to cut the soap into bars, as needed.
Once the soap has been cut into bars, set them aside for several weeks to dry and “cure”. (For more information about curing soap, check out my post about Why, When, and How to Cure Soap!)
While you probably won’t want to invest in soap making supplies on your first try, there are inexpensive sets available for those who enjoy making soap.
For a small investment, you can get a soap making set that includes a silicone-lined wooden soap mold, and a wooden cutting set for easy, straight cutting!
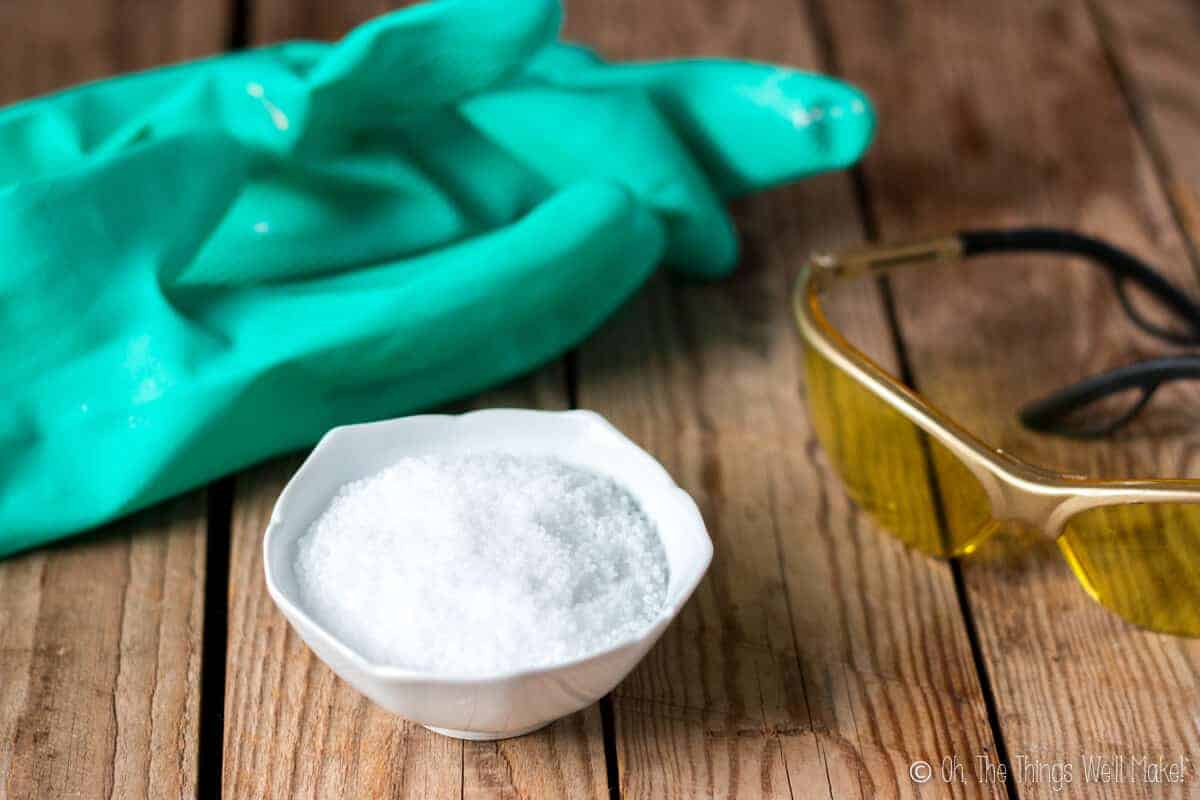
Soap making safety warnings
Keep in mind when making soap that you have to be very careful with the lye. I don’t think the book I had read when making soap for the first time was quite as emphatic about that as most places I have read since. I don’t remember mixing the lye into the water outside or wearing protective gloves or glasses. Luckily, nothing bad happened.
I don’t want to scare you, but I do want you to be careful. Lye is a strong base that is very caustic and can cause chemical burns just like any strong acid would. Keeping that in mind, protect yourself when making soap!
Safety tips
- Wear glasses and gloves throughout the process!
- Mix the lye solution and soap outside or in a well-ventilated area.
- When mixing the lye solution, pour the lye into the water and not the water into the container with the lye. (It sounds like it shouldn’t make a difference, but it pouring the water into the lye can result in a somewhat explosive reaction.)
- I suggest mixing the lye solution in a stainless steel bowl (or plastic). I used to mix the lye solution in heavy glass bowls. While I never had a problem, I have heard accounts of people who have had them crack from the heat given off by the chemical reaction.
- If you should happen to get some lye on your skin, rinse it off with plenty of clean, cool water- not vinegar!
- You can later neutralize leftover lye wherever you have spilled it with a bit of vinegar if you feel it is necessary but always rinse everything well with water first.
I had read in the past that lye on the skin should be quickly neutralized with vinegar. The idea was that it would neutralize the lye as quickly as possible. You should, however, NOT do that! After further investigation, I learned that you could inadvertently be setting off a chemical reaction that gives off enough heat to burn you further. (Makes sense, right?)
Should you use separate equipment for making your soap? Is lye toxic? Read more about lye in my post about using lye in soapmaking.
Is temperature important?
I have been told many times that it is very important to have the oils and the lye solution at certain temperatures in order to successfully make soap. That said, I haven’t found that to be the case.
I’ve experimented over the years with using everything from a cold lye solution with cold, solid coconut oil (Yes, the tricky part was combining it well, but I was stubborn in wanting to prove my point. 😉 ) to using very warm ingredients.
What did I find?
Effects of temperature
The process moves much more quickly with warm ingredients. It also is quite helpful to use the lye solution while still warm. (When you mix the lye with the water, a chemical reaction occurs that gives off heat.) The residual heat from the chemical reaction is enough to warm the oils and move things along.
What I would suggest, though, is that you at least melt the coconut oil before using it if it’s solid when you are going to make soap. (Coconut oil is normally liquid at temperatures above 76ºF/24.4ºC, but solidifies when it’s colder than that.)
While I didn’t have a problem making soap with the cold lye solution and solid coconut oil, the process was confusing. Using solid oils means that your mixture is already thicker than usual when you begin. That makes it much harder to know when you have reached “trace,” the point where you’ve really made your soap. (Once you reach trace, the reaction will continue on its own, even if you stop mixing.)
The risk is that you may reach a “false trace” and stop mixing your soap before it’s actually ready.
Once I reached trace, I decided I couldn’t resist trying out adding things to my soap…
Customizing the basic soap recipe to make it fun!
I made the majority of the soap in a silicone bread pan using lavender essential oil. Before adding in the essential oil, though, I set some of the soap mixture aside. I divided the unscented soap mixture and added coffee grounds to one part and tangerine essential oil and poppy seeds to the rest.
Exfoliants
The coffee grounds and poppy seeds can help with exfoliation when using the soap. Exfoliants are great for garden soaps or soaps meant for cleaning greasy hands. They can also help remove dead layers of the skin.
Other possible exfoliants to use are colloidal oatmeal, sugar, and salt. You can also find exfoliating powders and beads like jojoba beads or bamboo powder. Add any exfoliants when the soap is thick enough to be able to suspend them within the soap. (You don’t want them falling to the bottom.)
If you want to make a true coffee soap, you could try substituting coffee for part of the water in the recipe. Who knows, maybe the caffeine in coffee can help with circulation and combatting cellulite. A lot of cellulite creams do add caffeine! Coffee is also known to help remove odors, so it might be a good soap for cleaning up in the kitchen too.
As for the tangerine poppy seed soap, it just sounded like a fun combination to me. I love citrus scents and use them a lot in my homemade products.
Now that I have gotten over the hurdle that has kept me from making soap again all of these years, I foresee myself experimenting with it quite a bit.
Lye calculators no longer intimidate me either. If you are ready to start adapting recipes or formulating your own, check out my post about how and why to use a lye calculator!
What is the curing time?
Once you have finished making your soap and cutting it into bars, I told you to leave it alone for several weeks.
The resting period in soap making is referred to as the “curing period.”
Reacting all of the lye
Many people think that the curing time is important because it allows the saponification (aka. Soap making process) to complete. They think it is “unsafe” to use your soap before the curing time passes.
Well, while it’s true that the saponification process is normally finishing up in the first few days after making your soap, it is pretty much finished in a few days time. After the first few days, the soap is “safe” to use.
In a recipe like this one, with an excess of oils, you shouldn’t have to worry about any residual lye being harsh on the skin.
Some people mistakenly choose to make “hot-process soap” vs. this “cold-process soap” thinking that they can immediately use their soap rather than needing to wait out of lye safety concerns.
Why is the curing time important?
If the soap is safe after a few days, why should you let it cure for several weeks?
During the curing time, the quality of the soap improves.
Bar soaps have a crystalline structure that keeps them hard and gives them their shape. (Liquid soaps don’t have this same crystalline structure, which is why you don’t need to cure them before using them.) Over time, that structure is changing and improving.
The moisture in the soap is evaporating, too, so the soap is getting harder. A hard bar of soap will last much longer!
Basically, over the weeks of curing, the soap should have better lather and improve in quality. It will also be harder and last longer. It’s not that you can’t use your soap before then. It’s just better to wait.
Some soaps, like a pure Castile soap, are often given much longer curing periods before use! Because they have much less lather and feel “slimier” than soaps made with only coconut oil, long curing times can help overcome those shortcomings. Some people refuse to use pure Castile soap without having cured it for a full year!
More soap recipes:
Since I originally wrote this post, I’ve shared more soap recipes.
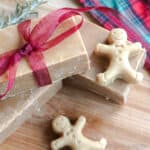
The first two soap recipes I shared after this one, my Pumpkin Spice Soap and Gingerbread Soap were both soaps based on this very recipe. I wanted to show you how to work with other ingredients without complicating things too much.
The pumpkin spice soap tutorial shows you how to work with added sugars like goat milk and fresh pumpkin puree.
Easy Pumpkin Spice Soap
The gingerbread soap is just a fun recipe for Christmas time.
Easy Gingerbread Soap
Afraid to make my activated charcoal face soap? Consider adding around a tablespoon of activated charcoal to this recipe at trace for an easy version. 😉
I also have a whole soap making section up on the blog with all sorts of soaps like glycerin soap, liquid soaps, and shave soap.
My favorites are the liquid soaps, specifically the liquid coconut oil soap, and the glycerine bar soaps. (I also have a vegan glycerin soap recipe available.)
Those recipes may look a bit more complicated because you need to add heat to the ingredients to make them (or hot process them. Hopefully, though, once you’ve successfully made your first bar of soap, you’ll have developed the confidence to give one of those other recipes a try!
Video

Easy Basic Beginner Soap
Equipment
- Soap mold
- Soap cutter
Materials
The Oils
- 500 g olive oil (Can use regular or extra virgin)
- 100 g coconut oil (Regular coconut oil that melts around 76ºF)
For the lye solution
- 195 g water (Ideally fiiltered or distilled)
- 80 g lye NaOH (Sodium hydroxide)
Optional ingredients
- 10 g lavender essential oil (Optional, for fragrance)
- exfoliants (Colloidal oatmeal, coffee grinds, poppy seeds, etc.)
- colorants (iron oxides, micas, soap colorants)
Instructions
Mix the lye solution
- Mix the lye into the water (Not the other way around!) in a recipient that can handle heat. (See safety tips below!) The mixture will heat up and become cloudy.
- Once the lye has dissolved, leave the mix to cool in an area where no kids or pets have access to it while you go measure out your oils! It will clear up as it cools down.
Mix the oils
- Meanwhile, weigh out the olive oil and coconut oil and mix them together in a large bowl. (Make sure it's large enough to add the other ingredients and safely mix them together.)If the coconut oil is in a solid state (in cooler room temperatures), melt the coconut oil. Otherwise, there is no need to heat your oils.
Combine the oils and lye solution
- After the lye mixture has cooled enough to easily handle the container, pour the warm lye solution into the oil mixture. Mix them together gently at first.Note: You do not need to wait very long. The residual heat of the lye solution reaction can help speed the process along. I normally just have it cooling while I measure out the oils and then immediately proceed to mix everything together.
- Once the lye solution has been incorporated into the oils, you can start to blend them with an immersion blender. Be careful not to spray the mixture all over! You can do this step by hand, but it supposedly will take a very long time. (I'm not patient enough to have ever tried myself.)

- When the mixture starts to thicken and look like a thin mayonnaise (after a few minutes), you are at the stage that is called "trace." That is what you want!
Customize the soap
- Now is the time to customize your soap and make it fun! You can add fragrances, colorants, exfoliants, etc. I use essential oils to naturally add a fragrance, but the scent doesn't last as long as synthetic fragrances.
- Pour into soap molds. Silicone loaf pans work great as a soap mold. I also have successfully used plastic kitchen containers. Some people even recycle tetra briks and other food packaging. (Avoid using metals as they may react with the lye in the soap.)
- Set aside for at least 24 hours. It will probably get warm. If it will be in a cold environment, consider covering the soap with a towel.
Unmold the soap
- After 24 hours, uncover and gently press on it to determine if you can easily unmold it. If it is too soft, wait a few more hours/days and unmold. If you are having a hard time unmolding the soap, you can freeze it for a short time to help shrink it a little and slightly harden. If you have used a loaf pan, don't wait too long to unmold the soap or it will be too hard to easily cut it into bars.
- If you've used a loaf pan, cut the soap into bars. I like the look of big, chunky square-ish bars. The nice thing about making your own, is that you can decide how you want to cut them.

Cure the soap
- Let the soap cure/set for around a month. Separate the soaps so that each one has air circulating around it. At first, turn the soap every couple of days. This helps the soap dry out and harden evenly.
- Enjoy your soap!!
Notes
Safety instructions:
- Wear gloves and safety glasses when working with the lye.
- It’s best to mix the lye solution outside or in a well-ventilated area. Try not to breathe in the fumes released.
- Mix the lye solution in a recipient that can handle heat, preferably stainless steel or plastic. (Glass may break with the heat from the chemical reaction. Other metals may react with the lye.)
Oil information:
- You can use regular olive oil or extra virgin olive oil. If using pomace, you may need to adjust the recipe using a lye calculator.
- While you can use refined coconut oil or virgin coconut oil, don’t use special coconut oils with higher melting points like fractionated coconut oil. (To use them, you’d also need to adjust the recipe with a lye calculator.)
Water Information
- It’s best to use distilled water, or at least filtered water, to avoid issues with any impurities in the water reacting with the lye.
- You can experiment with using other liquids, but some, especially those with sugars in them like milk, may cause a more violent reaction. For learning how to work with milk, check out my pumpkin spice soap recipe or my goat milk with honey.
Lye information
- For bar soaps, use NaOH, or sodium hydroxide. It can often be found in the cleaning section of supermarkets with the drain cleaners. Most suitable lyes will mention that they can be used for soap making on the container.
Customizing the recipe
- Once you’ve reached trace, you can add other ingredients to customize your soap. Add the ingredients and mix them into the soap well before pouring the mixture into your molds.
- Fragrance: Add essential oils or fragrance oils. (When using fragrance oils, choose those meant for soaps and cosmetics.)
- Colorants: You can use soap colorants, iron oxides, and/or micas. You can also experiment with using clays and/or spices to add natural color.
- Exfoliants: Add sugar, salt, coffee grounds, poppy seeds and/or other exfoliants to your soap, as desired.
Soap molds
- You can use special soap molds or use plastic or silicone containers that you already have at home.
- Plastic food storage containers
- Silicone loaf pans, muffin tins, or candy molds
- Recycle some food packaging like milk cartons.
- Avoid using metal molds as the metal may react with any remaining lye in the solution.
- If using metal or wooden molds, line them first with plastic wrap and/or parchment or wax paper.
Curing period
- All bar soaps benefit from a curing time of around a month. During the curing time, the crystalline structure of the soap continues to form. As it dries, the soap hardens which allows it to last longer. It also generally improves other properties like its ability to lather.
More lather/Cleansing – Alternate soap recipe
For those who want a soap that provides more lather and cleansing, consider adding more coconut oil and less olive oil.Keep in mind that the working time will be slightly shorter and the soap will set a bit more quickly.
Try using:
- 450g olive oil
- 150g coconut oil
- 81g lye
- 195g water
This post was originally published on October 5, 2013.
It was rewritten in November 2020 to add new information, more links to other posts, and new photos.


Hi, I am about to start trying to make soap, but have just moved to Micronesia where commercial coconut oil is limited but local supply abundant. There are two types of coconut oil here, “virgin” coconut oil fairly white/clear in colour and similar to what I would see for sale back in Australian, extracted from the fermented coconut pulp, and regular coconut oil which is light brown in colour and I have been told there is a cooking process involved. Would it make a difference which one was used?
Thanks.
Hi Nina,
It could very well make a difference. I know that in lye calculators, they use different values for “regular” coconut oil (the kind that melts at 76º or so), one that melts at a higher point, and then fractionated coconut oil.
I’d probably try with the virgin coconut oil and see what happens. I think it should be OK.
Hi Tracey, just made this recipe but the ph is very high, will it burnout after 24 hrs. Thanks
Hi Linda,
How high?
The pH of all soaps is naturally quite high.
The reason liquid soap is self-preserving and doesn’t need any sort of preservative is because it has a pH above 9.
Hiya! New to soap making here and just wondered how much this recipe actually makes in terms of grams or LxWxH? Thank you.
Hi Hannah,
This recipe makes around 800g of soap, but some of that weight will evaporate away while the soap cures and hardens.
I can fill a normal loaf pan with this recipe. (I use a silicone one as a soap mold.)
If you are wanting to experiment with several different soap types as I did that first time (shown in the pics), I still was able to make some shorter soaps in the loaf pan and made a few separate ones in Tupperware type plastic containers. I hope that helps!
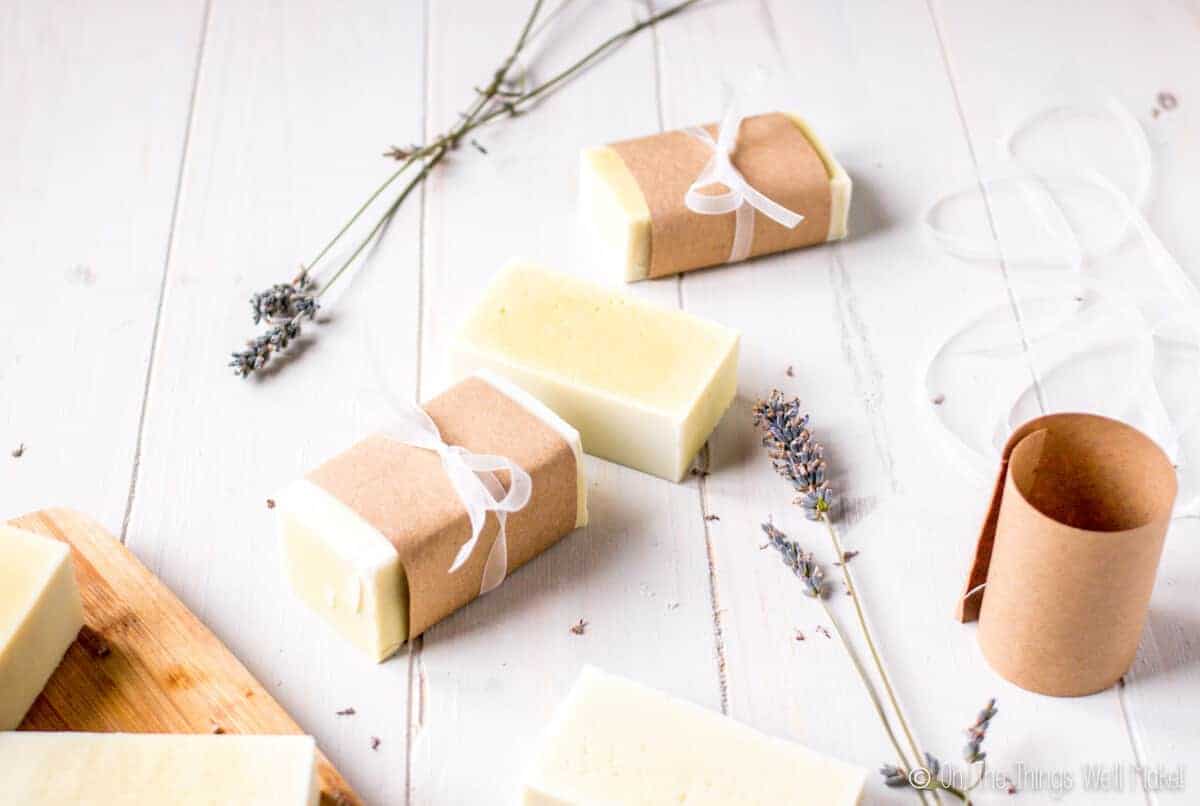
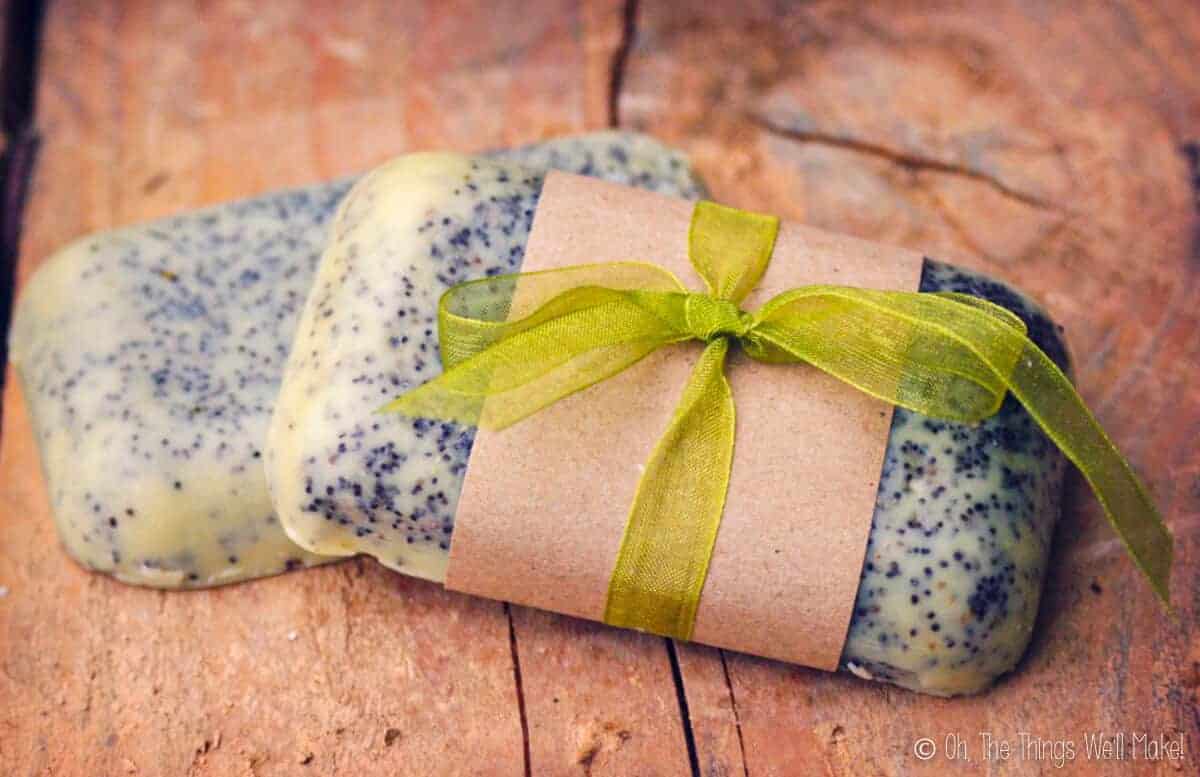
Thank you for a great post. I am fairly new to soap making but totally hooked! I made your Castile soap recipe tonight and I can’t wait to see how it turned out! My question for you is, what do you wrap your soaps in to make them so adorable?! Is that brown craft paper? Would love to gift soap for Christmas, thanks!!
Hi Ashley,
Thank you! Yes, it’s just brown craft paper. I’ve used the regular paper that they wrap packages in because it’s a bit thicker than the brown wrapping paper. (You could even upcycle a paper grocery bag!) 😉
I use double sided tape to tape it together on the back and then wrap with organza ribbon. Tucking in a sprig of an herb adds a special touch too. (my go-to is lavender, but other herbs also look beautiful!)
Do you have a good recipe for a first time beginner. Thanks, Lisa
What sort of recipe are you looking for? This one is meant for a first time beginner. The pure Castile soap that Ashley is referring to is also on the blog, but I think most people will prefer this soap with a bit of coconut oil in it to give a bit of lather.
This soap would be considered a Castile soap by most people’s standards, though. 😉
Thank you for putting this post together! My daughter is so excited to start making soap! I’m not familiar with the process so I appreciate you breaking it down into simpler terms and providing this easier recipe! She is getting all the supplies for Christmas and this will be our first batch 🙂 She wants to use poppy seeds for exfoliating and add colorant. Would both of these be mixed in after it reaches the mayonnaise consistency? Or right after blending and get a gentle mix in? Thanks again!!
Hi Cindy,
Sounds like a fun holiday plan! 🙂
Yes, I’d add both after you get to a bit thicker consistency. The color doesn’t matter so much, but I wouldn’t add the poppyseeds when you’ll need to be blending them with the blender for a while. You may end up pulverizing them. 😉 I usually just add in everything by hand- although it might be good to blend in a colorant with the blender so that the color is more evenly dispersed.
Good luck with it and I hope you girls have a good time with it!
Hi there! So glad I found your blog and am excited to try the beginner recipe! I waned to do a scent free soap for my first batch, do you think I should compensate for the 10g of essential oil, or do you think the amount is negligible?
Thank you!
Heather
Hi Heather,
The essential oils are completely optional!
Good luck and have fun making soap! 🙂
Hi there!
I just tried my first soap batch ever tonight, and i’m not 100% sure I did it right! I followed the recipe exactly, but it was hard to reach a mayonnaise like consistency, so I had to leave it go after about 30 minutes of a blender at a lighter trace. I have since poured it and covered it, but feel no heat? Also, when i let my lye/water mixture cool, for about an hour I went to get it and a portion of it had evaporated. Is that normal? Maybe I let it cool too long and now there wasn’t enough lye for the right balance? Let me know what you think as I am stumped! We’ll see how it looks in 24 hours to see if it has hardened. Thanks for the recipe though excited to perfect it (on my end of course!)
Hi Lauren,
Yes, you probably let it cool a bit too long- which is what made it so difficult for you to reach trace. (That’s my fault, I guess. I should go back and clarify that you only really need to allow it too cool for a few minutes while getting your oils together. And I guess you don’t really even need to let it cool, but I say that so that you don’t burn yourself when working with the hot mixture. That wait time also allows for the fumes to dissipate.) When the temperature is on the cooler side, it takes longer to reach trace.
All of that said, you are probably fine. I’m sure it will harden up. I’ve purposely made soaps at very cold temperatures without even melting the coconut oil just to show it will work. (I’ve had people tell me that you need to make soap at certain temperatures, but it’s not really the case.) 😉
Anyway, yes, I found it to take much longer to reach trace, and the trace wasn’t as thick. In the end, though, the soap turned out the same.
I’m so glad to read this comment! I left my lye to go cold and I’ve had the whole lot in my stand mixer for 10 minutes and it’s nothing like mayo yet! It would be helpful to people like me who take instructions very literally, if you updated the instructions to say you only need to leave it a few minutes. I left mine for a few hours ?
On it!
I guess I didn’t make a fuss about it because I’ve made the soap at all temperatures and it works even when I purposely chilled it as an experiment. (Somebody tried to tell you you needed a specific temperature to make it work, and I guess I had to prove that statement wrong! 😉 )
It is easier with a slightly warmer temp, though, so I guess it would be a good update to make!
Hi there! I just whipped up a batch of this tonight and had a few questions. First off I noticed in the video you used a large mold to make one big block and then cut it into smaller bars after 24 hours. I actually used a mold with six small molds that are the size of 1 bar each. (I was able to pour about 9 bars) Do you think it will harden as well as 1 big block? Should I maybe wait longer before taking them out of the molds? Also, about how many minutes does it typically take to reach trace?
Hi Jonah,
Well, let me start with the part about trace. It’s really impossible to say because so many things factor into it. Soaps with a lot of olive oil like this one take longer to reach trace than soaps with mostly or all coconut oil like my coconut laundry soap. The temperature will also be a factor (if the ingredients are cold, it will take a lot longer to reach trace), as can be many other things. I don’t typically time the process, but, perhaps could next time.
About your molds- if anything, they may harden more quickly. That said, you don’t have to hurry to remove them from the molds because you don’t need to worry about cutting them before they get brittle. It is more likely that your soaps could distort or break as you remove them from the smaller molds, so it’s not a bad idea to leave them until you feel they are hard enough to safely remove. It’s still best to remove them when you can safely do so as it will allow them to dry out and cure better.
Not sure if this was asked above or not, but the measurements for the soap — they are all weighed the same?? I just put them on the scale and weigh them in a container? Just clarifying…
Hi Lori,
Let me see if we’re understanding each other correctly…
You put your container on the scale and then tare it so that it’s at zero. Add your first ingredient- then when you get to the right number, you’d tare it again to get it to zero before adding in the next ingredient.
For this soap, it’s set in grams, but you can switch it to ounces too on the recipe card- that’s weight ounces, and NOT liquid ounces. 😉
Does this answer your question?
Great post! I am so excited to try this!! ☺
Thanks, Jessica!
Wishing you the best of luck!
hi I love your chanal !
Aww, thanks, Lily! 🙂
Thank you, thank you, thank you! This was a pleasure to read and also helped me figure out where to start.
You’re so welcome, Ashley!
I wish you the best of luck! And thank you for your sweet comment. 🙂