Hans’s 50th Surprise Birthday Optometrist Cake
Learn the basics of covering a cake with fondant and ideas for making an optometrist inspired fondant cake with glasses, eyes, and eye chart.
Despite blogging about healthy foods and alternatives, I used to love to make a lot of fondant cakes for birthday parties. My friends wanted me to blog about it, or even to bake cakes professionally, but I noticed that I would get sick, to a point, after working around all of the sugar. I decided that I would only make cakes for very special occasions, and this, well, was one of them. While most of my readers are healthy food types, I decided to share the process and ideas for an optometrist cake anyway in case it will help somebody out. I know some of you are probably horrified by this sort of post, but I don’t have a problem with fondant and its artificial colors because so many people peel it off anyway. Underneath is a freshly baked cake with homemade buttercream frosting, and no artificial colors or flavors. If you’re looking for a grain free cake recipe, this one is great. That said, let’s got on with the post…
For awhile now my friend Maite had been debating whether or not to throw a surprise party for her boyfriend’s 50th birthday. Plans for the party were on and off up until the final week before the party was actually held. She was worried about the financial aspects of throwing a large party, and wasn’t really sure how to pull it off without asking others for help. Once she realized, though, that everybody was willing to pitch in by bringing food, helping with the decorations and set-up, the party was back on.
…So, also, was the making of a cake. Thinking the party was off, I wasn’t ready with supplies for baking a cake of this type, and they aren’t readily available in my part of Spain yet.
My only choice was to head out of town to the nearest British supermarket. Unfortunately, they were out of the plain regal ice fondant because they don’t sell much of it in the summer. They did have a cute box of 5 colors, though, for only around 3 and a half Euros. I snatched it up, along with two small boxes of powdered sugar. It it still more expensive than it is in the US, but definitely better than the local alternative.
Thinking I had all the supplies I would need, I proceeded to start making all of the component parts of the cake. I started out by making the marshmallow fondant. It is best to make it at least a day ahead of time to give it time to dissolve any lumps of powdered sugar. I also made a swiss buttercream frosting and a few chocolate cakes. I would have made a simple sugar syrup that day, too, but I was out of sugar!
The next day Maite came over to help me assemble and decorate the cake. She brought over some sugar for me, and I immediately made the sugar syrup to give it some time to cool. I brought out the frosting and fondant to help get them to room temperature, and took out the cakes to get them ready. I would have made two of the larger sized cake layers, to make the bottom tier of the cake taller, but I had run out of sugar, remember!! So, we made do with what we had.
We leveled off each layer of cake, and cut them in half for frosting after pouring some sugar syrup over each layer to keep them moist.
After lightly covering them with the first coat of frosting, they went into the fridge. This first layer is called the “crumb coat” because crumbs from the cakes often break off into the frosting, leaving small bumps behind. If you put this into the fridge, it will somewhat harden, letting you frost the cakes with a cleaner, smoother layer on top.
We were in a bit of a hurry, so the cakes weren’t in the fridge that long, and I wasn’t so much of a perfectionist about smoothing the buttercream, but overall they looked pretty good.
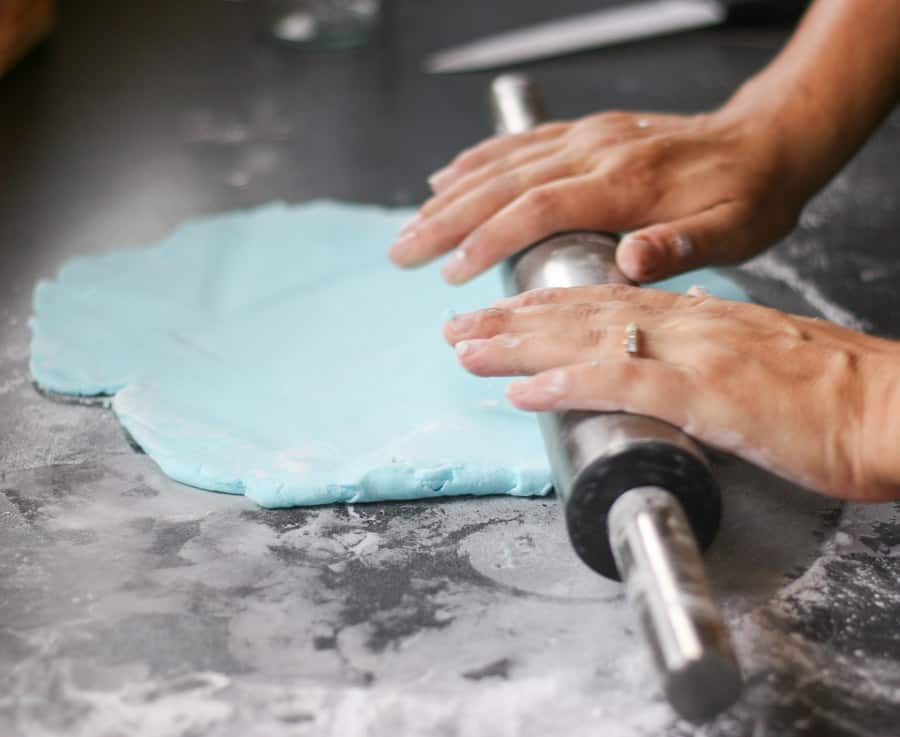
Next comes my least favorite part of the whole process, rolling out the fondant and placing it on the cake. That’s why I worked on smoothing the buttercream and “let” Maite roll out the fondant. 😉
You have to roll out enough fondant to cover the top and the sides of the cakes. It’s good to give yourself a bit extra in case you don’t center it perfectly as you place the fondant on your buttercream covered cakes.
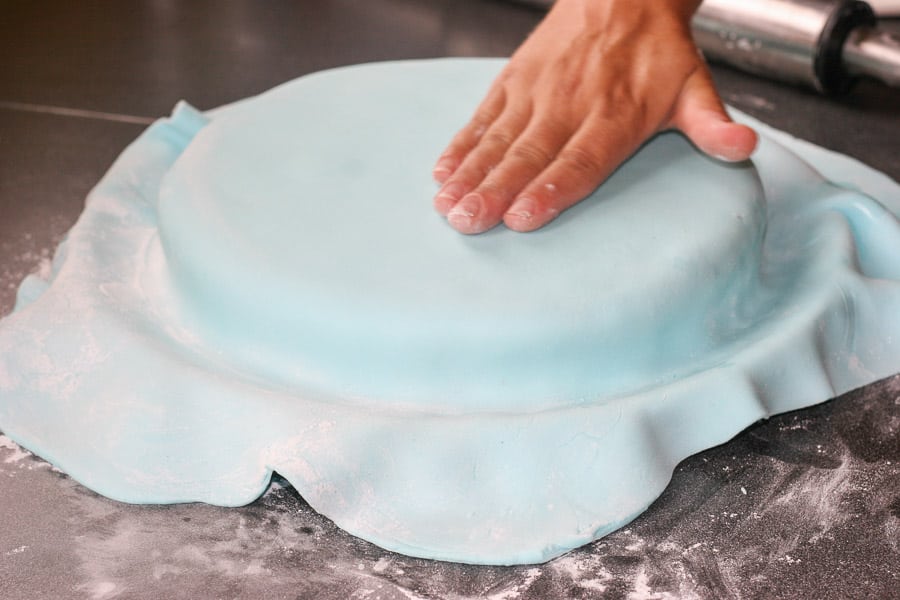
Raise your fondant over your cake, and slowly and carefully smooth it over. You can now cut off the excess. I have found, though, that it is good to cut it a bit too long at first, especially with marshmallow fondant. Marshmallow fondant is very elastic, and has a tendency to get too short when you cut off the excess if you aren’t careful.
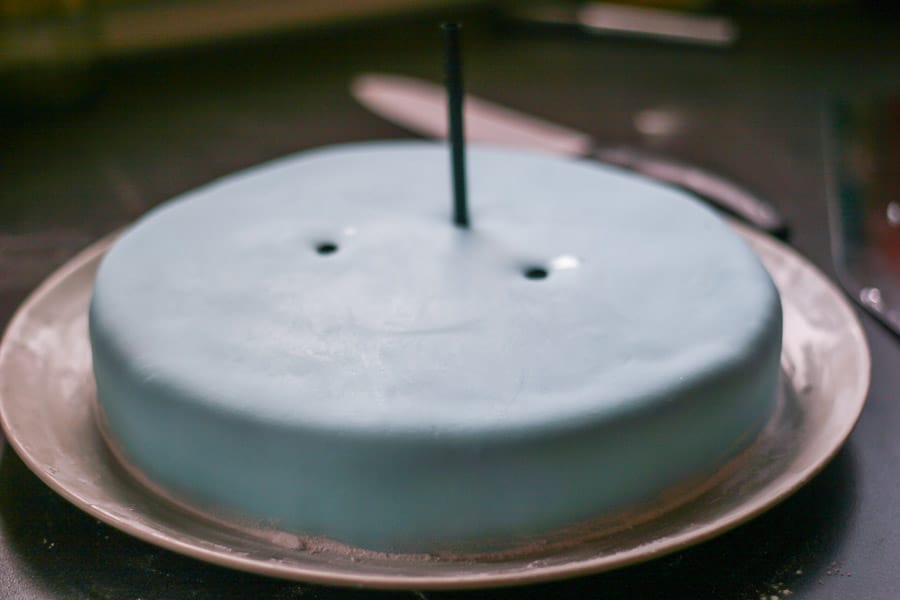
I like to rub some powdered sugar around the bottom of the cut fondant to cover any small blemishes that might be in the cut fondant. Later on the excess sugar can be brushed off with a clean paintbrush. Next, if you are going to make another layer on the cake, it is a good idea to give the cake structure so that it doesn’t collapse form the weight of the second layer. I use straws and cut them off level at the top of the cake. I also leave a larger straw in the center, with a wooden skewer in the center, to hold the layers of the cake in place.
The upper level of the cake should have a cake board of some kind underneath. I made my own cake board, the size of the bottom of my cake pan, out of cardboard, covered it with aluminum foil, and punched a hole in the center to allow the skewer to go through the center. Once both layers have been covered in fondant, the top layer can then be placed on the lower layer.
We didn’t do a great job of smoothing out the fondant on the second layer of cake. The sides weren’t as straight as I had thought, and I had a hard time forming the fondant over it. Some of the wrinkles stayed in the fondant, but I decided that it would be easier to just leave them since we were going to be decorating the cake and covering it more anyway.
If this had been a wedding cake that needed to be smooth, I would have taken it off, rerolled the fondant, and tried again! We, instead, covered the bottom wrinkles with a decorative layer of black fondant.
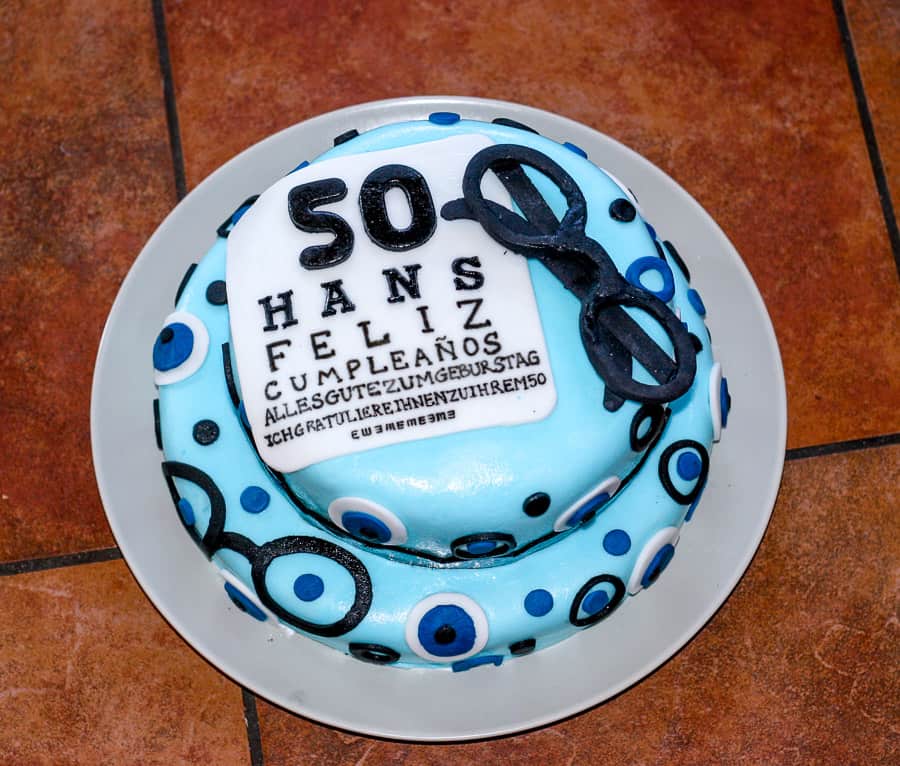
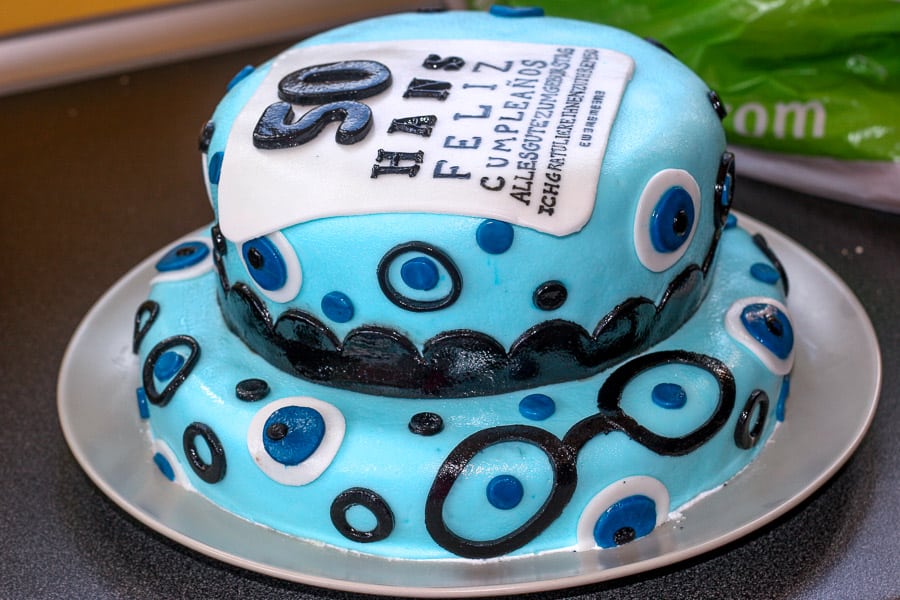
We weren’t sure about the theme of the cake, but eventually decided to make a cake fit for an optometrist. The idea was to cover it with an eye chart, glasses and “eyes.” We didn’t want realistic looking eyes, though, because we decided that those would be more fit for a Halloween themed cake. So, Maite worked on making some geometric looking fondant eyes.
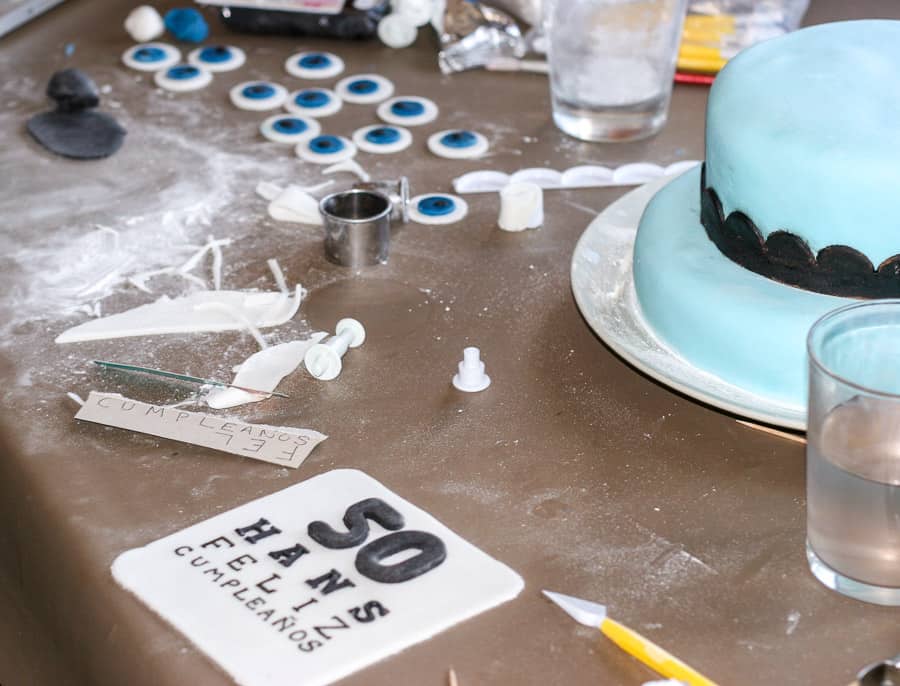
I worked on cutting out some parts for glasses, and planning out the eye chart. After Maite cut out a sheet of white fondant for me, I went to decorating it with the eye chart letters and, in this case, numbers. We started with the shorter lines of bigger letters and numbers. So, you can see that we placed fondant numbers with his age at the top, followed by smaller fondant letters with his name. Then I moved to using a food coloring marker to write Happy birthday, first in Spanish, and then in different ways in German since Hans is, of course, German himself.
We placed the eye chart and eyes on the cake, and also put on our first attempt at eyeglasses. I also made another set of glasses, meant to be placed on top of the cake, and set them aside to dry. The cake, though, was lacking quite a bit. So, I started to cut circles and dots out of black and blue fondant, and randomly covered the rest of the cake with them.
All that was left was to put the glasses on the cake, but they first had to dry out overnight.
With the summer heat, I decided to try to do what they always say not to do; I put the fondant-covered cake in the refrigerator.
The next morning when I took it out of the fridge, it started to sweat. I was expecting that to a certain extent, but this cake was quickly completely covered with water!!
I was afraid that the water was going to make the writing on the eye chart and the areas of black fondant run all over the rest of the cake. I blotted the cake with paper towels, but it just kept sweating. I tried putting a fan on it to help dry it out, but more and more water was condensing on the cake, and it wasn’t drying out at all. I did take advantage of the water to a certain extent; when the cake was wet, I smoothed out any cracks that were in the fondant.
My husband came to the rescue, and emptied out a few layers of our wine refrigerator, which cools at a much higher temperature than our regular fridge, and I put the cake inside to help bring it to room temperature more gradually. By making the change in temperature more gradual, the cake didn’t sweat as much, and was able to start drying out.
The plan was to stand the glasses up on top of the cake, but I wasn’t able to stand them without breaking them. Once broken, I had to fix them with more fondant, and dried them with the lowest setting of the oven. I wasn’t very happy with the way they looked when patched up, but I didn’t have time to make a new pair. I was able to place them on top of the cake, though, after “folding” them up, and they did help to complete the look of the cake.
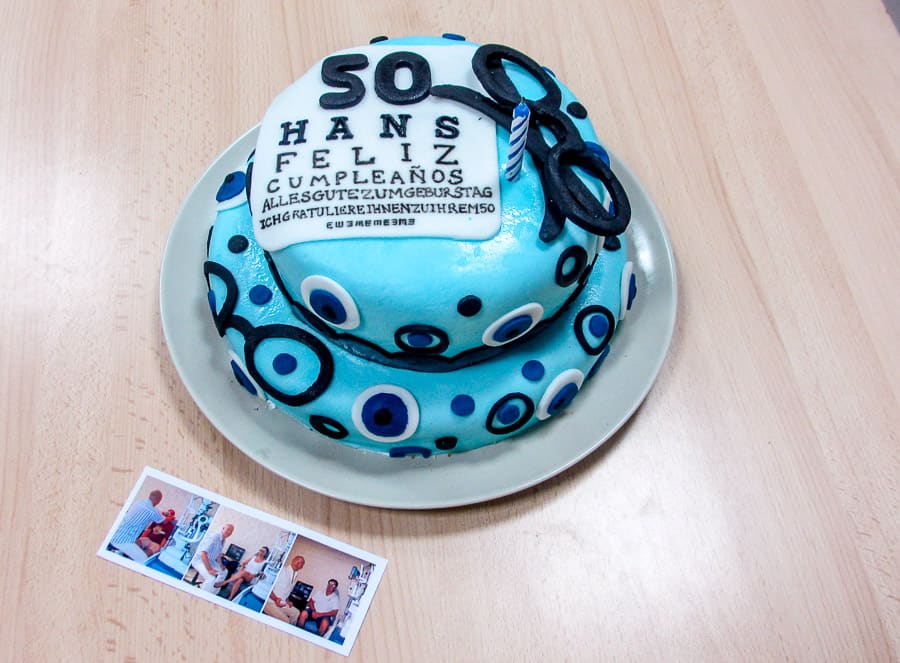
I guess a cake will always have imperfections that you want to fix, but overall I think it turned out well considering the little amount of time that went into the planning of the cake. In any case, Hans liked it as did most of the people at the party. The kids were the ones to have the most fun with it, and they wanted to take turns blowing out the candle.
That’s what makes it all worthwhile.