How to Make Fun Cheese Shapes Using Cookie Cutters

Looking for a fun snack idea? Learn how to make playful cheese shapes using cookie cutters to bring creativity to your meals or party platters.

To add a playful touch to your cheese platters, try using cookie cutters to cut cheese into fun shapes. It’s simple and effective! It’s perfect for parties, gatherings, or even kids’ lunches. With a variety of cheeses and cookie cutters, you can create all sorts of eye-catching cheese shapes.
What You Need:
- Cheese: Opt for firm cheeses like cheddar, gouda, or mozzarella. Use either blocks or thick slices.
- Cookie Cutters: Small metal or plastic cookie cutters work best. Avoid large shapes, as they may break or be difficult to handle.
- Cutting Board: A sturdy, flat surface is essential for pressing the cutters into the cheese.
- Knife, dental floss, or cheese slicer: If needed, to slice the cheese to the right thickness.

Choosing the Right Cheese
Selecting the right type of cheese is crucial for making perfect shapes. You want a cheese that holds its form well but is soft enough to press a cookie cutter through without crumbling.
Some ideal cheeses to use:
- Cheddar: This firm cheese holds its shape well and also adds color.
- Provolone: A mild, sliceable cheese that’s firm enough to shape
- Monterey Jack: Another good option for clean cuts and smooth edges.
- Colby Jack: Its marbled texture adds visual appeal to shaped cheese.
- Gouda: Both smoked and regular Gouda work well, offering a firmer texture and a rich flavor.
Avoid very soft or crumbly cheeses, such as blue cheese or feta, as they won’t hold their shape properly.
Steps to Make Cheese Shapes Using Cookie Cutters
1. Slice the Cheese
If you’re starting with a block of cheese, use a sharp knife to cut the cheese into slices about ¼ to ½ inch thick. Thinner slices may be difficult to work with, while thicker ones might be too hard to cut cleanly.
You can also use a cheese slicer or even dental floss to help slice the cheese to the desired thickness.

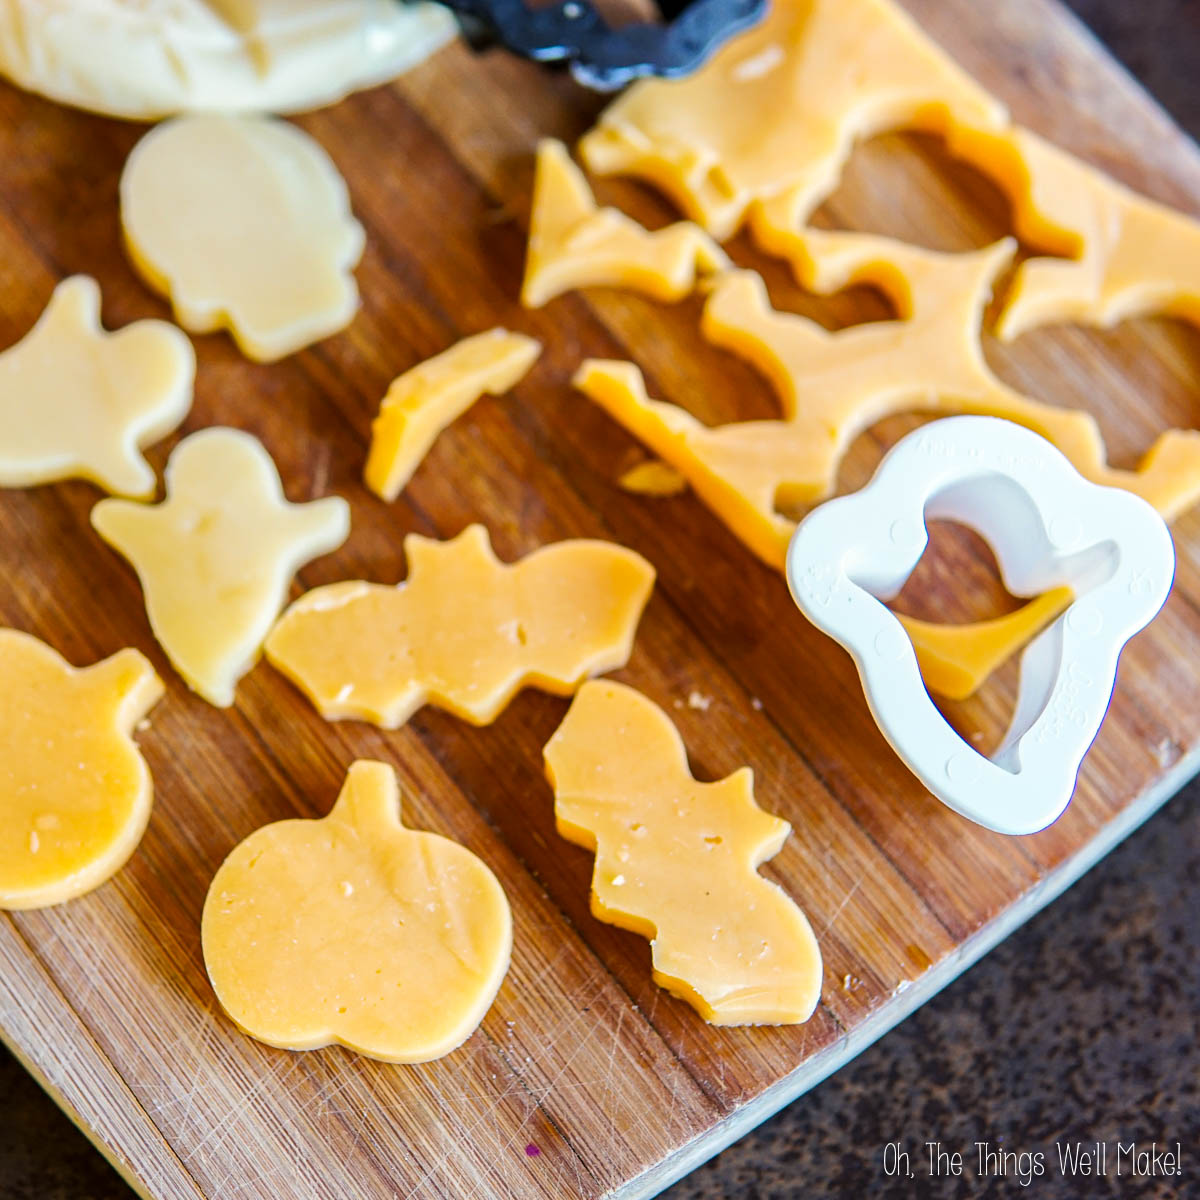
2. Choose the Right Cookie Cutters
Pick small cookie cutters to create manageable, bite-sized shapes. Shapes like stars, hearts, or animals are popular choices for both adults and kids. For special occasions, look for shapes that fit your theme.
Smaller shapes tend to hold their structure better and look more appealing on a platter.
3. Cut the Cheese
Place the sliced cheese on a cutting board. Press the cookie cutter firmly into the cheese, ensuring you push all the way through. Wiggle it slightly to make sure the cutter has gone through the entire slice, then lift the cutter, and gently push the cheese shape out.
If the shape doesn’t come out easily, use a butter knife or your fingers to help nudge the cheese out of the cutter.

4. Remove Excess Cheese
After cutting out the shapes, trim the excess cheese from the edges and save it for snacking or future use. You can even melt the leftover cheese and mold it into 3D shapes.
5. Arrange and Serve
Now that your cheese shapes are ready, arrange them on a cheese board, salad, or snack plate. Pair them with cured meats, fruits, nuts, or crackers. Here you can see them with a creepy face and a severed hand cheese balls.

Expert Tips for Perfect Cheese Shapes
- Use Firm Cheese: The firmer the cheese, the cleaner your cuts will be. Softer cheeses may crumble or deform when pressed.
- Stick to Small Cutters: Small cookie cutters are easier to handle and produce shapes that are less likely to break. Larger cutters may create fragile cheese pieces that can crack.
- Chill the Cheese: If your cheese is too soft and difficult to cut, pop it in the fridge for about 15 minutes to firm up. Chilled cheese is easier to work with and holds its shape better.
- Grease the Cutter: If the cheese is sticking to the cutter, lightly coat the inside of the cutter with a bit of oil or melted fat.
- Experiment with Different Cheeses: While firmer cheeses like cheddar or gouda work best, you can experiment with other types. Just remember that crumbly or overly soft cheeses will not give you sharp, clean shapes.
Storage Tips
Refrigerate the shaped cheese in an airtight container or cover it with plastic wrap to keep it from drying out. Cheese shapes will stay fresh for up to around 5 days, depending on the cheese.
When stacking cheese shapes, use wax or parchment paper between layers to keep them from sticking.
Avoid freezing the shaped cheese, as the texture can change when thawed.
Serving Ideas
- Cheese Boards: Arrange shaped cheeses alongside fruits, nuts, and cured meats for a beautiful cheese platter.
- Salads: Add playful shapes to your salads.
- Kids’ Snacks: Make lunchtime more exciting for kids by serving their favorite cheese in fun shapes like animals or letters.
- Appetizers: Serve cheese shapes with crackers or bread for an eye-catching appetizer.
Video

Cookie Cutter Cheese Shapes
Equipment
- Cookie Cutters Small metal or plastic cookie cutters work best.
- Cutting Board
- Knife, dental floss, or cheese slicer To slice the cheese, if needed
Ingredients
- 1 block Cheese Opt for firm cheeses
Instructions
- If you're starting with a block of cheese, slice the cheese into slices about ¼ to ½ inch thick.
- Place the sliced cheese on a cutting board.
- Press the cookie cutter firmly into the cheese, ensuring you push all the way through. Wiggle it slightly to make sure the cutter has gone through the entire slice, then lift the cutter.
- Gently push the cheese shape out. If the shape doesn’t come out easily, use a butter knife or your fingers to help nudge the cheese out of the cutter.
- After cutting out the shapes, trim the extra cheese from the edges.
- Arrange the cheese shapes on a cheese board, salad, or snack plate.
Notes
- Use Firm Cheese: The firmer the cheese, the cleaner your cuts will be. Softer cheeses may crumble or deform when pressed.
- Stick to Small Cutters: Small cookie cutters are easier to handle and produce shapes that are less likely to break. Larger cutters may create fragile cheese pieces that can crack.
- Chill the Cheese: If your cheese is too soft and difficult to cut, pop it in the fridge for about 15 minutes to firm up. Chilled cheese is easier to work with and holds its shape better.
- Grease the Cutter: If the cheese is sticking to the cutter, lightly coat the inside of the cutter with a bit of oil or melted fat.
- Experiment with Different Cheeses: While firmer cheeses like cheddar or gouda work best, you can experiment with other types.
Storage Tips
- Refrigerate the shaped cheese in an airtight container or cover it with plastic wrap to keep it from drying out. Cheese shapes will stay fresh for up to around 5 days, depending on the cheese.
- When stacking cheese shapes, use wax or parchment paper between layers to keep them from sticking.
- Avoid freezing the shaped cheese, as the texture can change when thawed.
Serving Ideas
- Cheese Boards: Arrange shaped cheeses alongside fruits, nuts, and cured meats for a beautiful cheese platter.
- Salads: Add playful shapes to your salads.
- Kids’ Snacks: Make lunchtime more exciting for kids by serving their favorite cheese in fun shapes like animals or letters.
- Appetizers: Serve cheese shapes with crackers or bread for an eye-catching appetizer.