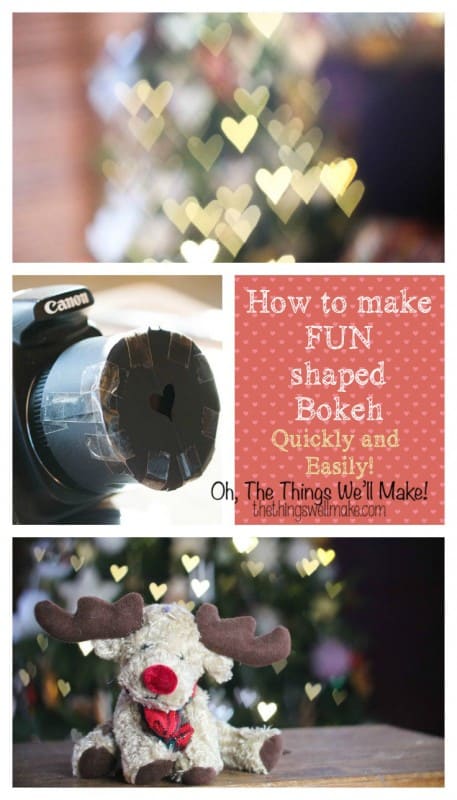
Playing with Fun Shaped Bokeh
As I was taking down my Christmas tree, I couldn’t help but take advantage of having the lights up one last time to play with fun shaped bokeh.
What is bokeh, you ask?
Basically, it’s the pretty blurry areas that are made by your camera lens.
Depending on which lens you use, and how you use it, you can control the depth of field of your photo, meaning that more or less of your photo is in focus while the rest is blurred. This is great for blurring a background so that your object of focus really stands out. That’s one of the reasons that I almost always use the aperture dependent setting on my camera.
For newbie photographers, let me try to make the idea a bit clearer and explain the basics of aperture and depth of field.
The aperture refers to the opening which affects the amount of light that is being allowed to hit the film or sensor of your camera when taking a picture. It is controlled by the diaphragm of your lens, and is written as the f-stops of your lens.
To achieve a blurred background, you want to use a wider aperture, which is written as a smaller f-stop number, giving you a narrower depth of field. At this setting, more light reaches your camera sensor, so you are also able to take pictures in lower light settings when using a wider aperture.
One of the common lenses used amongst food bloggers is a fixed 50mm lens. One of the better ones is the f/1.4 lens, which means that the maximum aperture for that lens is at the 1.4 f-stop. A cheaper alternative to that lens is the 50mm f/1.8, meaning that 1.8 is the maximum aperture for that lens. The 1.4 is a wider aperture than 1.8. Make sense?
Either of those lenses are great for playing with bokeh.
When used at the maximum aperture, you will have the narrowest depth of field, meaning that less of your photo will be in focus and more will be blurred.
Why would you want a blurry picture?
Having the ability to blur parts of the photo give you the control to highlight other parts of your photo by bringing them into sharp focus, making them stand out from the blurry parts.
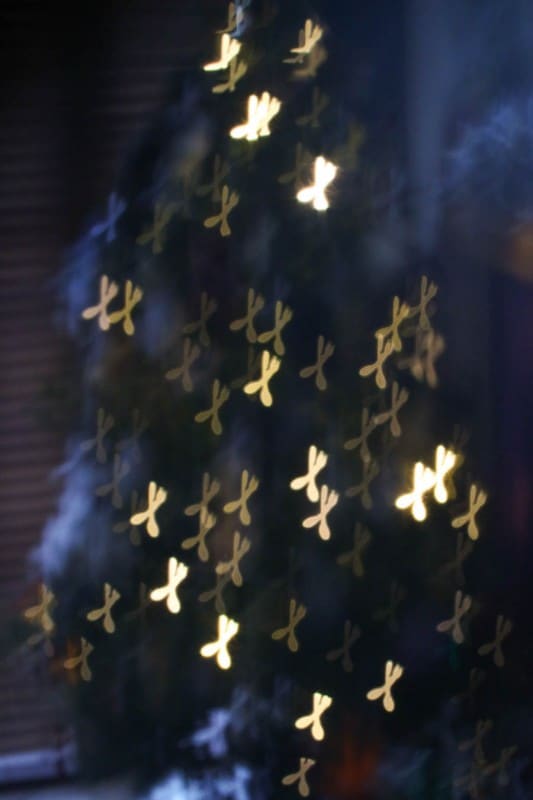
Playing with the amount of bokeh for different subjects, can give you different and fun effects. This is particuarly true when you are taking pictures of lights, and is especially fun when you are photographing lots of small lights like Christmas tree lights.

The shape of the bokeh is usually round because it is dependent upon the shape through which you are taking your photograph. Without adding anything to your lens to create a custom shape, the shape of your bokeh will be dependent upon the shape made by the diaphragm of your lens. More expensive lenses tend to have more blades in the diaphragm, meaning that the shape is more circular as it opens and closes. Cheaper lenses tend to have less blades in the diaphragm, meaning that the resulting shape is less smoothly circular.
In any case, when making custom booked shapes, that won’t really matter because we will be controlling the shape that the camera shoots through by placing a filter with a cutout shape over our lens.
The easiest way to make fun shaped bokeh…

The easiest way to do it is to just go out and buy a bokeh kit like this one:
I personally haven’t tried a kit like that because I probably don’t use bokeh shapes enough to warrant buying the kit, but it is an inexpensive kit if you do want to play with it. Sometimes, though, you want to make a custom shape bokeh that isn’t in the kit.
So, I give you…
The DIY way
Perhaps this takes a little longer to use, but it is really quick and easy, especially if you have craft punches in the shape you want to use, or, better yet, have a cutting machine like the Silhouette Cameo, that I have and love!
Even if you don’t have either of those things, though, you can easily make certain shapes like a heart with only a pair of scissors, or more complex shapes with an x-acto knife and a steady hand!

To make my heart shape, I measured out the size of my lens, and cut a circle of black construction paper in that size. Once I had my circle cut out, I folded it in half, and cut out a half heart shape. I opened up the circle, and I had my first heart shaped template ready.
For my logo template, I used my Silhouette Cameo to cut out my logo from a circle of construction paper.
There are two ways you can use your templates.
1. The “Tape-on” method
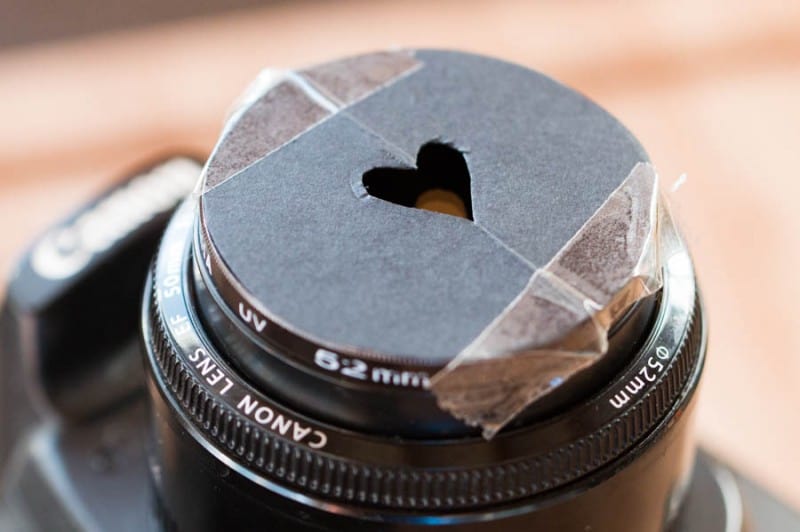
Tape the circle directly to the end of your lens, trying to cover up the edges in such a way that light only reaches the camera through your shape cutout.
This is the quickest way of doing it, but it can be inconvenient if you are flipping your camera from landscape to portrait mode because your shape will also flip with your camera.
The other problem with this method is that you risk leaving an adhesive residue on your lens. If you have an old lens like mine, you probably don’t mind taking the risk, but if you have a nice lens, perhaps you’s like to try the second method.
2. The Construction Paper Tube Method
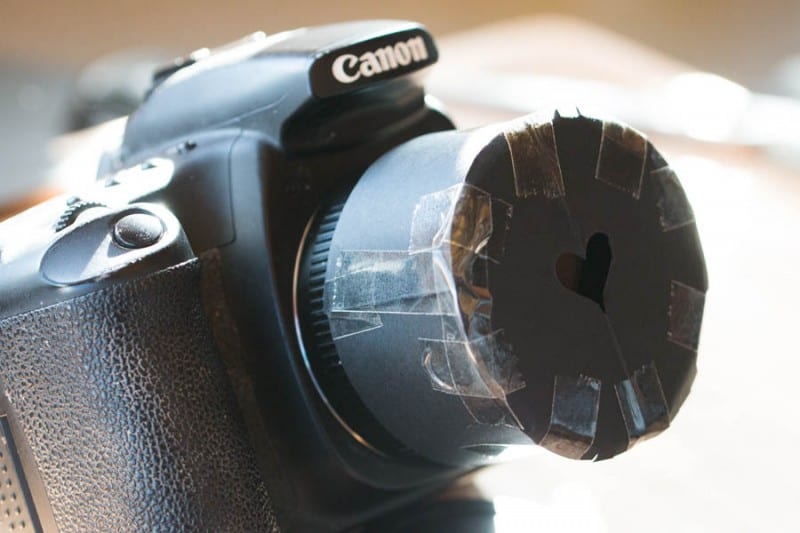
2. This only takes a minute or two more to make, and is probably more convenient in the long run.
Take a strip of black construction paper and roll it into a tube around your lens. Tape it closed into the tube shape. Now, cut a construction paper circle out in the diameter of the tube that you just made. Tape the circle to the tube of black paper. If you use a more opaque tape, it is easier to keep extra light from coming in through the sides. I obviously just used what I had on hand. (Do as I say, not as I do!) 🙂
To use this sort of template, just slip the tube over your lens. Depending upon how big you made it, it should stay in place, but if not, make sure to hold it steady. With this sort of bokeh template, you can easily switch from landscape to portrait view by rotating your shape as needed. Plus, you can quickly change templates to make different shaped bokeh in the same setting without wasting time taping a new template in place.
Taking pictures with bokeh shapes
Once you have your template in place, you can start playing with the effects. To get the biggest shapes, you want the largest aperture, and you want to blur your sources of light.

Depending upon how much you blur things, your bokeh will be bigger or smaller. On the left, my tree is almost in focus, but on the right, the picture is very blurred, creating bigger hearts. Keep playing with the amount of blur to achieve the effect you like the most.
If you use the autofocus feature on your lens, you’ll have a hard time getting the effect to work. I recommend using manual focus so that you can keep adjusting the size of your bokeh. Remember that when your light source is completely in focus, you won’t be able to see any bokeh shapes at all!

You don’t need to use Christmas lights like I did. Anything that reflects light back at your camera will work.
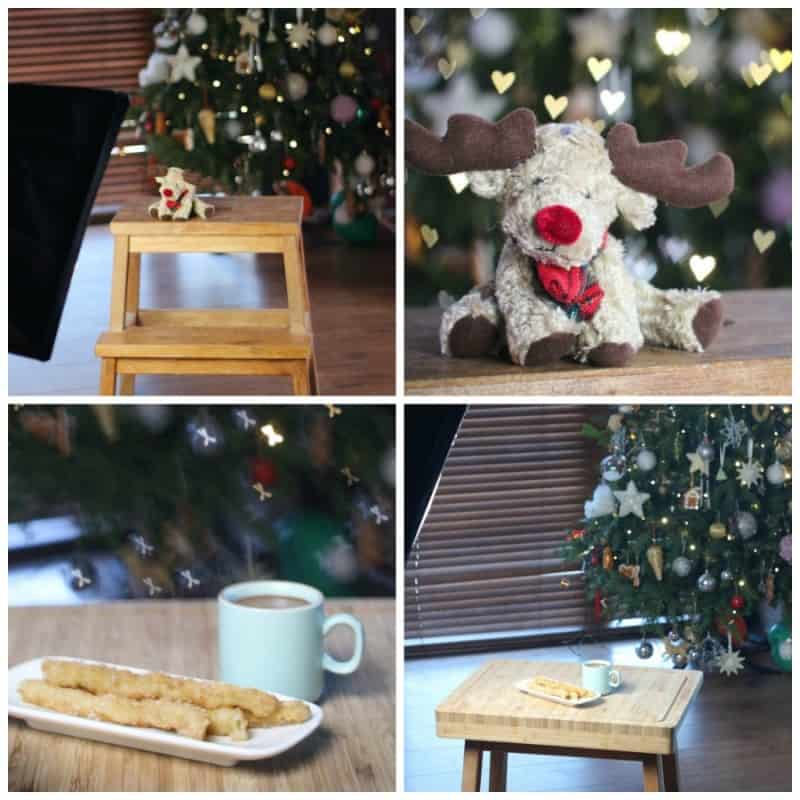
Here you can see how I got heart shaped bokeh from a reflection coming off the top of my refrigerator handle, the light shining through my blinds, and from a reflection coming off my ladel and spoon in the kitchen. Tiny light sources like Christmas tree lights tend to give the best effect, though.
While it is fun to just take pictures of light sources to make abstract bokeh art, it can also be fun to use the bokeh as a background to your photos.
If you focus on a subject in front of you and let your light sources blur in the background, you will end up with a fun shaped bokeh background.
I just shot a couple of quick examples using what I had on hand. My churros picture could have been greatly improved if I had placed the plate closer to the far edge of my cutting board, and if I had changed the perspective a little bit. I was hungry, though!! 😉
You still get the idea, right?
Imagine using this effect for taking beautiful Christmas card or Valentine’s Day photos:
Think Christmas photo card with a picture of your family and snowflake shaped lights behind you…
Or how about a Valentine’s day card with a picture of you and heart shaped lights behind you!
The possibilities are endless!
This is really a fun project for those who like to dabble with photography. I hope that you try this out, and let me know how it goes!