

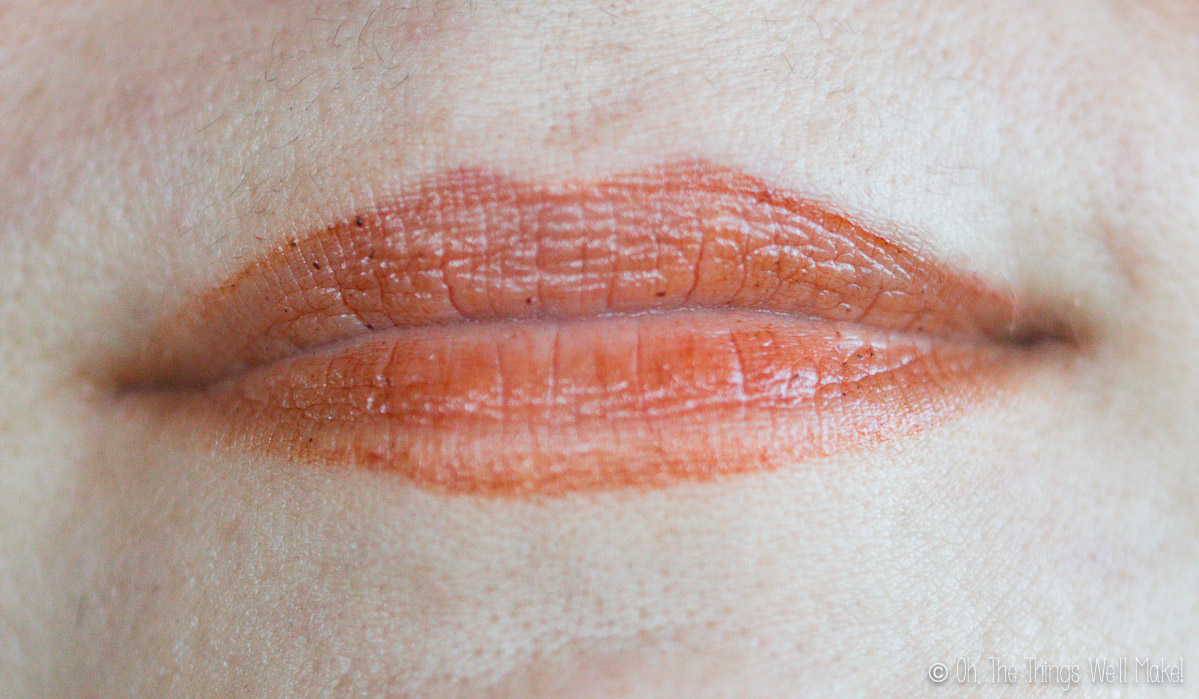
DIY Homemade Healing Lip Balm
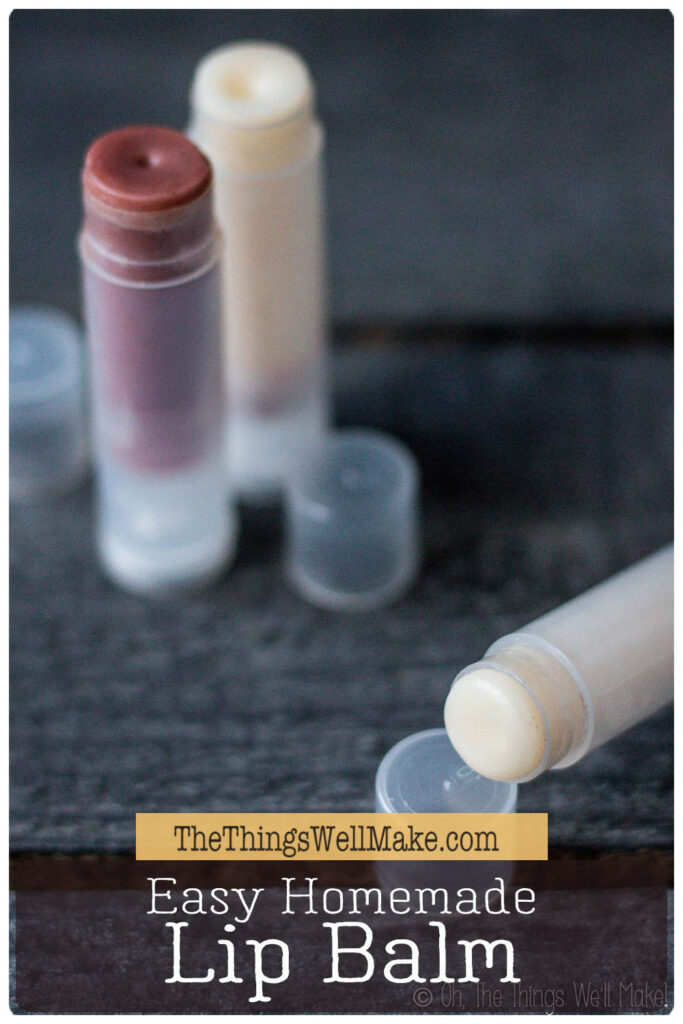
Soft and soothing, this easy, homemade lip balm can be whipped up in just a few minutes and will help support the healing of chapped lips and skin.
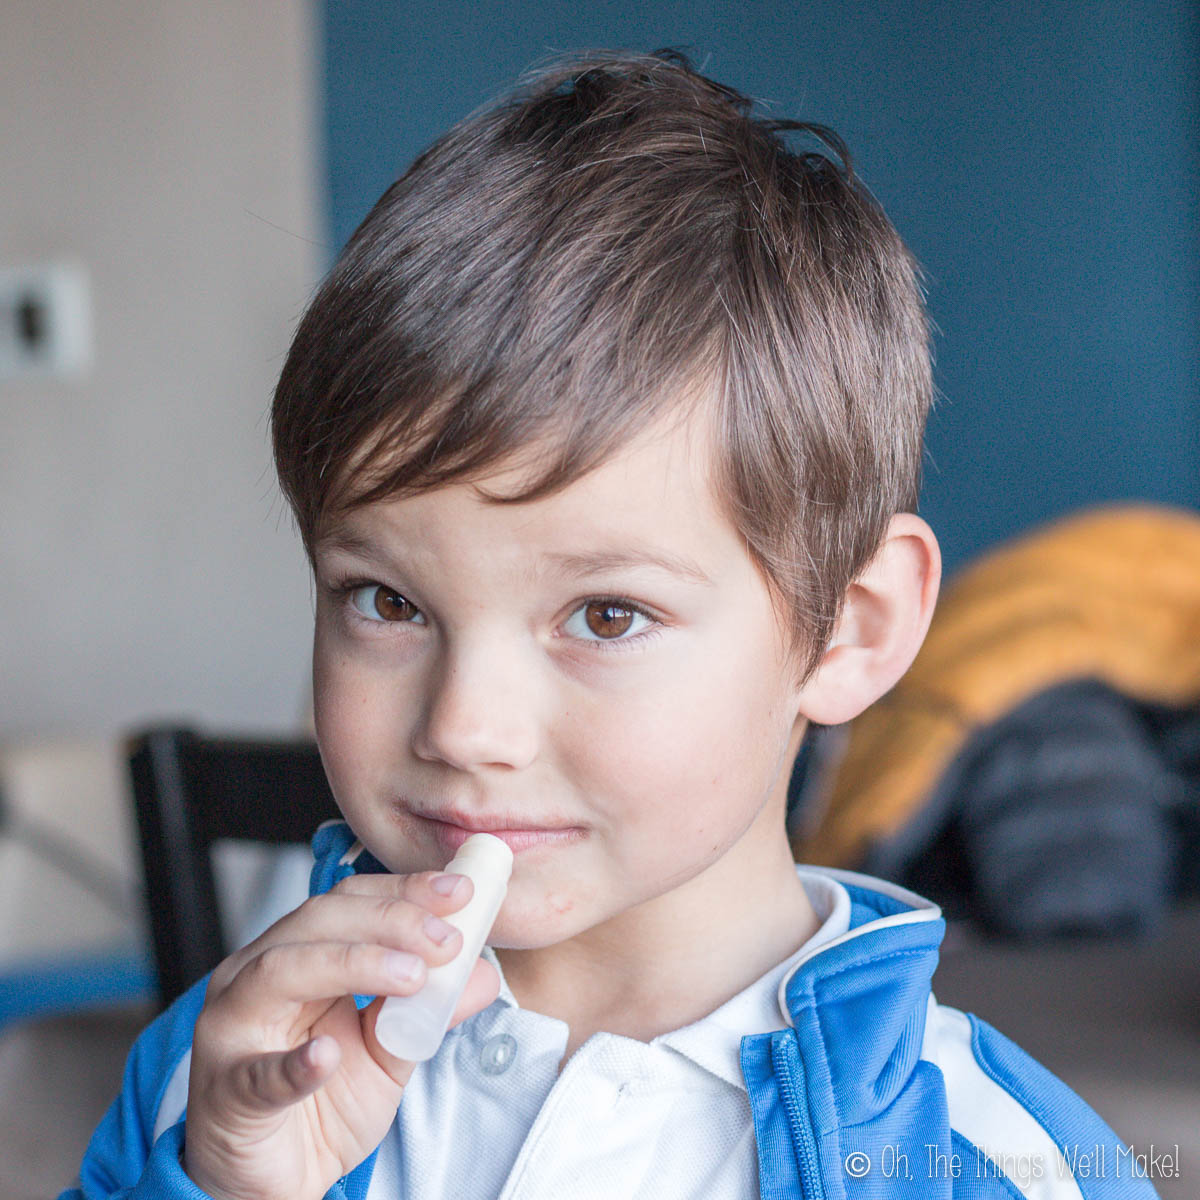
Lately, the cold harsh weather is exacerbating my son’s sensitive skin. Having atopic dermatitis, he’s very prone to rashes and dry, flaky skin. One of his most sensitive areas, though, is the area around his mouth.
When we visited his dermatologist, we learned that the rashes could be exacerbated by certain foods. Within a few hours after eating them, he developed a rash around his mouth. While he can now eat most foods without issues, in the winter, the rash around his mouth forms no matter what he eats. It’s a sign that the cold, dry weather is taking its toll.
No matter what the cause for dryness of the lips and surrounding areas, this homemade lip balm will help soothe irritated skin. I purposely formulated the lip balm so that it would be soft enough to easily rub over the most sensitive areas without causing pain.
This time of year, homemade lip balm also makes a great gift or stocking stuffer!
Ingredients
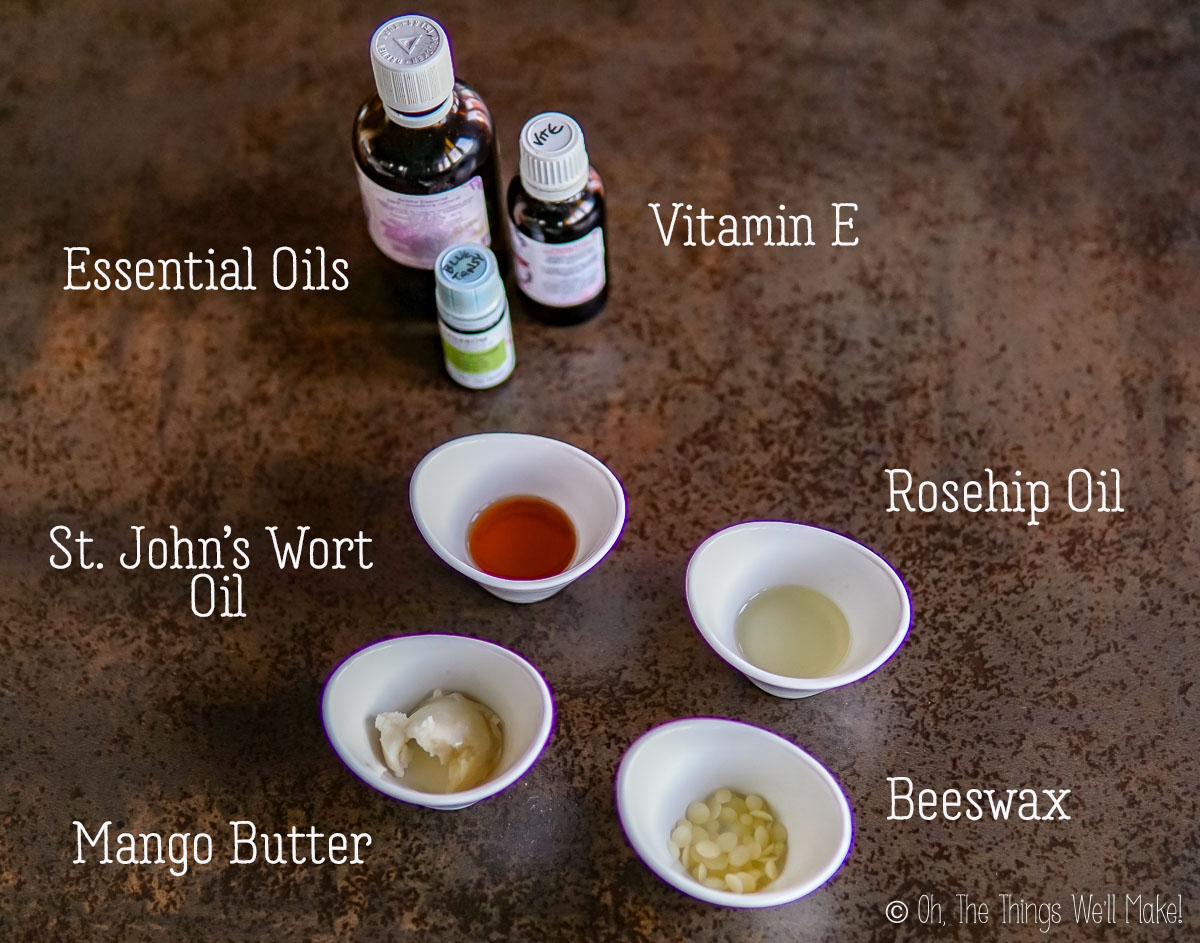
The main ingredients for this DIY lip balm include liquid oil(s), a butter, and a wax to help solidify the lip balm. Apart from that, you can add essential oils for added scent and healing properties. Vitamin E oil is another great addition that helps prevent the rancidity of the oils and fats, prolonging the shelf life of the balm.
The liquid oils
For the liquid oils, you can use whatever you have on hand, even common kitchen oils like olive oil or coconut oil work well. When I first published this recipe, I used sweet almond oil and jojoba oil for the liquid oils in the recipe. This year, I opted for a combination of St. John’s Wort oil and rosehip oil as they each have beneficial healing qualities.
The butter
Adding a butter helps give a creamier sensation to the balm so that it glides on. I chose to use mango butter for several reasons. My son hates the scent of cocoa butter and shea butter. Both of them, when bought unrefined, can have an overpowering scent and flavor. (If you’d like to avoid that, choose refined varieties.)
Rich in antioxidants, mango butter is soft and has a smooth and creamy texture that I prefer over shea butter or cocoa butter. In reality, you could even just rub pure mango butter over your lips and/or irritated skin in a pinch.
Apart from being nourishing and hydrating, mango butter can help support the healing process of rashes, eczema, sunburn, insect bites, and even frostburn. It’s not greasy and is easily absorbed by lips and skin. It also helps prevent wrinkles and sun damage, meaning that it’s a great addition to lip balms year round!
If you’d like to harden the lip balm slightly, you could also add a small amount of cocoa butter to the recipe, adjusting the recipe, as needed, to get the desired texture.
The wax
A wax is used in this recipe to solidify the product. I used beeswax pellets, but you could also try using candelilla wax if you want to make a vegan lip balm. Other waxes may also be used, but you may have to adjust the amount to get the desired texture.
Choosing essential oils
A benefit of making your own lip balm is that you can choose which essential oils to use or not use any at all. The essential oils will add a fragrance, may help aid the healing process, and some can even add a touch of color. If you are sensitive to certain oils, you can avoid them.
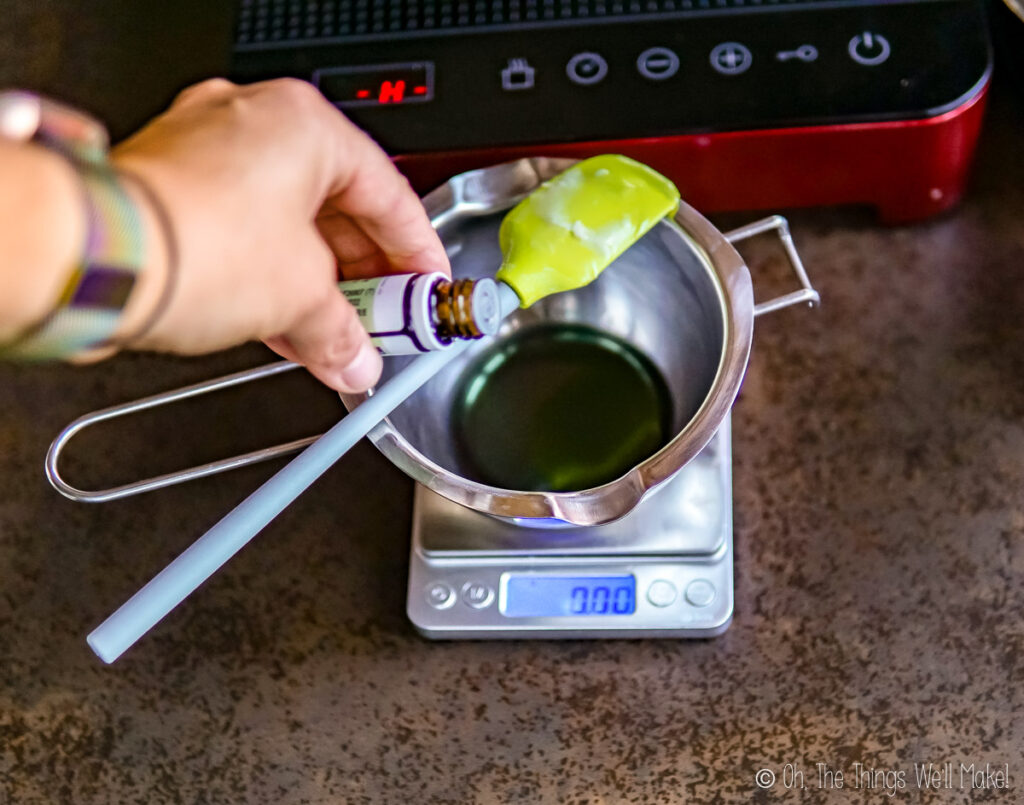
When adding essential oils, keep the dosage to around 2% of the recipe, or less, by weight.
When I first published this recipe, I used a combination of lime and lavender essential oils because both lavender and citrus oils may aid in healing chapped skin and minor cuts and scratches. I would normally use lemon or sweet orange oil, but I wanted to try out my new bottle of lime essential oil. While the combination might sound a bit strange, we both liked it. Plus, both oils are relatively safe oils for a child of my son’s age at the time.
This year, I used lavender again but combined it with blue tansy oil and chamomile oil as both are also known to help aid healing. Blue tansy is a blue-colored oil that will turn the lip balm a light shade of blue. I haven’t found it to stain the lips, though, at the dilution used for this recipe.
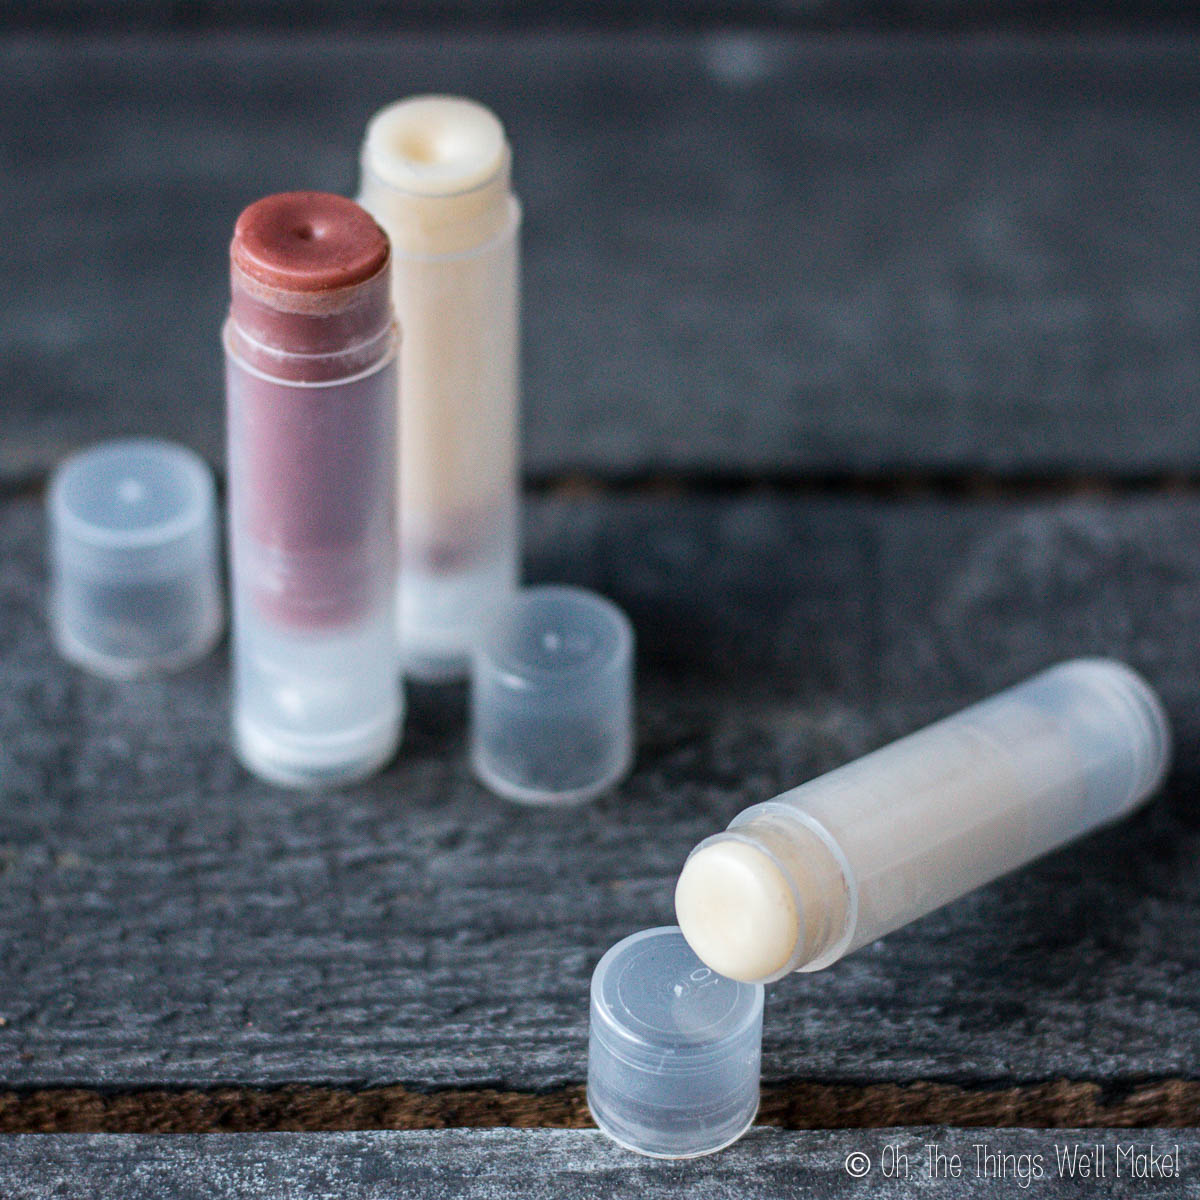
In the photos, you’ll see that I also photographed a pink-colored chocolate peppermint lip balm that I made for myself using cocoa powder and peppermint essential oil (see notes on coloring below). Peppermint essential oil gives a cooling sensation to lip balms which I happen to love. Some people, though, may find peppermint oil to be irritating to their skin and lips!
The following cold-pressed oils can cause photosensitivity, meaning that they can make the skin more sensitive to sunlight or ultraviolet (UV) radiation. This increased sensitivity can lead to a greater risk of sunburn, skin irritation, or discoloration when the skin is exposed to sunlight or UV rays after applying or using the essential oil.: (Use distilled instead to avoid issues.)
- Bergamot
- Lemon
- Lime
- Bitter orange
- Grapefruit (Distilled may also cause photosensitivity.)
Apart from the citrus oils, some other oils, like petitgrain, marigold, lemongrass, and verbena, among others, may also cause photosensitivity.
Vitamin E
Vitamin E (tocopherol) is an antioxidant that can help extend the shelf life of your lip balm when used at around 0.5% of the recipe by weight. Antioxidants help protect against free radicals which can damage cell membranes.
Because this recipe uses such small amounts of ingredients, you’ll probably need to aim to use around a drop of vitamin E as it’s generally thick and difficult to dose.
Can you add honey?
I’ve often seen people suggest using raw honey in homemade lip balms, but I suggest that you don’t use it. Honey, while self-preserving on its own, can make other products more difficult to preserve. Because it’s a water-based product, it won’t combine well with the other ingredients and will eventually separate from them.
If you want to add water-based ingredients, you’d need to use some sort of emulsifying wax, and you’d also need to add a cosmetic preservative. For more information, see my guide to natural preservatives and my emulsifier guide.
Can you add d-pathenol?
D-panthenol is a form of vitamin B5 that can help draw moisture into the skin. It’s known to help with wound healing, skin regeneration, and cell renewal. It also helps relieve dryness and capping. If you’ve been following it for a while, you’ll know that I often add it to many of my homemade skin and hair products.
Like with honey, d-panthenol is water-soluble. By adding moisture, albeit a very tiny amount, to the final product, you are making it more prone to microbial growth. After a bit of investigation, I found a recipe online from a Spanish natural products company that uses d-panthenol. While they do sell natural preservatives, they didn’t recommend one for their recipe. While my gut feeling is that a drop or two of d-panthenol won’t add enough moisture to warrant needing a preservative (or even an emulsifier), I have never done a microbial test on a lip balm made with d-panthenol.
If you do decide to try to incorporate d-panthenol, don’t go overboard with it. Stick to only using a drop or two to avoid separation and microbial growth.
Natural colorants for homemade lip balms
Eventually, I should write a post just focusing on natural colorants that can be added to homemade makeup. I once experimented with making lip balms with a wide variety of powders. I tried using everything from fruit powders (like dried strawberry and raspberry powder) to beetroot powder, etc.
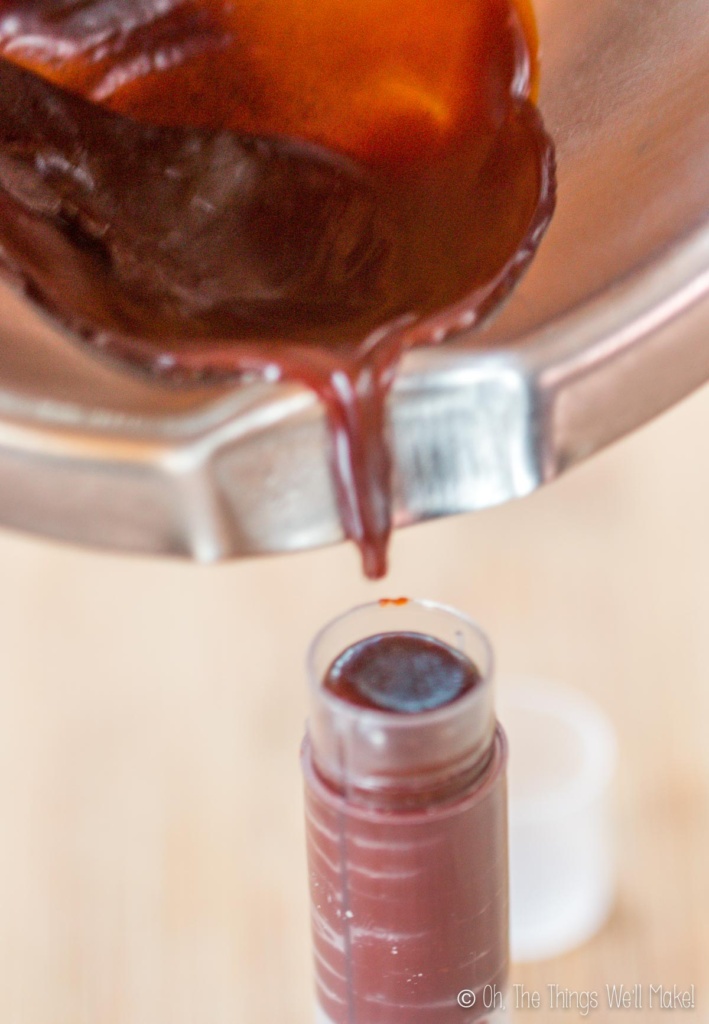
Most fruit and vegetable powders don’t work well for coloring an oil-based product like this one. I was able to find two natural colorants that work amazingly well in this type of recipe: alkanet root and annatto powder (which is made by grinding the seeds of the achiote tree).
Annatto (achiote) is an orange-colored seed often used as a spice/natural food coloring in Latin American foods. Because it is oil-soluble, it easily disperses into the rest of the ingredients and works well to color lip balms and other cosmetics.

Alkanet is an herb whose root gives more of a burgundy red color. The colored lip balm in the pictures used a mixture of finely ground alkanet root powder and a touch of cocoa powder.
You can read more about how I used both in my non-comedogenic blush stick experiments. To get a more even color, it’s important to grind the powder as finely as possible and mix it well with the other ingredients.
Iron oxides and micas can also be added to your lip balms to add color. I used both in my homemade costume makeup!
Optional flavor
To add some flavor to your lip balm, there are several options. Essential oils like peppermint or clove are great for adding flavor. Cocoa powder and/or cocoa butter can also add a mild chocolate flavor. If you prefer vanilla, try a vanilla oil or a non-alcoholic vanilla extract. (Follow the link to see how to make your own!)
Measuring the ingredients
While I normally prefer weighing out the ingredients for my homemade products, this recipe doesn’t need to be as precise as a product that needs preservatives. The recipe is quite forgiving and can easily be modified, as needed, if it doesn’t come out exactly as you wanted.
If you choose to weigh out the ingredients, jeweler’s scales are the best choice for small recipes like this one. The benefit of using a scale is that it is easier to dose the essential oils properly (keeping them under 2% of the recipe by weight).
If not using a scale (and using measuring spoons instead), err on the side of caution when adding essential oils. Only add a few drops of essential oils to ensure not adding too much.
Procedure
Making the lip balm couldn’t be simpler!
First, combine the wax, mango butter, and oils in a small pot or double boiler insert. If using the double boiler insert, add some water to a small pot and heat it over medium heat on the stove until the water simmers. Place the double boiler insert over the simmering water (lowering the temperature as needed), gently heating the ingredients until they melt.
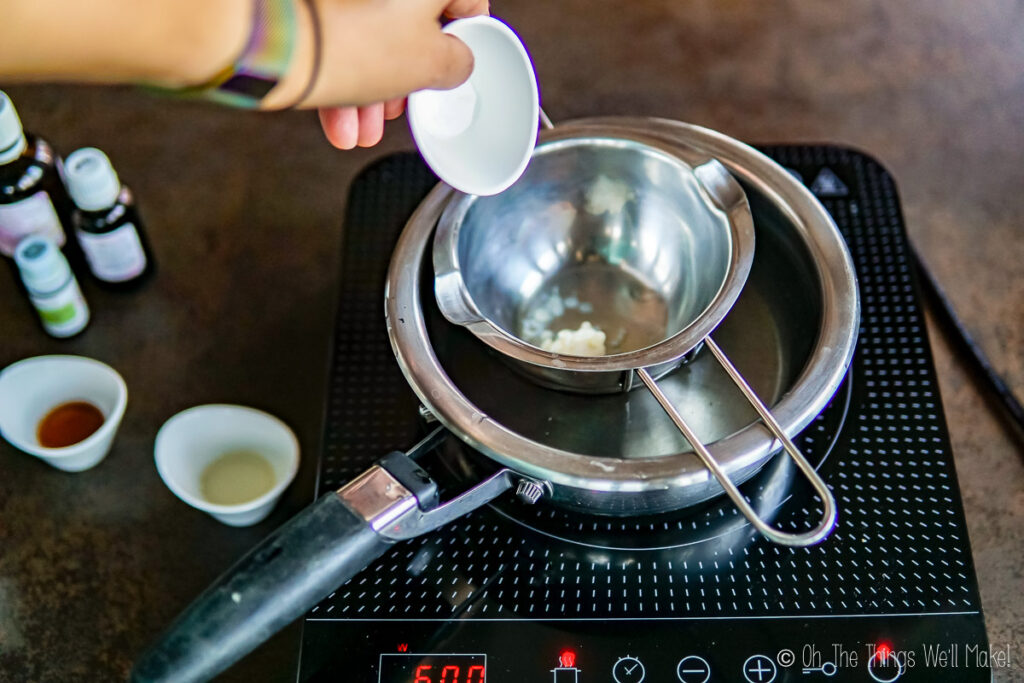
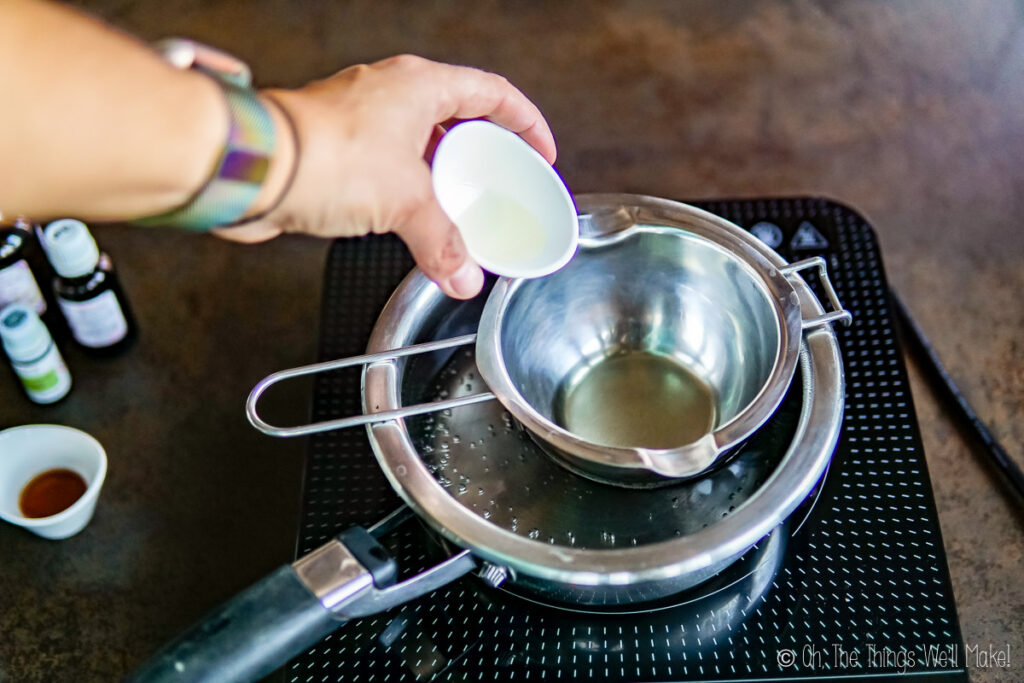
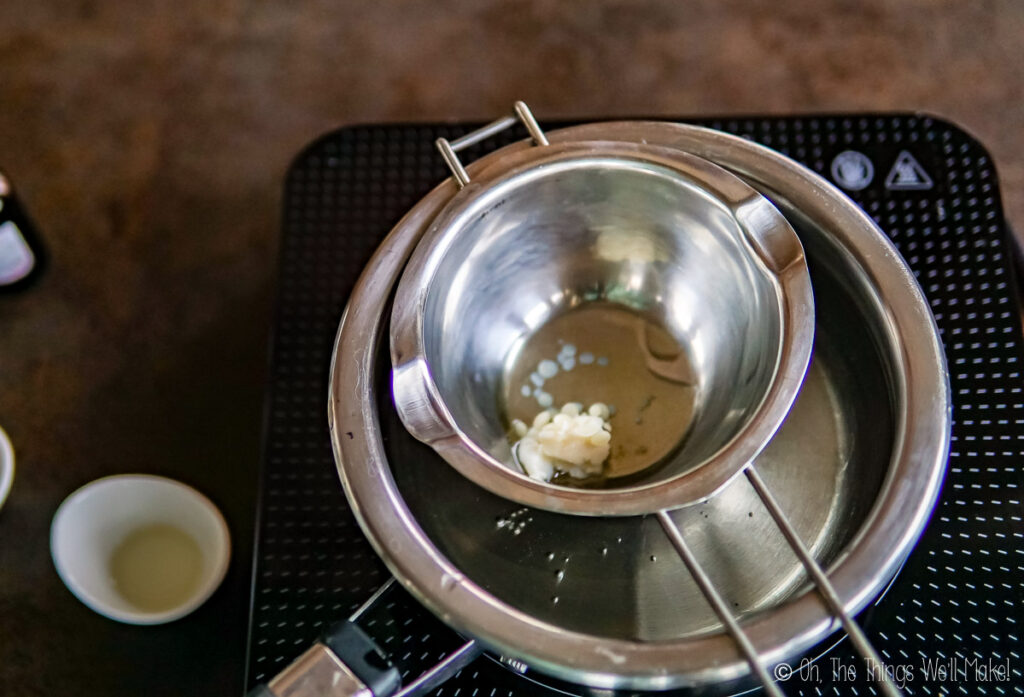
If melting the ingredients directly in a small pot or pan, use low heat. (While I haven’t done it personally, melting the ingredients in a glass bowl in the microwave should also work well.)
Once the wax and butter have fully melted, stir together all of the ingredients and remove them from the heat source. Add in any heat-sensitive ingredients like essential oils and vitamins and combine them well. Work quickly so that the mixture doesn’t solidify.
Pour the mixture into lip balm tubes while liquid and allow them to cool uncovered until solid. If the mixture begins to solidify while you are trying to pour the mixture into the tubes, gently warm the mixture, just until melted, to finish the process.

If you are avoiding using plastic, look for cardboard tubes or consider using metal tins like I did with my solid perfume. (When using a tin, you’d need to apply the balm with your finger.)
Adjusting the recipe
As I stated earlier, I formulated this lip balm to be on the softer side so that it glides on easily. If you aren’t happy with the consistency, you can remelt it and adjust the recipe as needed. For a more solid balm, try adding more wax or some cocoa butter. (In future batches, you could also reduce the amount of liquid oil used.)
For an even softer balm, increase the amount of liquid oil. (In future batches, you could decrease the amount of wax used instead.)
Video

DIY Homemade Lip Balm
Materials
- 8.5 grams sweet almond oil
- 2.5 grams jojoba oil
- 5.5 grams mango butter
- 4 grams beeswax I use pastilles for easy measuring.
- 0.5 grams essential oil (See suggestions in notes below.)
- 0.1 grams vitamin E
Instructions
- Measure out the almond oil, jojoba oil, mango butter, and beeswax pastilles over a double boiler, heating gently while stirring until the beeswax and mango butter have melted and are fully mixed with the oils.
- Remove the mixture from the heat source. Optionally add an essential oil (or a combination of several oils) and vitamin E.
- Whisk together all of the ingredients, and then pour the mixture into empty chapstick containers or small aluminum tins. Use a rubber spatula to help remove all of the mixture. (You may need to reheat it to melt it enough to remove it.)
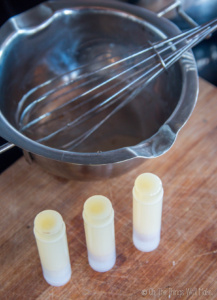
- Allow the balms to cool completely and fully set before using. (Speed up the cooling time by placing the balms in the fridge or freezer.)
Notes
New recipe
Yield: 3 tubes- 4.4 grams St. John’s Wort oil (1 teaspoon)
- 4.4 grams Rosehip oil (1 teaspoon)
- 5.6 grams mango butter (1 teaspoon)
- 2 grams beeswax (one half teaspoon)
Essential oils that support healing
- Lavender
- Frankincense
- Peppermint (gives cooling, numbing sensation if concentration is too high)
- Tea tree oil
- Chamomile
- Artemesia
- Blue Tansy (will turn balm a light blue color)
- Bergamot
- Lemon
- Lime
- Bitter orange
- Grapefruit (Distilled may also cause photosensitivity.)
This post was originally published on February 15, 2017. It was republished with new information, a new recipe, new photos and updated video.


Hi !
Thankyou for recipe etc! I just started making lip balms .. quick question is their an ingredient thats better to prevent quick absorption? ( after a few minutes upon applying my lips became dry .. like something not to “greasy” but not to hard ..? Im thinking the Mango or Shea butter is best for this? any suggestions would be great .. Thankyou!
Hi Nicky,
Yes, the butters are a bit slower absorbing than the oils. The wax is what really helps prevent the absorption and also helps to provide a more occlusive barrier that helps keep the balm in place and moisture inside. That said, adding too much wax can make the balm too hard, making it more difficult to apply. That said, I purposely made this recipe on the softer side because my son is so sensitive. He prefers the balm to glide on easily. You could definitely increase the amount of wax very slightly. It’s all about playing with the ratio of liquid oils, butter, and waxes until you find the consistency that best appeals to you.
Hello,
I just discovered this site, and i love it! Can you tell me the shelf life of this lip balm?
Hello,
Thank you! I’m so happy you do. 🙂
Because the lip balm doesn’t have any water-based ingredients, it should keep as long as the ingredients on their own would. So, if you’re using a generally fresh oil as the base of the lip balm, you can use the best-before-date on that oil as a guideline for how long the balm will keep. (The waxes tend to have even longer shelf lives, and, if anything, will only extend, rather than shorten, the shelf life.
I hope that helps!
Hello! Any ideas for making this without mango lor any other fatty butter? I want to make this today and have none on hand.
Thank you!
Hi Em,
We were already talking on Facebook, but I’ll answer here anyway for anybody who is interested in the response. You can make a lip balm with only wax and oil (at around a 1:1 ratio, probably with slightly more oil so that it glides on more easily). That said, it won’t have the same feel and won’t glide on as smoothly as this lip balm. I really love mango butter because it’s very smooth and soothing.
You could also use shea butter, but it tends to go grainy more easily and is also slightly harder than mango butter, so keep that in mind.
Hi!
My lip balm becomes a bit hard after a few days of making it. I haven’t tried Mango Butter yet, but have use Shea or Cocoa butter.
Do you think it’s the mango butter that’ll keep my lip balm soft enough to use through the winter? (Not super cold/harsh winter)
I gave it to some friends as gifts and they told me it’s become a bit hard to apply…
Please help.
Hello!
Cocoa butter is very hard. To Soften something made with cocoa butter, you’ll want to add in more liquid oils or a softer butter, or use less wax.
She butter is somewhat in the middle. It’s definitely softer than cocoa butter. Again, to make it softer, use less wax or more liquid oils to accompany it.
Mando butter is the softest of the 3.
My recipe is on the soft side. I purposely made it that way to apply to a child’s sensitive skin when he was having issues. Some people find it too soft for their liking and can add more wax.
This is the second time I’ve read mango butter as a lip balm ingredient. I’m so intrigued by the benefits of it instead of shea butter!
Hi Jennifer,
Yes, I bought it just to try it out, and I have to say that I like the texture better. I like and use shea butter for a lot of things too, but it can be a bit finicky and can get grainy when melted and cooled. That’s especially bothersome in a lip balm recipe. Mango butter can do the same, but not as much. I find the texture much smoother and loves how it glides right on. Give it a try! 🙂
Can I replace mango butter with Shea butter?
Hello. Made this and love it. My question is… after a couple of minutes it turns my lips white. I’m i doing something wrong? Could it be the bee’s wax? Thanks
Hi Janice,
That’s interesting. Ours doesn’t do that.
Are you using a white beeswax? (My beeswax beads are naturally golden colored, but I know they do sell white beeswax- which I’ve never tried.)
Did you add any coloring agents?
Hi! Sorry to bring up an old post, but I just tried this and when I poured it in my Chapstick container it all just poured right out the bottom 🙁 I tried 4 different brands and they all did it. What am I missing????
Thank you!
Hi Jaime,
I’m sorry you’re having that problem.
I’m not sure. I’ve used several different containers and never had that problem. Are you re-using commercial Chapstick containers? They may be made differently.
I buy containers made for DIY lip balms. I can pour water into them without it leaking; they’re normally made for filling with liquids.
The only thing I can think to try is to let it start to cool and get a bit thicker before pouring the mixture to help prevent the leaking.
I just saw your comment regarding the chapstick tubes. The tubes need to be locked in place first. Wind it all the way down until it locks or stops. That should tighten the bottem so it doesn’t spill out. I did this with some very cheap tubes and it did the trick. I hope this helps.
~ D’Anna
Hi D’Anna,
Thanks so much for the tip. That’s very helpful!
I think I’ve always instinctively done that, which may be why I’ve never had a problem, even with the cheap tubes. 🙂
Tried the recipe. I added a bit of castor oil for shine and swapped out the lavender & lime for a couple of drops of benzoin for the slightest vanilla scent.
It goes on very smooth, a little on the soft side but still works with the tube mechanisms.
My grandson is tolerating it well and at first blush, my husband (an avid chapstick user) likes it also. For me however, around 5 minutes or so after application, my lips are a bit dried out.
Any suggestions?
I yielded around 10 chapstick tubes with your measurements.
Theresa
Hi Theresa,
Castor oil is known to be a drying oil (Oh my! Autocorrect changed that to frying oil at first! hahahaha), so that could be part of the reason for the dryness. They often suggest that people with very oily skin wash with castor oil to help dry the skin a bit. Adding more liquid oil will also make the balm softer. If anything, you should substitute one liquid oil for another, but, of course, different oils and amounts will give different textures/properties. If you find it drying and soft, I’d add more mango butter, and maybe a few more wax pastilles. I did make it slightly soft on purpose because my son’s skin is so irritated right now that he was’t having a hard chapstick. That said, it still definitely holds its shape.
Another issue could be the measurement of the beeswax. Different pastilles of different sizes will yield different amounts when measured by volume. I made this recipe using teaspoons because it’s not a recipe that I thought would need to be super precise and so many people complain about not having a scale, but I’m thinking I’m going to have to update the recipe with weight amounts too for those who do have a scale.
I’ve been wanting to make another batch anyway because I keep misplacing the tubes, but I’m still waiting for my order of new empty tubes to arrive. It’s really been helping my son on the days I remember to put it on him. The days I realize I left it at home and don’t put it on him before he heads off to school, he comes back with really red skin all around his lips.
The weird thing is your yield. I ended up filling the 3 chapstick tubes I had, with a little leftover.
Oh no! I just noticed the problem with the yield! I must have used a capital T when typing which got converted into Tablespoons. I was using teaspoons! I truly apologize for the mixup in how many chapstick tubes the recipe yields, and have adjusted the recipe to fix it so that people don’t end up making 10 tubes each time! That said, because all of the main ingredients were using the same measurement, the overall mixture will be the same, you’d just end up with more of it.
I’ve emptied out tubes before to add more ingredients to change things I don’t like, so you can definitely rebatch it to make it suit your tastes if you don’t like the texture. I’d empty a couple of tubes and heat up the ingredients again, this time adding in more mango butter and maybe a touch of wax if you really want to harden it a bit more. I usually run the empty tubes through the dishwasher or clean them in a pan of very hot water. The mango butter is very moisturizing and the wax helps hold in moisture, so those ingredients should also help with the dryness you’re experiencing somewhat.
I hope that helps, and once again, I truly apologize for the yield amount mistake!
Well, my chapstick containers arrived today, and I just whipped up another batch.
I noticed something… I tend to not fill the oils exactly to the top of the container, and don’t worry about making sure I completely clean out the spoon each time, so I could be using a bit less oil than you, perhaps.
I weighed things as I made it this time and ended up using 8.5g almond oil, 2.5g jojoba oil, 5.5g mango butter, and 4g beeswax. I’m not quite sure why it was only 2.5g of jojoba oil as I also ran the numbers through online converters and found that a tsp. of jojoba oil usually weighs almost twice that?!?!, but I was weighing as I went along.
Now I want to make yet another batch. hahaha
This time I added the panthenol, and by scraping everything out of the bowl was able to get to 4 tubes. (The last one was only just over half full from pouring, but by using a spatula, I was able to fill it to the top!) 🙂
Anyway, I’m going to make the notes on the recipe so that people have an idea that if they want a harder balm to use a bit more wax. For my son, it’s really best like this, and I actually quite like the texture myself.
I wonder if you are having issues with one of the oils? Maybe you could switch out the jojoba for argan oil or another very hydrating oil?
Hi Tracy,
I will omit the castor oil next time around…I ended up ordering 150 empty tubes so ending up with 10 tubes of chapstick wasn’t too bad ?.
I should have made the connection with the T & tsp, or compared it to my recipe/yield but truth be told I get a little starry-eyed when going over your post. Have I mentioned that I think you’re the bee’s knees!
My husband had no issues with the slightly softer texture and it did not melt or leak; big plus since he keeps the tube in his pants pocket all day! ?
I will make another batch soon and and will play around with adding some color and such. Thanks for the weight measurements…my nerdy, type-A personality thanks you!
All the best,
Theresa
Thanks Theresa!
If you are planning on making the colored version, I would suggest adding more wax to it (I did!). That will help hold the color in place when you put it on.
I’m actually working on making natural lipsticks (and mascara, etc.) lately. I have made a few batches already, and am happy with what I have so far, but am still playing around to get things exactly as I like.
As for the mixup, I found the problem. I always make a point to double and triple check the recipes before posting, but the problem was in my notes. I jot things down quickly as I experiment the first time around. Sometimes I’m good about cleaning up my notes before moving onto another project, but other times I take a look and decide it’s all completely clear enough. In my notes for this recipe, I had only quickly jotted down 1 T, etc. So, a few weeks later when I went to write up the recipe (I always wait to use whatever it is for several weeks first, to make sure we all like it), I must have just assumed that I used a Tablespoon. Because it is such a small amount anyway, I didn’t question it at the time. Watching the video, though, I can totally confirm it was a teaspoon. I’m just happy that you caught it early on, and that you aren’t mad at me. I’m a perfectionist, at least when it comes to posting recipes, and I tend to beat myself up a lot over these things.
Another great post!
Simple, clean recipe with great pictures and detailed instructions!
Loved the video!
All the best from San Diego, California
Theresa
Thanks, Theresa!
It’s good to hear from you. I’m glad you liked it.
Have you seen the new lotion recipe? I’m really loving making my own lotions, creams, and conditioners lately!
I had a hard time finding good tutorials for beginners, so I had to buy a ton of materials and play with everything to figure it all out. I’ve made so many different things over the last weeks now. 🙂
Have you seen I just opened up a new Facebook group for chatting about how to make soaps, lotions, and other recipes? I’d love to see you there if you’re interested!
No matter what, have a great week.
I’ve been busy with sick kids and dreary weather. Hoping to get back into the swing of things soon since we enjoyed a few consecutive days of warmer weather and sunshine but alas, it is raining again as I’m writing this with high winds and and quite a chill in the air! Not to mention my grandson is coming down with another cold!
I definitely will head over to the fb page…you don’t even have to ask! I’m in!
I will look for your lotion post and looking forward to all the upcoming posts!
Also goes without saying that your son is quite the handsome little guy!
My little guy is still in his Wall E faze but have just discovered ‘Rusty Rivets’ (Robots & Dinosaurs…what’s not to love for a 3 year old?)
Have a great week yourself!
Theresa
Sorry to hear about the weather. It’s been a harsh winter here too!
Yesterday was the first warm day all year and I was so happy to see the sun shine again. Hopefully that’s a good sign that spring is finally coming!
Hope everybody feels better soon!
Oh, I just noticed your url. Is that your website? If it is, I’ll go head over and give your FB page a like. 😉
Awww… Thank you. Yes, that is the website along with the fb page.
Both are still works in progress but I think I corrected all the trailing, incomplete sentences…?
Trying my best to get it to look nice (no where near your level of expertise but at least I now have something to strive for!)
My son’s calling me over, but I’ll definitely stop by after dropping him off at school! Good luck with it, it looks really nice. 🙂
Tracy, what’s your FB group I would love to join
My email is (edited out) I would appreciate it greatly thank you.
Hi Tara,
I’d love to have you in there. I just sent an invite to your email address, but just in case, I’ll leave you the link here…
https://www.facebook.com/groups/968125513310515/
You can join through the link too!