• Skip to main content
  • Skip to header left navigation
  • Skip to header right navigation
  • Skip to site footer
es_ES EspaƱol
  • About
    • Meet Tracy!
    • Contact Me
    • Disclaimers & Disclosures
    • Terms and Conditions
    • Cookie Policy
    • Privacy Policy
  • Holidays
    • New Years Eve
    • Valentine’s Day
    • St. Patrick’s Day
    • Easter
    • Fourth of July
    • Halloween
    • Thanksgiving
    • Christmas
  • es_ES
Oh, The Things We'll Make!

Oh, The Things We'll Make!

Make it yourself so that you control the ingredients!

  • Recipes
    • Appetizers & Snacks
    • Soups & Salads
    • Breakfast
    • Lunch & Dinner
    • Desserts & Sweets
      • frozen treats
    • Breads & Wraps
    • MIY Pantry Basics
    • Condiments & Sauces
    • Beverages & Smoothies
    • Story Archives
  • Make it Yourself
    • Arts & Crafts
    • Face & Body
      • Cleansers, Soaps, & Gels
      • Deodorants
      • Hair
      • Skin Care
      • Oral Care
      • Baby & Toddler Care
    • Home & Garden
      • Cleaning & Laundry
      • Garden & Hens
    • Soap Making
    • Upcycling
  • About
    • Meet Tracy!
      • More About Me
    • Contact Me
    • Disclaimers & Disclosures
    • Cookie Policy
    • Privacy Policy
  • Recipes
    • Appetizers & Snacks
    • Soups & Salads
    • Beverages & Smoothies
    • Breakfast
    • Lunch & Dinner
    • Desserts & Sweets
      • frozen treats
    • Breads & Wraps
    • Condiments & Sauces
    • MIY Pantry Basics
    • Story Archives
  • Make it Yourself
    • Arts & Crafts
    • Natural Face & Body
      • Cleansers, Soaps, & Gels
      • Natural Skin Care
      • Natural Hair care
      • Oral Care
      • Deodorants
      • Baby & Toddler Care
    • Soap Making
    • Home & Garden
      • Cleaning & Laundry
      • Garden & Hens
    • Photography
    • Upcycling
  • Holidays
    • New Years Eve
    • Valentine’s Day
    • St. Patrick’s Day
    • Easter
    • Fourth of July
    • Halloween
    • Thanksgiving
    • Christmas
es_ES EspaƱol
An orange homemade trick-or-treat bag decorated with a Jack-o-lantern face.

DIY Trick or Treat Bag

Last Modified: May 12, 2021 // by Tracy Ariza, DDS // October 16, 2019 I may receive a commission if you purchase through links in this post. Learn more here.

es_ES EspaƱol

Jump to Tutorial Print Tutorial
Upcycle an old t-shirt into a DIY trick or treat bag in a matter of minutes and then let the kids help decorate it with homemade craft foam stamps. We decorated ours with ghosts and pumpkins on one side and a jack-o'-lantern on the other side using fabric paint. #halloween #trickortreat #halloweencrafts #jackolanterns #upcycle #fabricstamp

Upcycle an old t-shirt into a DIY trick or treat bag in a matter of minutes and then let the kids help decorate it with homemade craft foam stamps.

A homemade orange trick-or-treat fabric bag decorated with ghosts and bats laid on the left side in the dark with a small lighted red oil lamp on the other side.
Pin this post for later!

Halloween, here in Spain, wasn’t really a holiday, until recently. The real holiday was/is November 1, All Saints Day.

Each year, though, the stores bring in more Halloween merchandise and more Halloween themed events are planned all over town. You can buy everything from jack-o’-lantern type pumpkins ?to candy decorated for Halloween. Our town now hosts a yearly “Tunnel of Terror,” and many bars have also begun to hold Halloween parties complete with costume contests.

On the other hand, trick or treating hasn’t really caught on yet. A few neighborhoods plan together to allow the kids in their neighborhood to trick or treat at a few houses and enjoy the experience, but most kids don’t get that chance.

Luckily for me, my mother-in-law just happens to live in one of those special neighborhoods. 

When my son was only a month old, he had his first opportunity to go trick-or-treating. Of course, he was way too young to know what was going on. The neighbors, on the other hand, enjoyed having us parade him around to show off how cute he was in his lion costume. 

Any candy he received was promptly given away to the other kids. I appreciated him having the opportunity to experience something that I had always loved growing up; even if he didn’t really understand it yet.

In the following years, we missed the trick-or-treating experience. The kids in the neighborhood were growing up, so they didn’t start the activities until around 10 PM. (Things always seem to begin late here.) By that time, we had already gone home so that my young son could go to bed.

An orange homemade trick-or-treat bag decorated with a Jack-o-lantern face.

Because trick-or-treating isn’t really “a thing,” neither are trick-or-treat bags.

We could just use a pillowcase or any old bag, but that wouldn’t be as much fun!

Upcycling an old t-shirt

If you’ve been following my blog for a while, you know that I love to upcycle things whenever I can. It allows us to reduce waste and save a little money.

Making bags from t-shirts isn’t new to me either. Check out how I made all sorts of different shopping bags from t-shirts.

How to Make Shopping Bags from t-shirts

There are lots of ways to make a t-shirt into a bag or backpack. I’ll show you eight great ways to do it, and you don’t even need to know how to sew for some!
Check out this recipe
Photo collage of 6 bags showing several ways to make a t-shirt bag

You’ll need:

  • T-shirt
  • Scissors
  • Ribbon or Cord
  • Safety Pin

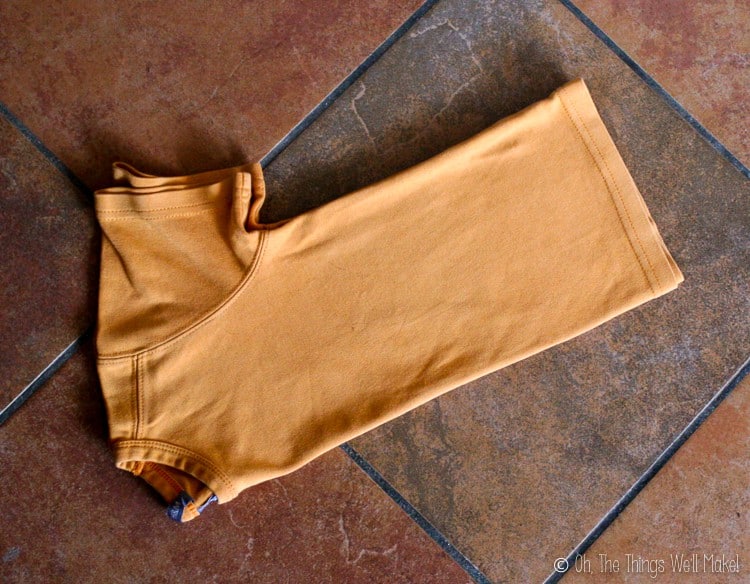
Choosing the t-shirt

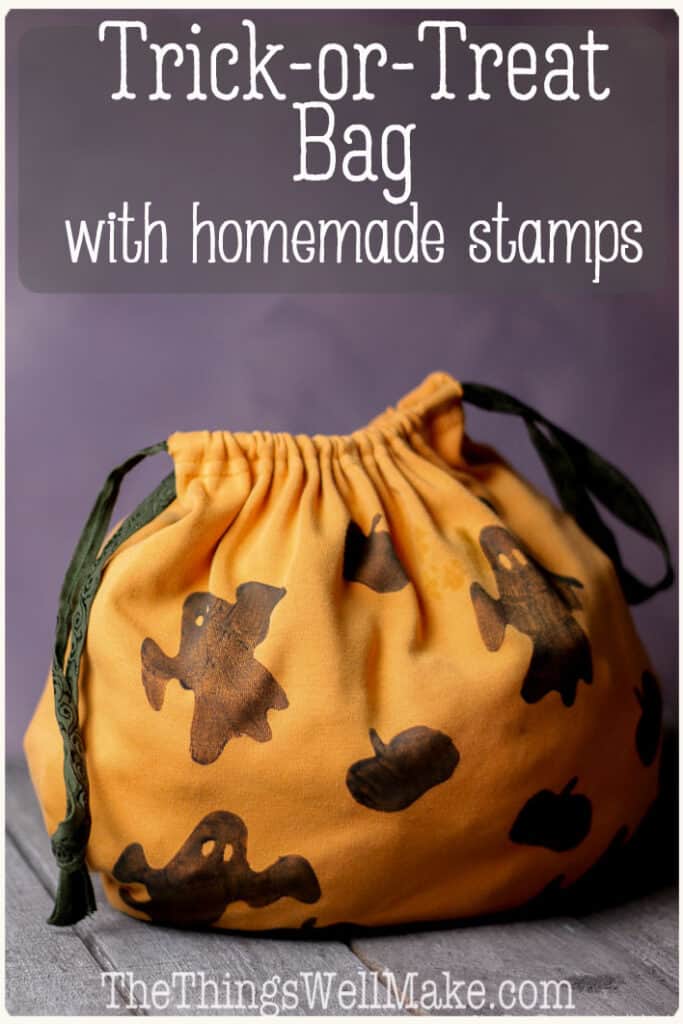
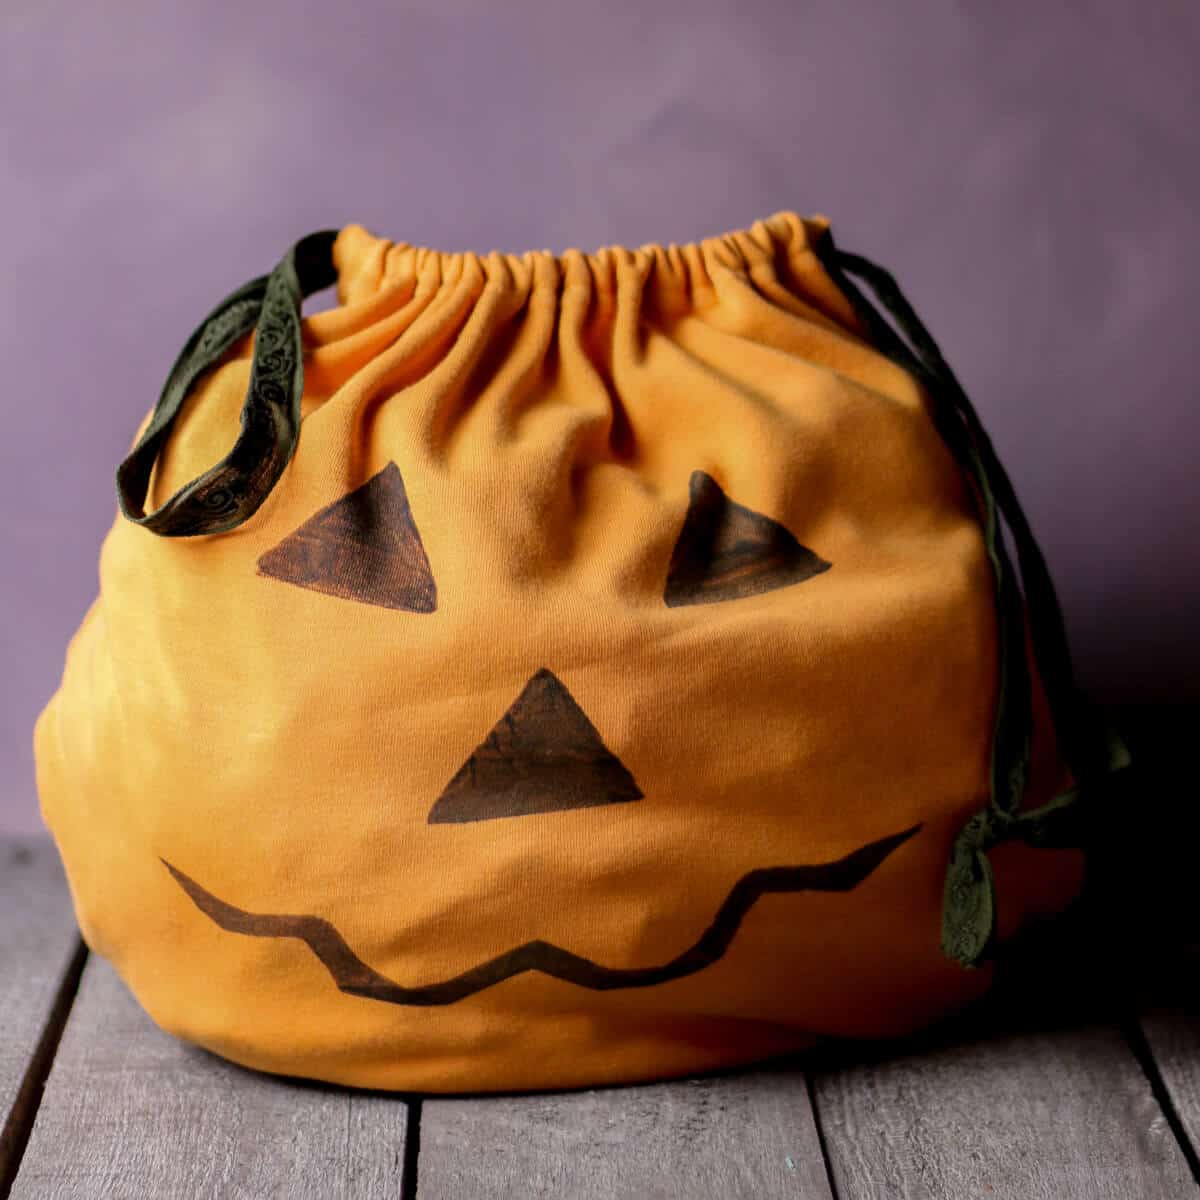
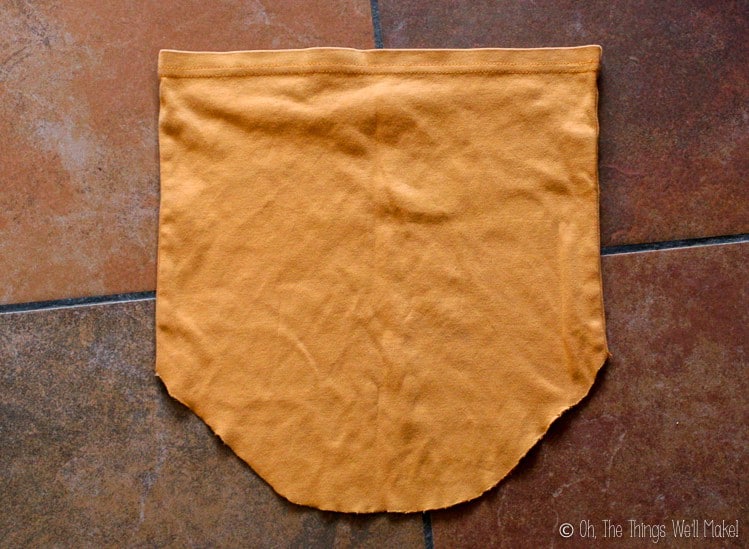
For this project, I had the idea of making a jack-o’-lantern face on one side of the bag, so I was ideally looking for an orange t-shirt.

I raided our old clothes bin and was lucky to find a stained, old orange t-shirt with a hole on one sleeve. By using one of my son’s own t-shirts, it made a bag around the perfect size for him.

Making the bag

For the main structure of the bag, we’ll be making use of the hem enclosure that is normally found on the bottom of t-shirts as a sort of drawstring enclosure. This will allow us to quickly make a bag with only one seam.

  • An orange t-shirt folded in half
    Fold t-shirt in half.
  • Cutting the neck and sleeves off an old t-shirt
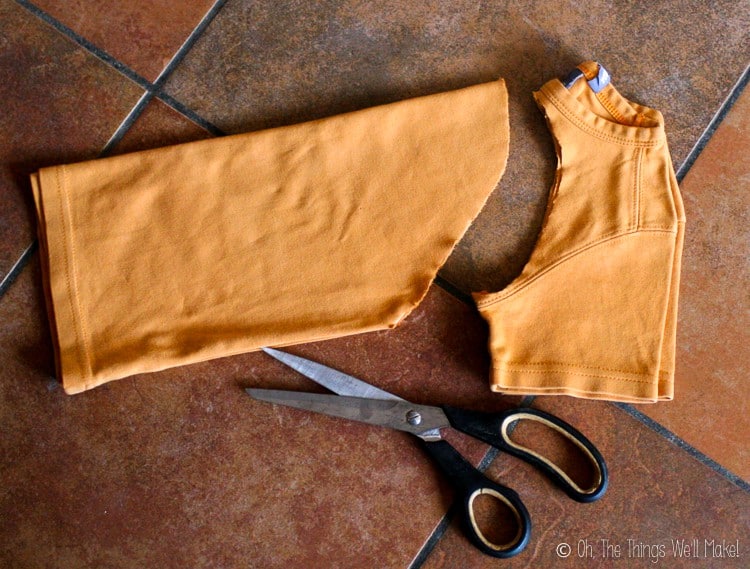
    Cut off sleeves and neckline.

To begin making your bag, cut off the neck and sleeves of your t-shirt. You can save and use the sleeves to make small drawstring pouches if you like. This cut will become the bottom of your bag. I kept mine rounded to make it more pumpkin-like.

How to Make a Drawstring Pouch from a Sleeve

Easily make a drawstring bag in less than 10 minutes by upcycling old t-shirts and taking advantage of the hem. You can also make a pouch from the sleeves.
Check out this recipe
Top view of 3 drawstring pouches made from the sleeves of baby clothes.

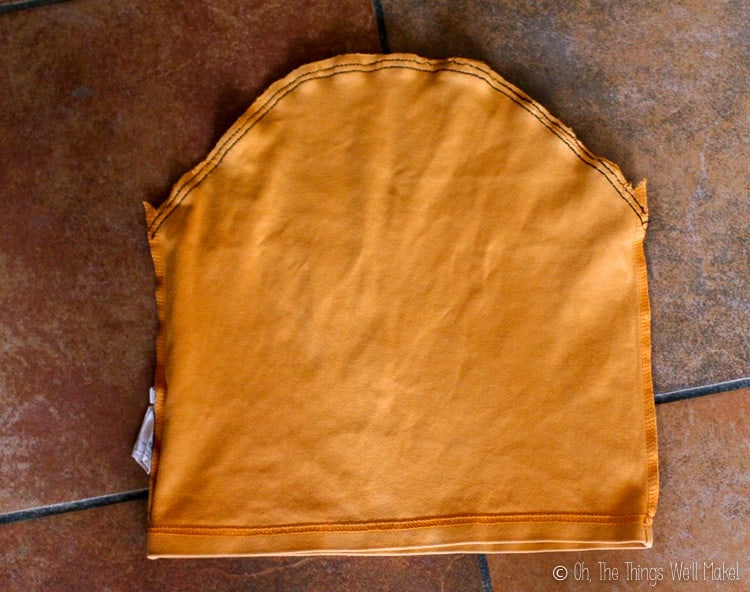
Unfold your shirt and turn it inside out before sewing across your cut. Turn the shirt right side out again. You are almost done!

Cut small slits through the top layer (only) of the hem in your t-shirt. Make four small slits, one on either side of the side seams of your shirt.

  • Inside out t-shirt bodice that has been rounded at the top and sewn together along the cut edge.
    Turn inside out and sew across cut.
  • Small slits have been cut into the bottom hem enclosure of the t-shirt on either side of the seam
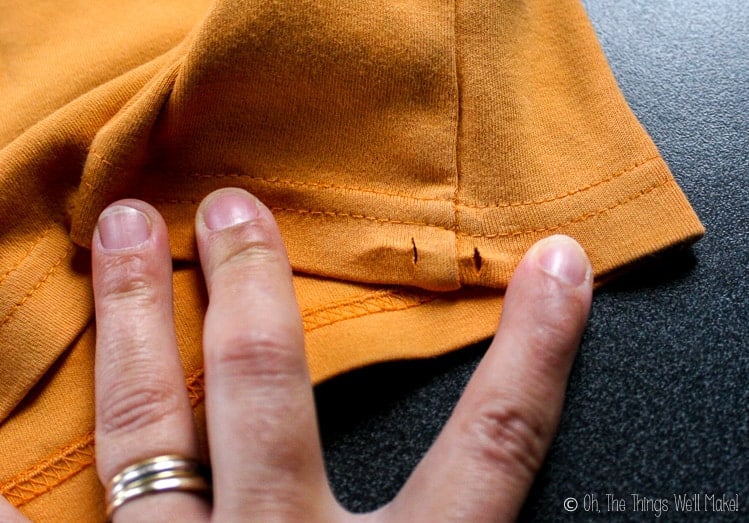
    Turn rightside out and cut slits for ribbon.

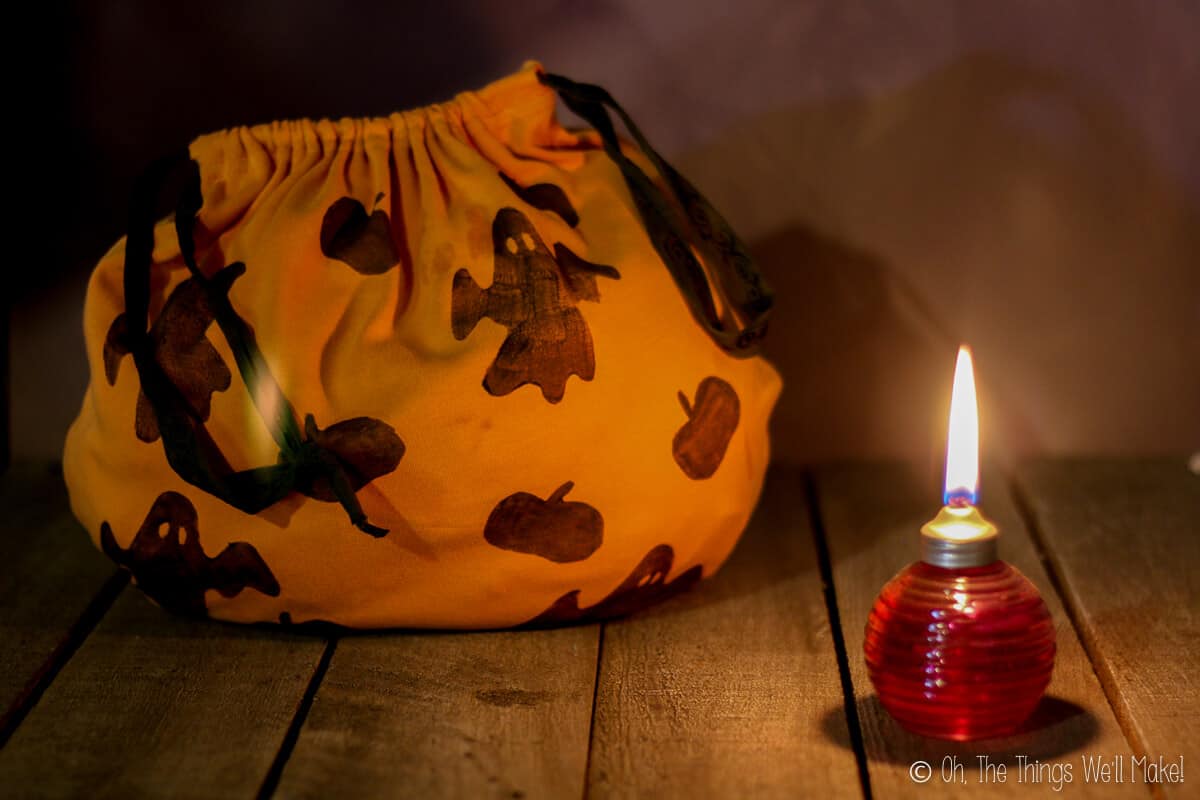
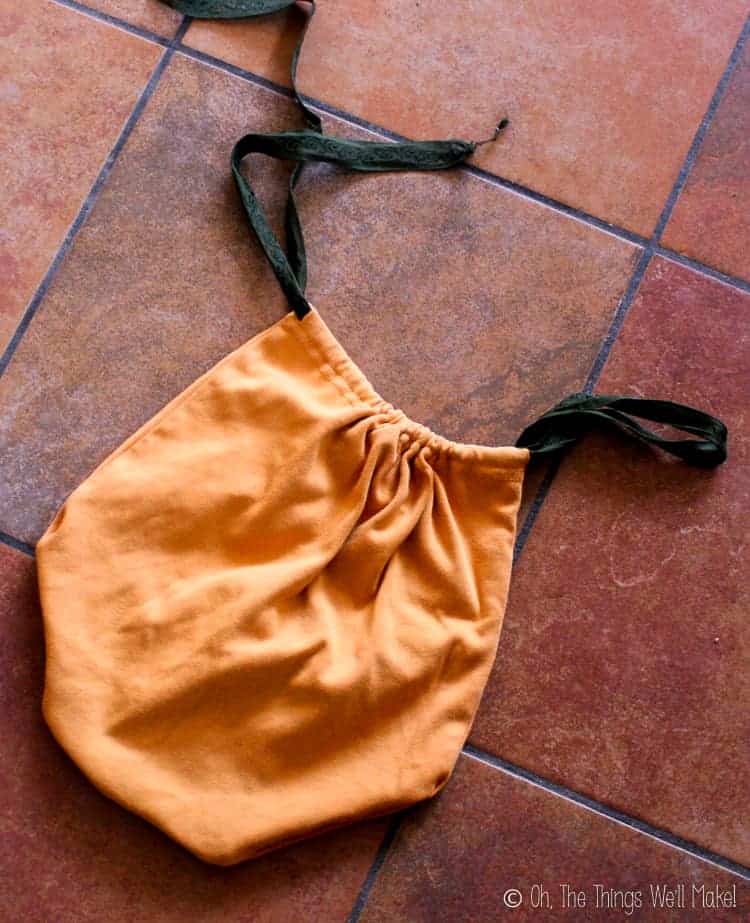
Find some cording or ribbon that you want to use for your handles. I wanted my trick or treat bag to slightly resemble a pumpkin, so I chose a dark green thick ribbon.

Pin a safety pin to one end of the ribbon and pull the ribbon through the front hem of the t-shirt, going from one side to the other. Then go through the back hem of the shirt back to the side you started on.

Before you cut your ribbon, pull enough of it out on either side of the bag to make a sort of handle. Keep in mind that it looks better slightly gathered when you are deciding how much cording or ribbon to leave.

  • Running a green ribbon through the hem enclosure of a t-shirt to form handles for the trick-or-treat bag
    Thread ribbon through the hem.
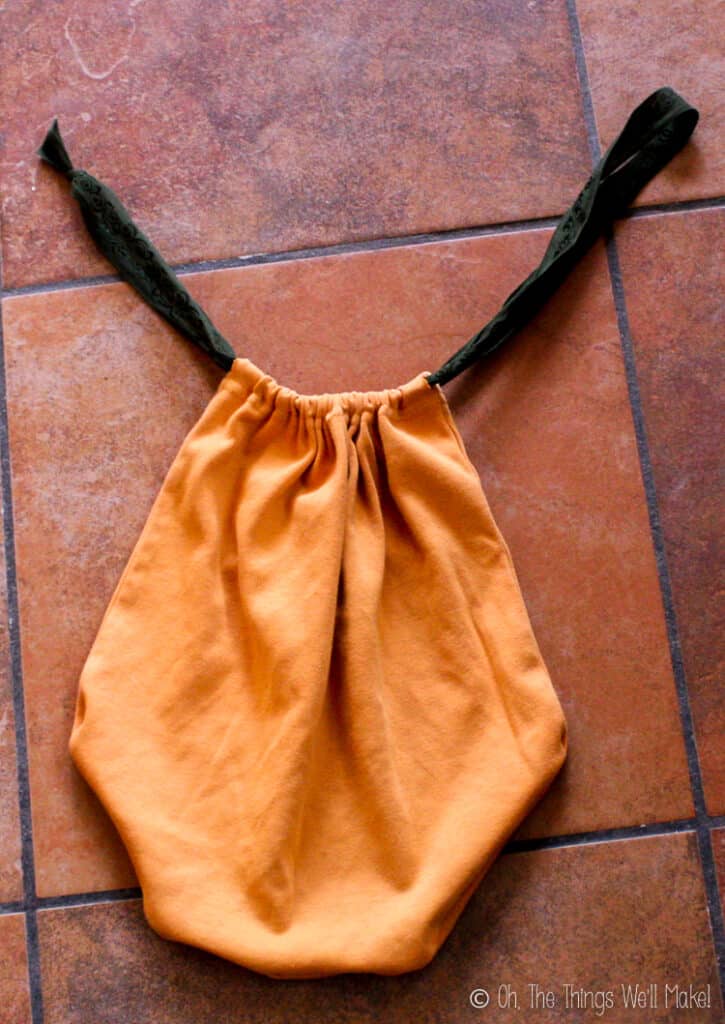
  • After tying the ribbon, the trick-or-treat bag is complete, yet undecorated.
    Finished!

Cut the ends and tie the ribbon on one side. If you don’t like seeing the knot, you can always pull it into the hem of the shirt to hide it.

Your bag is done!

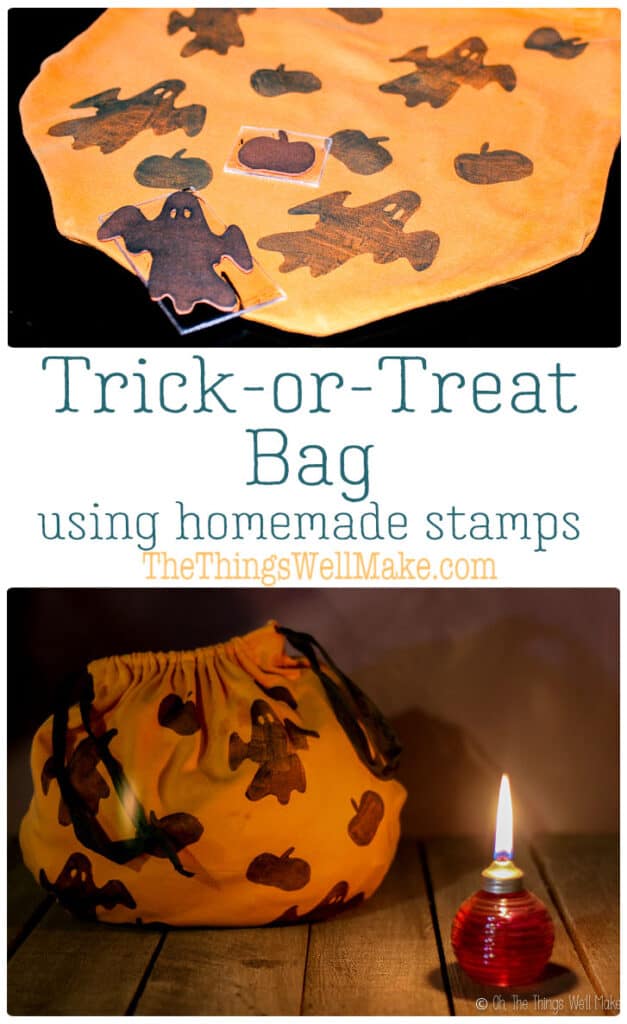
Make Fabric Stamps from Craft Foam

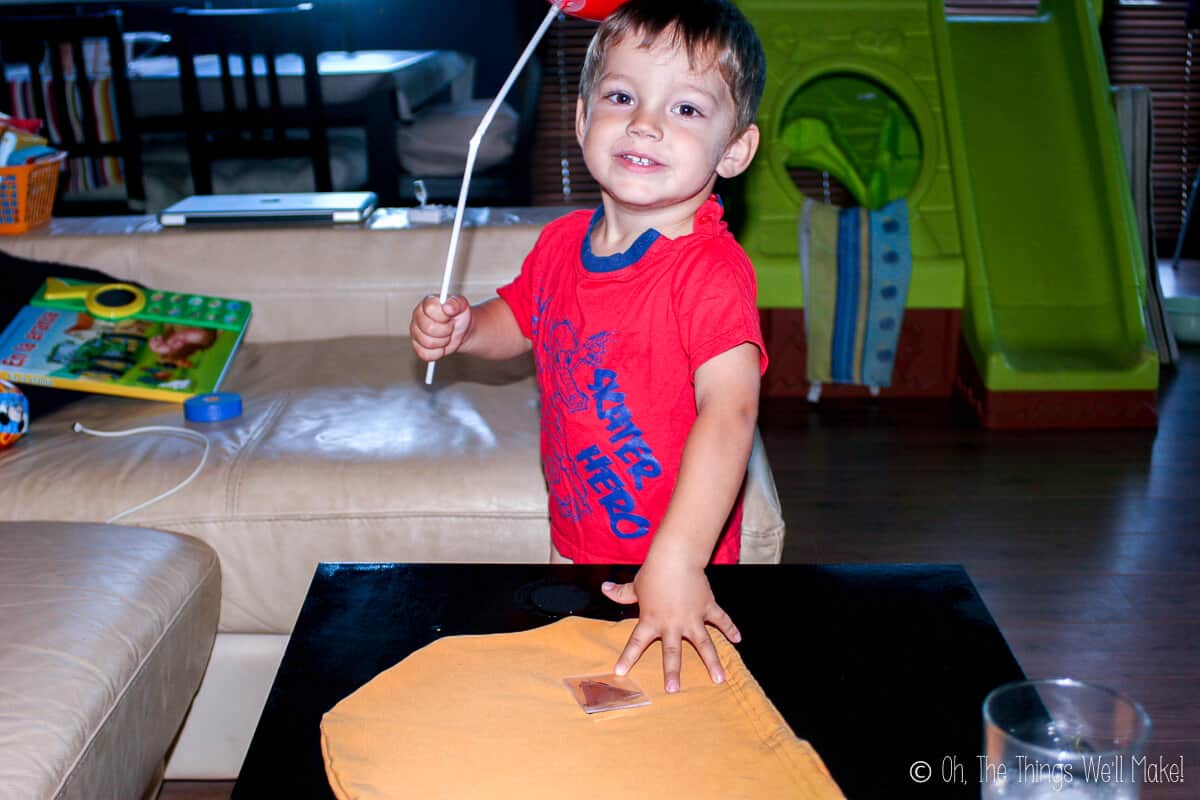
To allow my young son to participate in making his trick-or-treat bag, I decided to use a stamping technique. He did love stamping on the balloons on our Up t-shirt!

A young boy wearing a red shirt and holding a white balloon stick  eagerly smiling for the camera as he places a hand on an unmade trick-or-treat bag on the table.
My son didn’t want to let go of his balloon to help, but he did have fun with it. After stamping on the eyes, he asked for more.

So, I started making some craft foam stamps for decorating our bag.

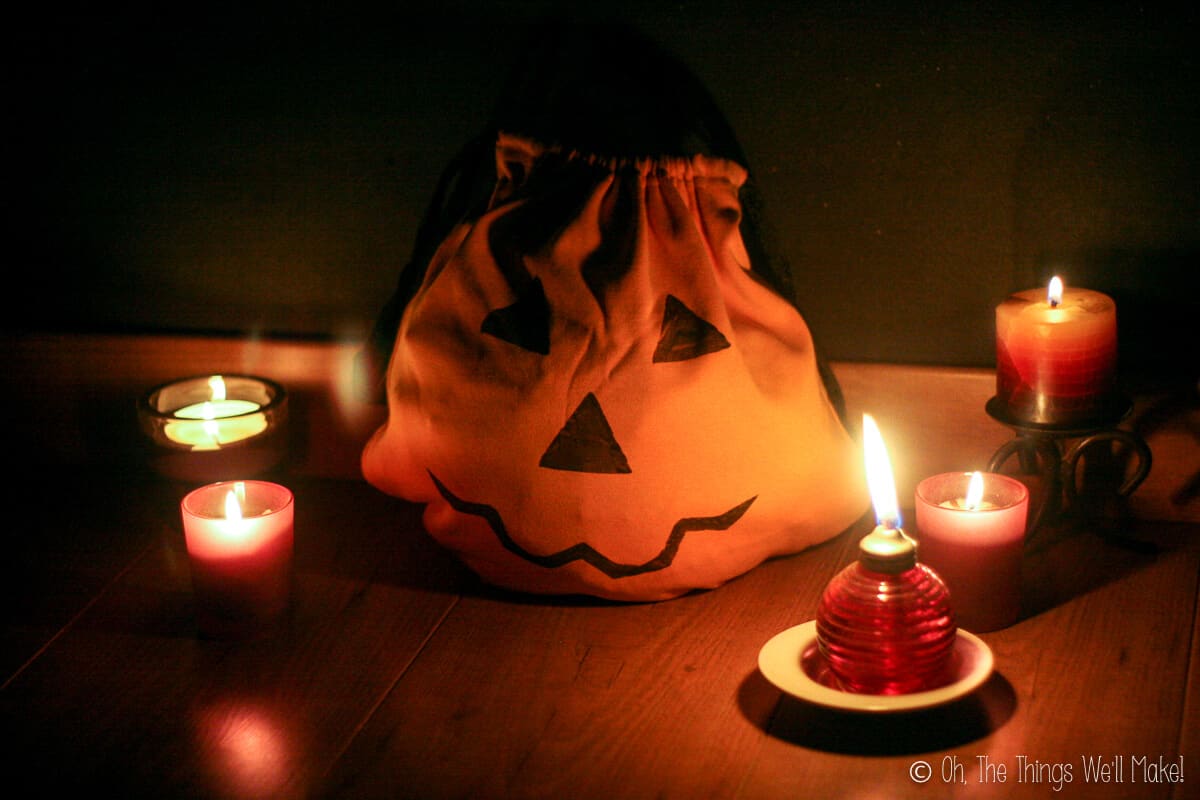
Because the bag looks like a pumpkin, I decided to make it look like a jack-o’-lantern on one side. We stamped the other side with ghosts and pumpkin shapes.

You’ll need:

  • Craft Foam
  • Scissors
  • Clear plastic or wood blocks for mounting the stamps
  • Glue

Instructions:

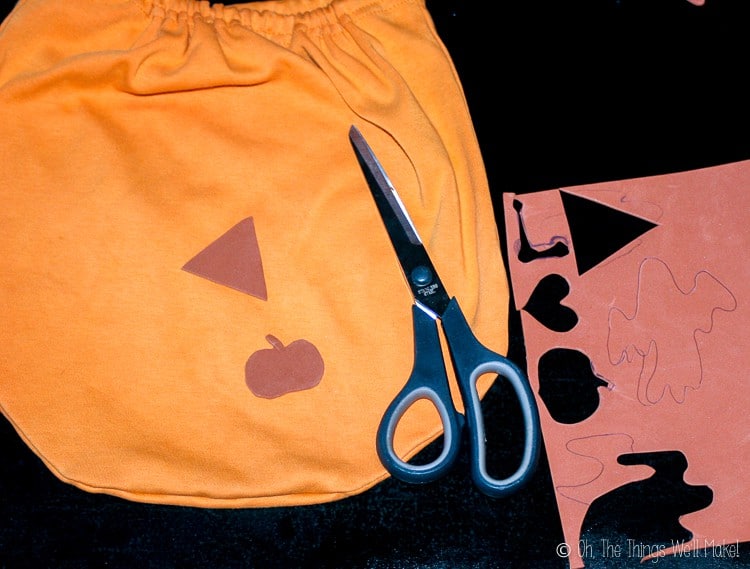
To make the craft foam stamps, decide on a design for each shape and draw it on the craft foam. Cut each shape out with scissors.

  • Cutting a triangle and Halloween themed shapes from craft foam to make fabric stamps
    Cutting shapes out of craft foam
  • gluing the craft foam Halloween shapes onto clear plastic to make fabric stamps
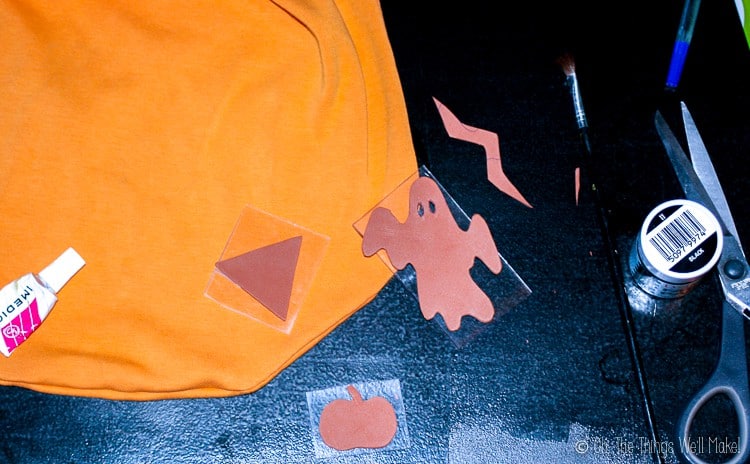
    Gluing the shapes onto plastic
  • stamping a Jack-o-lantern face onto our homemade trick-or-treat bag
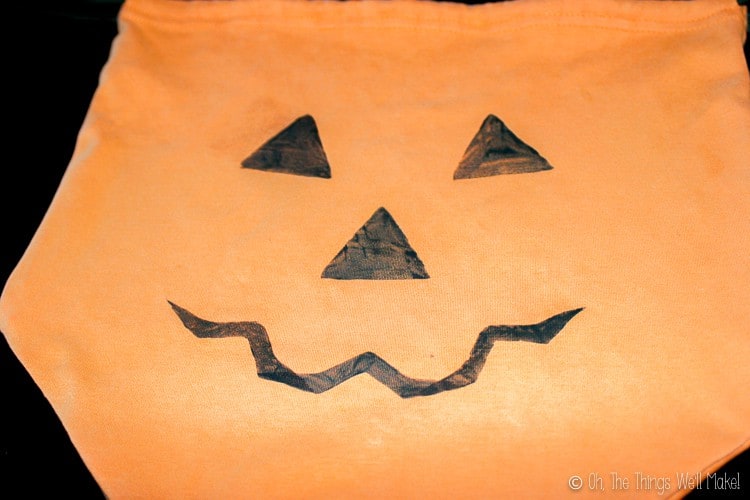
    Stamping the jack-o’-lantern
  • stamping ghost and pumpkin shapes onto our homemade trick-or-treat bag with homemade fabric stamps
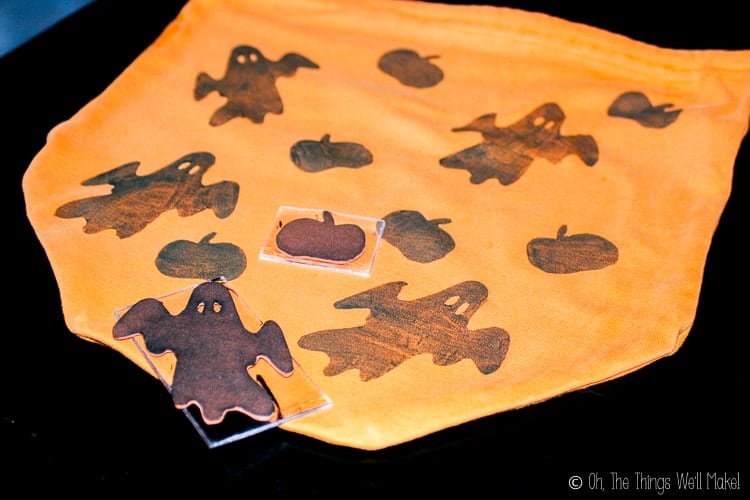
    stamping the ghosts and pumpkins

We made 4 different stamps: a ghost, a pumpkin, a triangle for the eyes and nose of our jac-o’-lantern, and a wide “w” shape for the mouth.

Look at the pictures to see how we stamped the mouth of the jack-o’-lantern. We just repeated the same w-shaped stamp 3 times across the bottom.

Once you have your shapes cut out, glue them onto a hard surface like a wooden block or a hard plastic. I like using transparent plastic from old cd cases because it allows you to see where you are stamping when using them.

To use your stamps, dab some paint onto your stamp and carefully stamp it on your bag. It’s a good idea to place a piece of cardboard inside your bag to keep the paint from passing through to the other side.

Once you’re happy with the design, allow the paint to dry. Set it (usually with an iron) according to the directions that came with your particular fabric paint.

An orange handmade trick-or-treat fabric bag decorated with ghosts and bats stamps placed on a grey wood surface and grey photo backdrop.

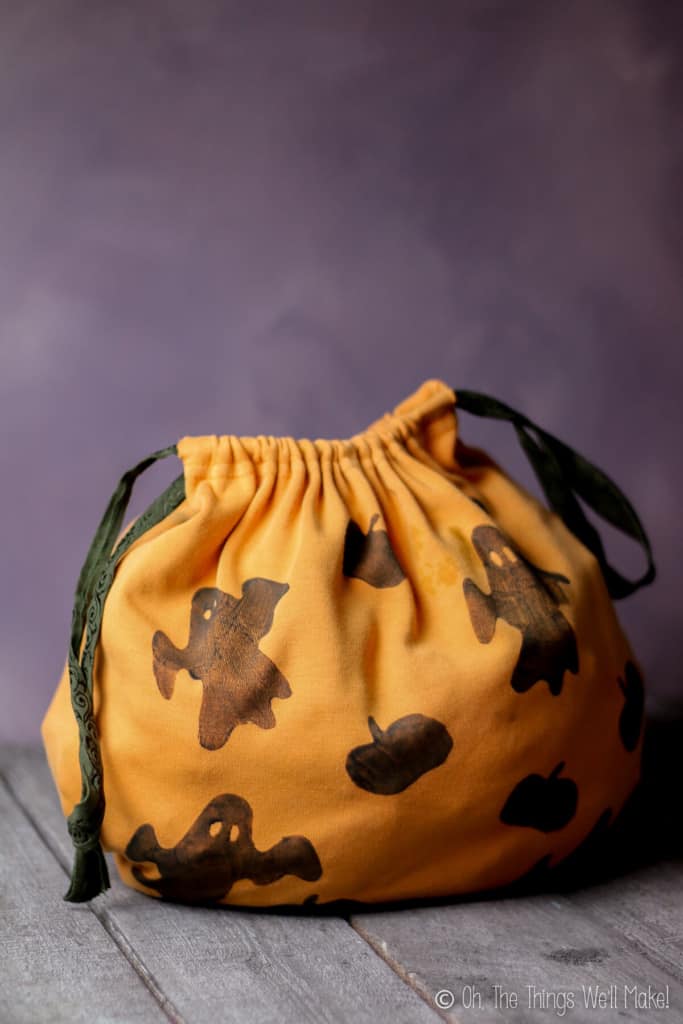
Enjoy trick-or-treating with your new super-cute bag!

An orange homemade trick-or-treat bag decorated with a Jack-o-lantern face.

DIY Trick-or-Treat Bag

No ratings yet
Quick and easy to make, this fun homemade trick-or-treat bag allows us to upcycle an old t-shirt. Kids can help decorate this project using homemade fabric stamps.
Print Tutorial
Work Time30 minutes
AuthorTracy Ariza, DDS

You’ll Need:

For the bag

  • 1 t-shirt
  • 1 yard ribbon or cording

For the fabric stamps

  • 1 piece craft foam
  • 3 pieces hard, clear plastic or wood pieces
  • glue

For decorating the bag

  • fabric paint

Instructions

Make the bag

  • Fold the t-shirt in half lengthwise.
    An orange t-shirt folded in half
  • Cut off the sleeves and neckline, forming a curve from the armpit area to the center of the neck.
    Cutting the neck and sleeves off an old t-shirt
  • Unfold the shirt. It should be rounded where the sleeves and neckline were removed.
    Unfolded t-short bottom section with the sleeves and neckline cut off.
  • Flip the shirt inside out and sew across the cut curved area.
    Inside out t-shirt bodice that has been rounded at the top and sewn together along the cut edge.
  • Flip the shirt right side out again, and make 4 slits in the hem enclosure (only through the top layer of fabric). Make one on either side of the seams on each side of the shirt. (If your shirt didn't have seams, make 2 slits about an inch apart on either side of the hem.)
    Small slits have been cut into the bottom hem enclosure of the t-shirt on either side of the seam
  • Pin a safety pin to one end of a ribbon or cord. Use the safety pin to help guide the ribbon through the hem enclosure of the t-shirt.
    You want to go in on one side on the front of the shirt, through the hem and out on the opposite side. Then, go back through the nearby hole on the back of the shirt, through the hem on the back, and come out on the opposite side.
    Running a green ribbon through the hem enclosure of a t-shirt to form handles for the trick-or-treat bag
  • Leaving enough ribbon or cording to easily open the bag and cut off any excess. Tie the cut ends together.

Make the Fabric Stamps

  • Decide what you want to stamp on your bag. Draw out the shapes on craft foam and cut them out.
    Cutting a triangle and Halloween themed shapes from craft foam to make fabric stamps
  • Glue the craft foam shapes onto a clear, hard plastic. (I've used broken cd cases and other plastic scraps.)
    gluing the craft foam Halloween shapes onto clear plastic to make fabric stamps

Decorate the bag

  • Dab some fabric paint onto your homemade fabric stamp and stamp onto the fabric.
    stamping ghost and pumpkin shapes onto our homemade trick-or-treat bag with homemade fabric stamps
  • To make the jack-o'-lantern mouth, stamp a W-shaped stamp 3 times, overlapping the edges. (See how it's a bit darker where it overlapped in the picture.)
    We used a triangle for the eyes.
    stamping a Jack-o-lantern face onto our homemade trick-or-treat bag

Notes

  • The fabric stamps can be glued onto any hard surface, but clear plastic makes it easier to see where you are stamping. (Plastic from old CD cases makes a great backing material.)
  • When stamping on the fabric, it’s a good idea to insert a piece of cardboard in the bag to keep the paint from seeping through to the other side.
  • To set the paint, follow the directions for your particular paint. Normally, though, you should cover the dry paint with parchment paper and iron the design for around a minute.
Have you made this? Show me!Mention @thethingswellmake or tag #thethingswellmake!
A jack-o'-lantern trick-or-treat bag surrounded by lit candles and a small oil lamp.

*This post was originally published on October 28, 2013. It was updated in October of 2019 with clearer instructions and printable instruction card.

Category: Halloween, sewing, Upcycling

About Tracy Ariza, DDS

Tracy Ariza, B.A., D.D.S., left dentistry and the United States to found Oh, The Things We’ll Make!, writing to you from the Spanish Riviera. She loves making things herself in order to keep control of what goes in them. While far from perfect, she strives each day to live a healthier, more sustainable lifestyle.

Previous Post: « Creepy Halloween dish shaped as a head made out of Prosciutto ham with cream cheese and green olive eyes, surrounded by square crackers. Creepy Halloween Food: Make a Prosciutto Face
Next Post: Homemade Dulce de Membrillo (Sweet Quince Paste) A block of homemade sweet quince paste (dulce de membrillo) on a black rectangular platter, in front of a cutting board with manchego cheese and chorizo sausage. »

Reader Interactions

Comments

  1. Tutul

    February 16, 2018 at 7:45 PM

    Wooooooow!
    Adorable šŸ™‚

    Reply
    • Tracy Ariza

      February 17, 2018 at 8:46 AM

      Thanks, Tutul!

      Reply
  2. Fiona Turner

    October 6, 2015 at 4:47 PM

    How lovely! My girls will love this treat bag! Up-cycling tees this way is so clever. Thanks for the inspiration!

    Reply
    • Tracy Ariza

      October 7, 2015 at 2:59 PM

      Thanks, Fiona!
      I hope they have fun making them. šŸ™‚

      Reply

Leave a Reply Cancel reply

Your email address will not be published. Required fields are marked *

Recipe Rating


Sidebar

Search

  • Email
  • Facebook
  • Instagram
  • Pinterest
  • Twitter
  • YouTube

Hello, I’m Tracy!

I love making my own natural products like soaps and lotions and my own pantry items like yogurt and salad dressings.
Why do I do it? Sometimes to save money, sometimes because it's healthier, but I always love having control of the ingredients!​
Oh, the things we'll make!...

More about Tracy

I am a participant in the Amazon Services LLC Associates Program, an affiliate advertising program designed to provide a means for us to earn fees by linking toĀ Amazon.comĀ and affiliated sites.

Featured on Buzzfeed, Lifehacker, Fitness, Shape, Country Living, Healthline, Redbook, Redfin

Closeup of 4 bars of homemade soap. Two of them have been wrapped in brown paper and wrapped with ribbons. One soap is wrapped with red ribbon and the other with white ribbon.

Making an Easy, Basic Beginner Soap, and Then Making it Fun!!

Homemade prawn crackers on a plate in front of uncooked homemade prawn crackers and a roll of prawn crackers dough.

Prawn Crackers from Scratch

Impress your friends and save money by making your own soy sauce from scratch. Today we'll learn how to make a homemade shoyu, a fermented Japanese soy sauce made from soybeans and wheat berries. #shoyu #soysauce

How to Make Soy Sauce (Homemade Shoyu)

Two bottles of a homemade conditioner next to a wooden comb and a washcloth.

Easy DIY Hair Conditioner for Natural Hair

A small glass jar filled with an emulsified sugar scrub with a wooden spoon in it.

Easy Emulsified Sugar Scrub

Over head view of a spoon full of tomato paste over a jar full of it. A couple of fresh tomatoes lay next to the jar.

Easy Homemade Tomato Paste Recipe

Featured on Buzzfeed, Lifehacker, Fitness, Shape, Country Living, Healthline, Redbook, Redfin

White logo for Oh, The Things Well Make! website

Copyright © 2023 Tracy Ariza · Disclaimers and Disclosures · Privacy Policy · Cookie Policy