

DIY Earring Holder for Studs (& Display Organizer)
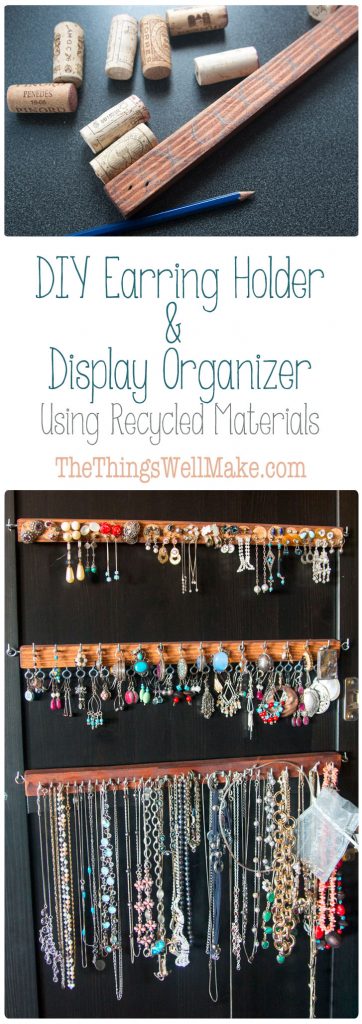
Using recycled materials like scraps of wood and wine corks, you can make a handy DIY earring holder for studs and post earrings that is also a beautiful and practical display organizer.
This has been one of my favorite DIY projects lately. Not only does it use recycled materials, and you know how much I love repurposing things, but it is practical, looks nice, and it’s super easy to use.
Canvas earring holder
Up until now, I’ve had all of my earrings on display and organized on a painted canvas in my room. I painted the canvas in the color of my walls so that when I hung the canvas up, it blended in with the rest of the room. It looked great. While I liked that system because it put all of my earrings on display, it had a few disadvantages.
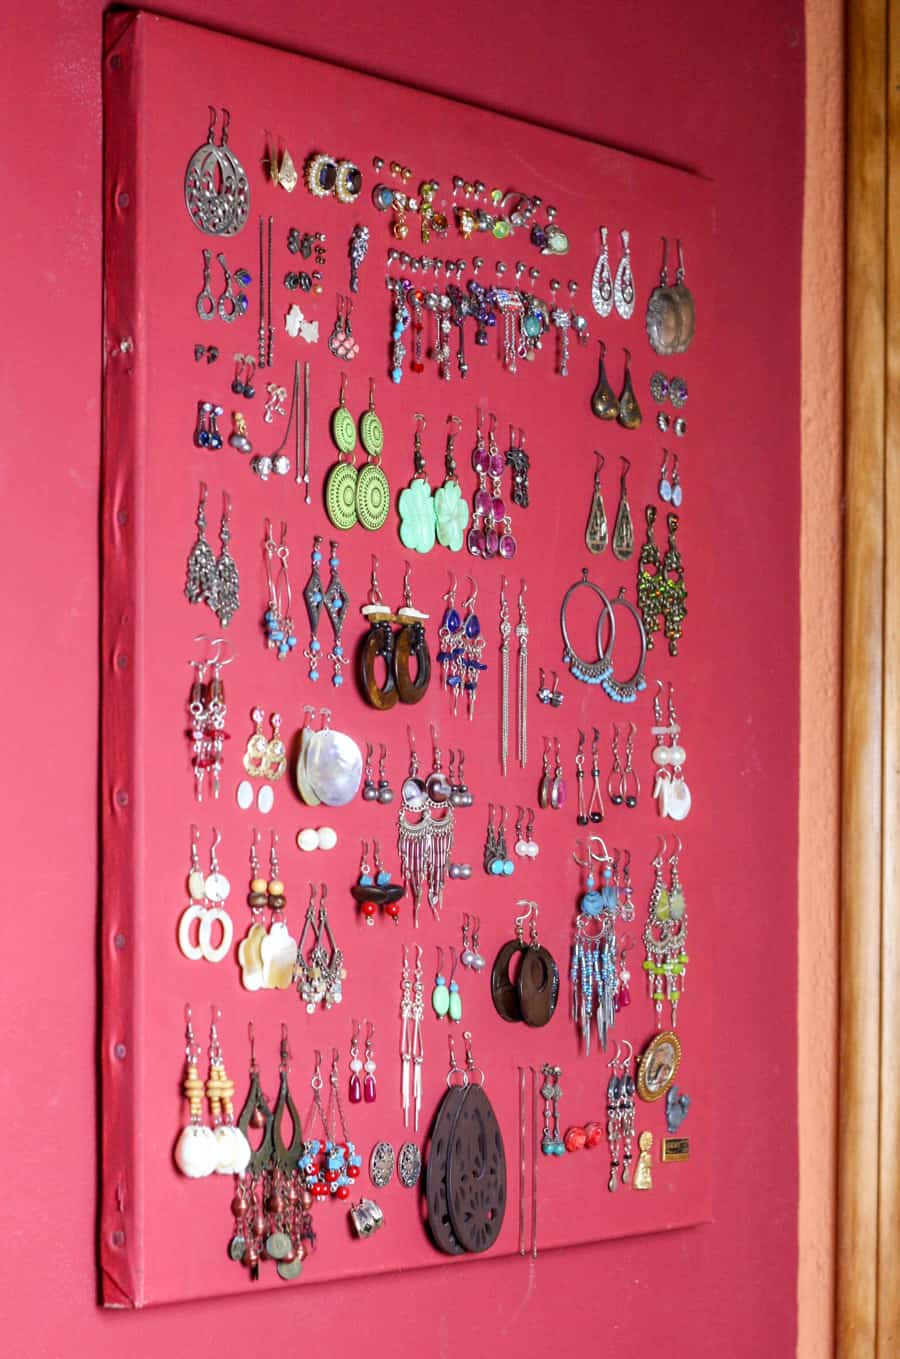
First of all, we changed bedrooms, and I went from bright red walls, to a completely different color: dark gray. I never got around to taking all of my earrings and pins off to repaint the canvas to the new color. That seemed like a daunting task. Sadly, the red canvas on my gray walls stuck out like a sore thumb.
Another disadvantage was that the earrings accumulated dust, and a lot of it! Here in my region of Spain there is a lot more dust in the air than there ever was in Michigan. I can dust the furniture and an hour later it looks like I haven’t dusted in days! On the other hand, when I lived in Michigan, I rarely dusted, and nobody was the wiser! I think that’s probably one of the big reasons people don’t have a lot of things on display here.
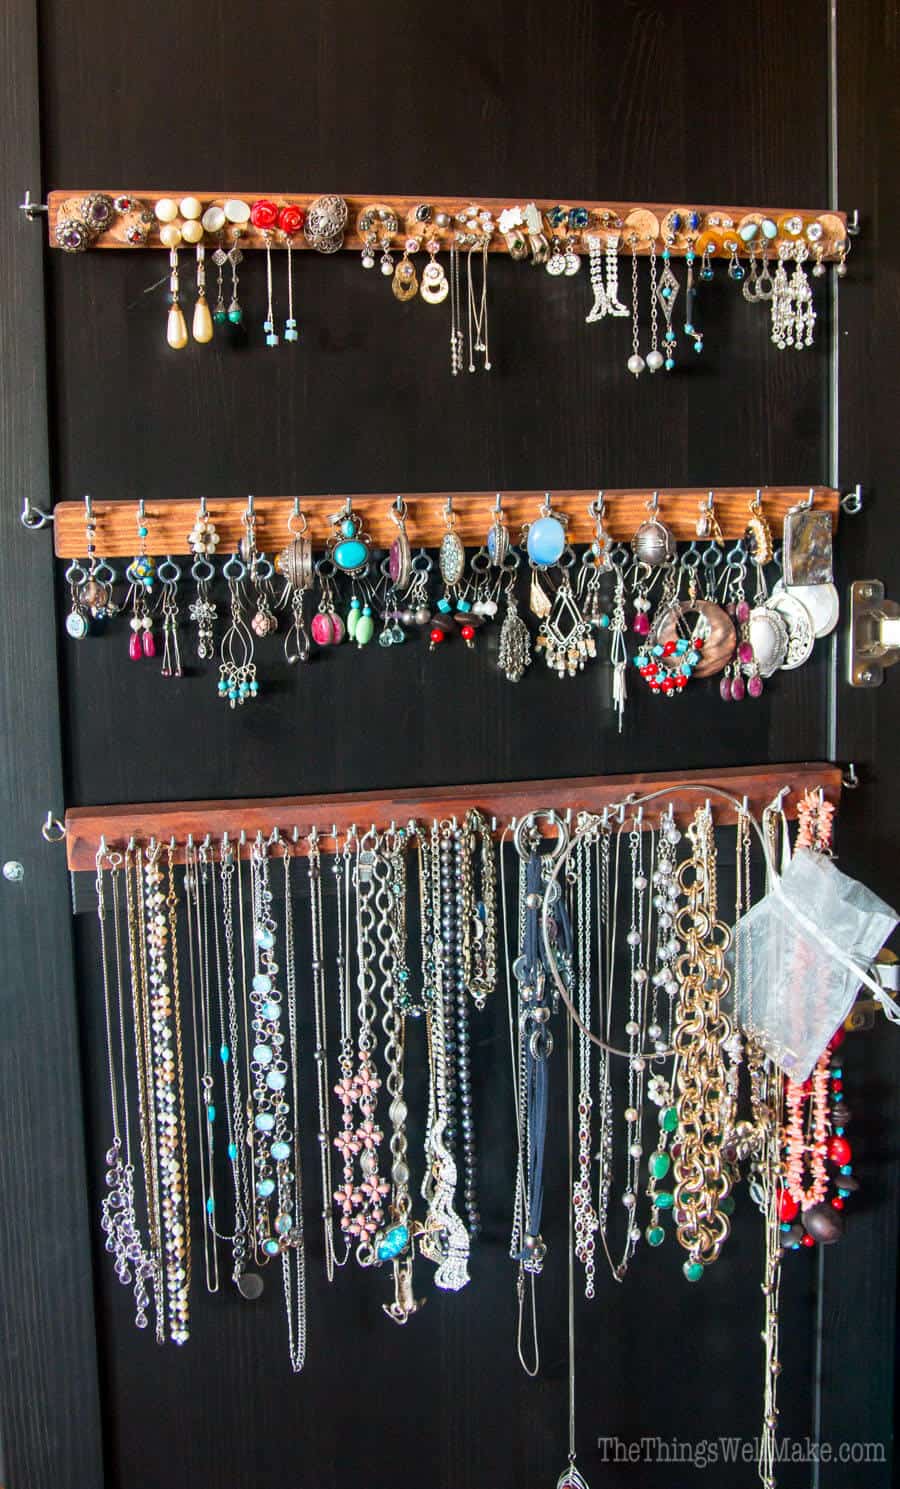
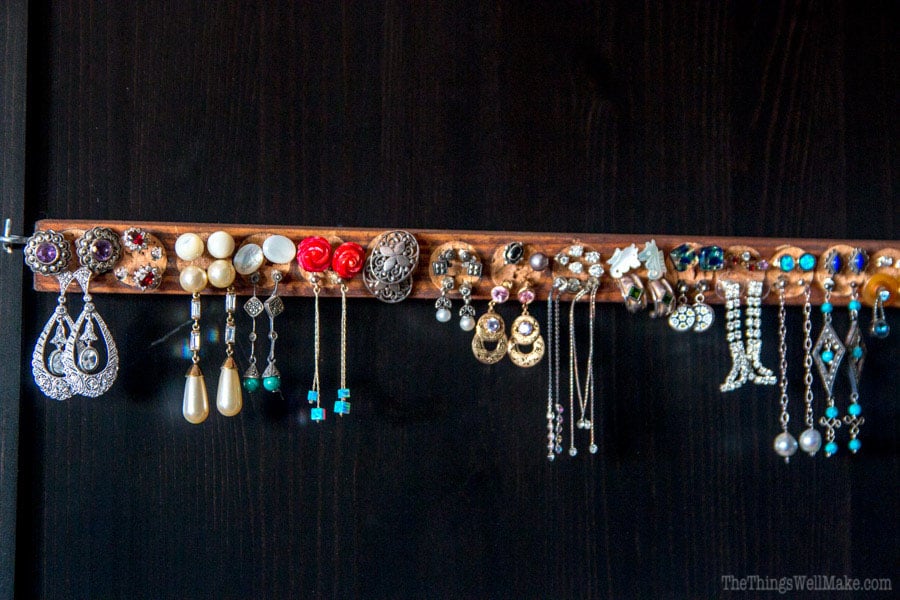
Another inconvenience was that post earrings were tricky to remove and replace from the canvas. I had to take down the whole canvas to reach around to the back and remove the earring backings. OK, so that isn’t that big of a deal, but my new earring holder is a lot more practical for post earrings. I leave the posts on them before I push them into the corks, and they are super quick to remove and store when I’m in a hurry.
Wine cork earring holder and display organizer
I’ve been reorganizing all of my jewelry lately because I realized I had it scattered all over the place. Plus, I had been wanting to fix the neglected (red) canvas earring display for quite some time. Rather than repaint it, I came up with another idea.
I had already been making necklace and hanging earring organizers for my closet door. I didn’t know what to do with my post earrings, though. I though of sticking the posts into a strip of wood covered with cork sheets that I found in my craft room, but the sheets were so thin that I was going to need to add several layers, and the process seemed like it would be messy, and I wasn’t sure everything would stick right.
Then one night, while drinking a glass of wine, it occurred to me that wine corks would work perfectly! Unfortunately, we don’t drink enough wine for me to save up enough wine corks fast enough. When I get an idea, I want to make it yesterday!
We went out to dinner that weekend, and I asked the waiter of one of our favorite restaurants if he had any wine corks for me. He had commented to me once that he had a collection of them for projects, and was happy to collect a handful of wine corks from that night’s visitors for me.
Because you end up cutting the corks into 4 pieces, you really don’t need that many wine corks to complete this project. Mine is 39cm wide and has 18 spaces for earrings. To make an earring display of that size, you’ll need 5 wine corks.
I still wasn’t sure if I wanted to glue the wine corks to the wood strip, or how I was going to make my project work. So, I started bugging my husband about it until he decided to come to my rescue and help me out.
I asked if he had anything that would let me drill holes into the wood that were more or less the width of the wine corks. After a bit of searching, he decided to use a 20mm milling cutter (I think his was a 20mm countersink bit which he mounted onto a normal drill using a drill press). Anything that can cut 20mm width holes should work, and a drill press makes it easier to get nice, straight holes, but isn’t absolutely necessary.
How to make the wine cork earring holder display organizer
You will need:
- strip of wood (Over 23mm wide. I made mine 39cm long to fit the door of my closet.)
- 2 eye screws
- 2 L screws
- wine corks (I used 5 for each of mine.)
- 20mm drill bit
- knife
Instructions:
- Measure the area where you want to hang your earring holder display. I mounted mine on the back of my closet door, so I measured from one side to the other. My idea was to place the L screws into the thicker borders of the door, so I measured the space between them to make my wood strip the size of that space. In my case that was 39cm long.
- Find a strip of wood to use as the base of your earring organizer. It should be slightly wider than 23 mm so that there is a bit of space on either side of the wine corks.
- Cut the strip of wood to the desired measurement, and sand and paint the wood strip as desired.
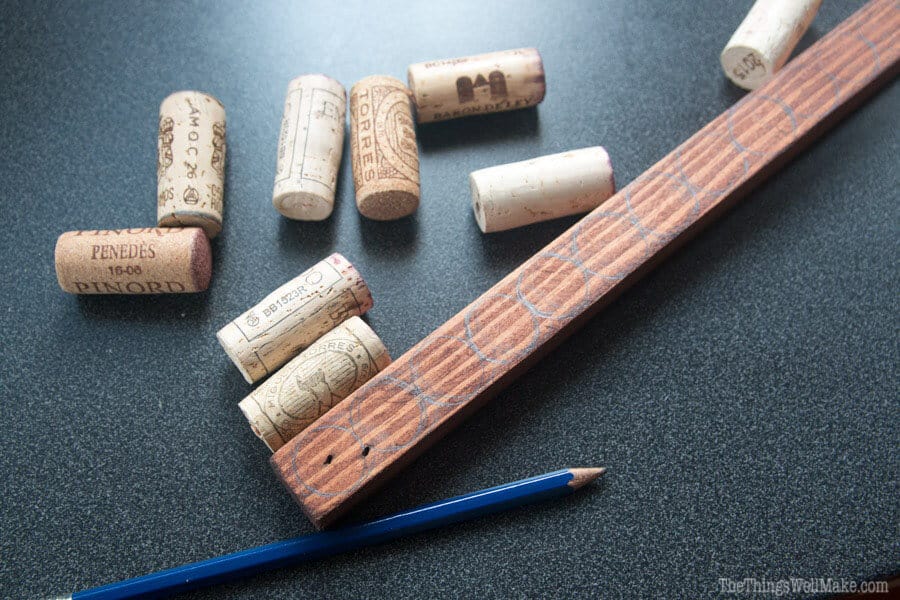
- For my first time through this project, I traced the wine corks to try to make markings that would space them correctly across the strip of wood. In the end, though, I should have decided on the size of the holes that we were going to make rather than measuring the corks. Not all of the corks were exactly the same width, but most of them could be easily fit into the 20mm space. (We ended up rejecting a couple of wine corks that were a bit too wide to easily fit them into place.) If you want to premark the areas for the holes, it’s best to divide the length by the 20mm+whatever width you want between each hole, to get an idea of just how many holes will fit across the wood strip. I ended up fitting 18 holes across the length of my earring display.
- Start drilling holes for each of the wine cork pieces. My husband drilled the holes for me to about the depth of his drill bit. That depth measurement was just under the length of 1/4 of a wine cork in most cases. (Some of the corks were shorter and fit into the hole almost perfectly.)
- Cut the wine corks in half, and then cut each half into halves again. You will need one of these 1/4 cork pieces for each of the holes in the wood strip.
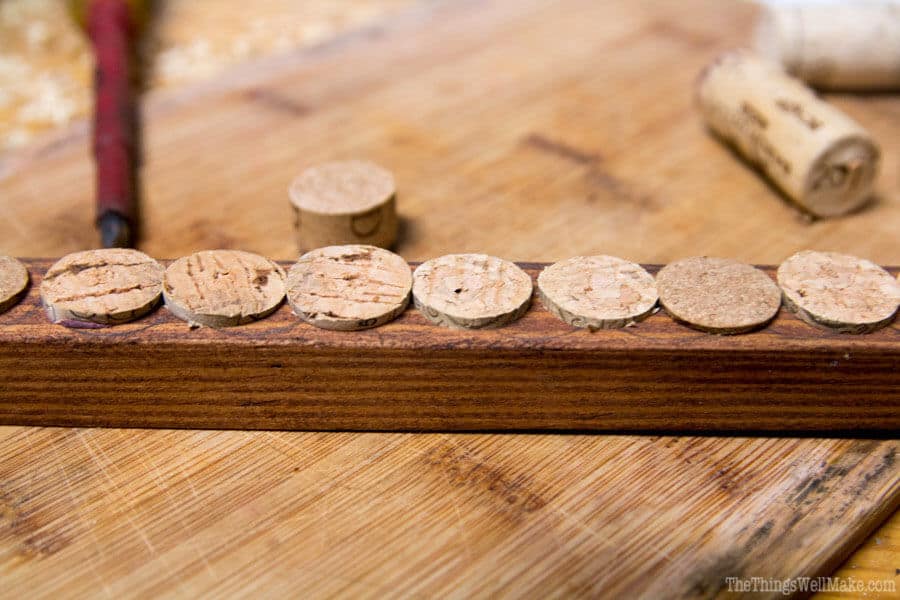
- Press the cork pieces into the holes in the wood strip. You can either leave them like that, or even it out by using a sharp knife across the top to remove any excess cork. (We decided on the latter and it looks pretty professional looking despite the fact that we didn’t plan out the spacing of the holes very well.)
- Screw one eye screw into each side of the wood strip.
- Screw L screws into either side of the area where you want to hang the earring display organizer. If you aren’t sure about the width, screw one side in first and then mark the other side using the wood strip to guide you. (This method will also help you mark the hole in a way to make sure the earring holder will hang level.) This system is pretty forgiving because you have a little wiggle room.
- Hang the earring display organizer by hooking the eye screws over the L screws.
- Fill the display with earrings by pressing the posts into the corks. If you are having a difficult time, use a pin back to make the hole before forcing an earring back into it. If you use too much force to push the earrings into the corks, you could end up bending your post backs.
Notes:
I used the removable system of eye screws and L screws to hang my earring holder on the closet door because I find that it’s convenient to be able to quickly remove it and bring it around with me as needed. Plus, I find it’s easier to hang the earrings when I have the display rested on a table rather than when it is hanging vertically. You could choose to hang it in a more permanent way, though.
I leave the backs on the earrings when I press them into the corks. There is enough leftover post to press them into place securely without needing to remove them. That’s one of the reasons I love this display because it conveniently lets you keep the earrings and backs together in a way that you can quickly grab your earrings!
Video
Wine Cork Earring Display Organizer
Equipment
- 20mm drill bit
- knife
Materials
- 1 strip of wood Over 23mm wide. I made mine 39cm long to fit the door of my closet.
- 2 eye screws
- 2 L screws
- wine corks I used 5 for each of mine.
Instructions
- Measure the area where you want to hang your earring holder display.
- Find a strip of wood to use as the base of your earring organizer. It should be slightly wider than 23 mm so that there is a bit of space on either side of the wine corks.
- Cut the strip of wood to the desired measurement, and sand and paint the wood strip as desired.
- Drill holes for each of the wine cork pieces using the 20mm drill for most wine corks to about the depth of the drill bit. (You can adjust the size as needed.)
- Cut the wine corks in half, and then cut each half into halves again. You will need one of these 1/4 cork pieces for each of the holes in the wood strip.
- Press the cork pieces into the holes in the wood strip. Remove any excess cork with a blade.
- Screw one eye screw into each side of the wood strip.
- Screw L screws into either side of the area where you want to hang the earring display organizer. If you aren't sure about the width, screw one side in first and then mark the other side using the wood strip to guide you. (This method will also help you mark the hole in a way to make sure the earring holder will hang level.) This system is pretty forgiving because you have a little wiggle room.
- Hang the earring display organizer by hooking the eye screws over the L screws.
- Fill the display with earrings by pressing the posts into the corks.


Do you have instructions for making the wall necklace display that is shown in the photo? Thanks!
Hi Terry,
No, I’m sorry. I never made a full tutorial for that- but it’s actually quite simple.
I used the same size piece of wood and all I did was screw l-shaped hooks into it by hand.
There wasn’t any rhyme or reason to it. I just tried to leave enough space between them to comfortable hang necklaces. 😉
Excelente idea! Hace mucho que quiero algo así. Cómodo y fácil de usar. Gracias por la idea!
Gracias, guapa. 🙂
I love mine and ended up making several. I need to stop buying earrings or I’ll have to keep making them. 😉