

DIY Shaving Soap Recipe (& How to Use Shave Soap)
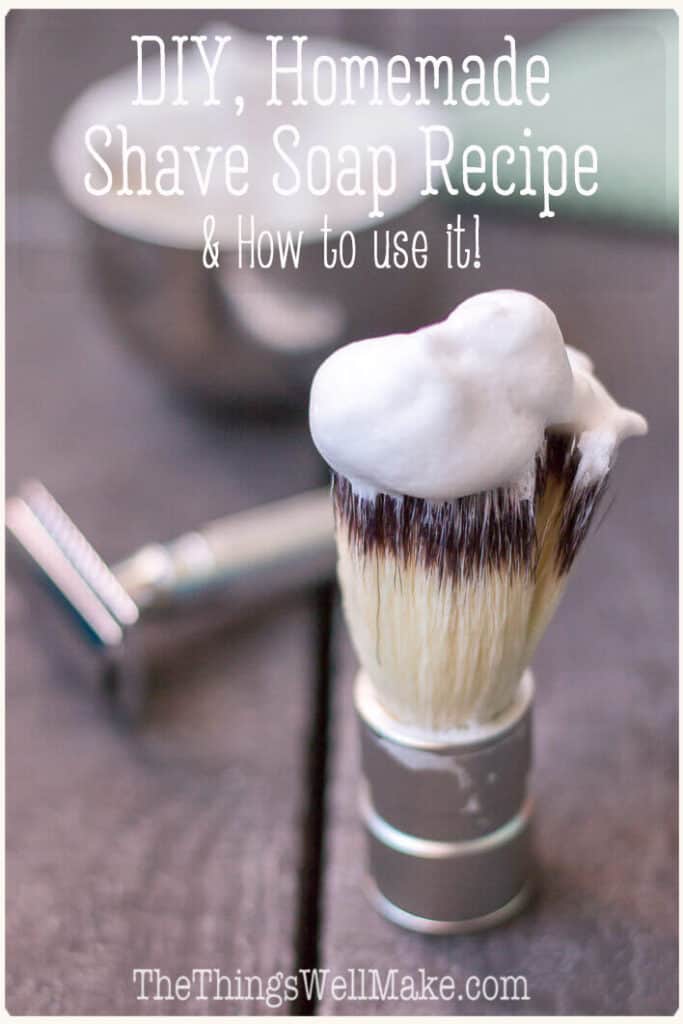
Ditch the toxic chemicals of commercial shaving creams, and use an inexpensive, more environmentally friendly, DIY shaving soap instead. Make your own shave soap, and learn how to use it to build up a protective lather.
A few months ago, I would have never imagined that I’d be making a shaving soap. Heck, I didn’t even know that shaving soap was even “a thing.”
What I did know is that I had stopped waxing, and had begun shaving again after my husband gave me an IPL machine. I didn’t want to be using a store-bought shaving cream after taking a look at some of the chemicals commonly used, so I started investigating what I could use instead. Plus, you know I always like a challenge when it comes to making my own cosmetics and natural beauty products, right?
I actually spent several weeks researching before I finally came up with my own recipe for a shaving soap.
Traditional shaving blades and wet shaving
At first, when I started researching the different products that you could use to help protect your skin as you shave, I found it really interesting how so many people have gone back to traditional type shaving methods. Rather than use the fancy new razors with multiple blades, many men prefer to use straight razors; yes, the ones seen used in the barbershops in movies! A lot of people also prefer to use safety razors with a replaceable single razor blade. I was surprised to find that most seemed to like those traditional razors better than the expensive more disposable modern counterparts!
I haven’t had a lot of luck with the disposable pink razor blades made for women, nor do I like the idea of throwing that much plastic in the trash, so I immediately looked into buying a more traditional type razor blade instead. I figured that if a lot of men seem to prefer them, a woman like me might like them better too.
The most “green” option, and the most appealing to me, was also the scariest option. The best option seems to be traditional straight blades that you keep sharp by rubbing over a leather belt called a strop. Despite my interest, I ruled out going directly for a traditional straight blade because I wasn’t sure that I’d be able to use it. (I tend to be a bit clumsy at times.) A high-quality straight blade is a bit pricey, and I didn’t want to waste the money if I wasn’t going to be able to use it right. I do think it’s the best option, though, and that you’d definitely get your money’s worth from buying a traditional straight blade with all of the money you save on disposable razor blades.
Instead, I opted to try out two different types of traditional razors with disposable razor blades.
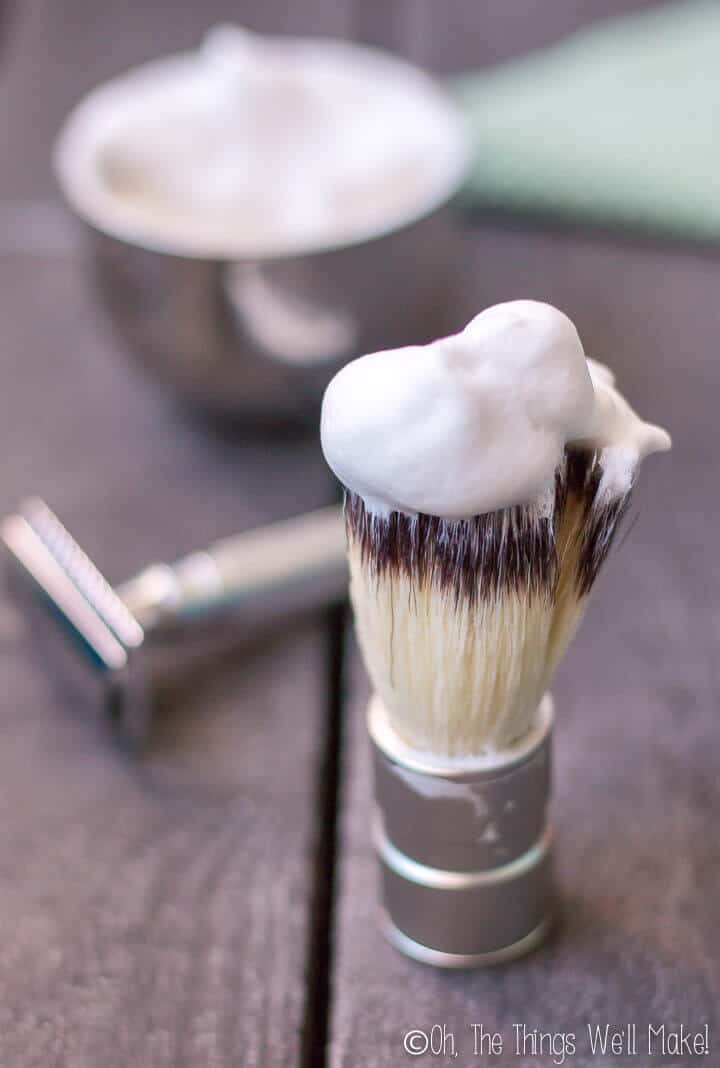
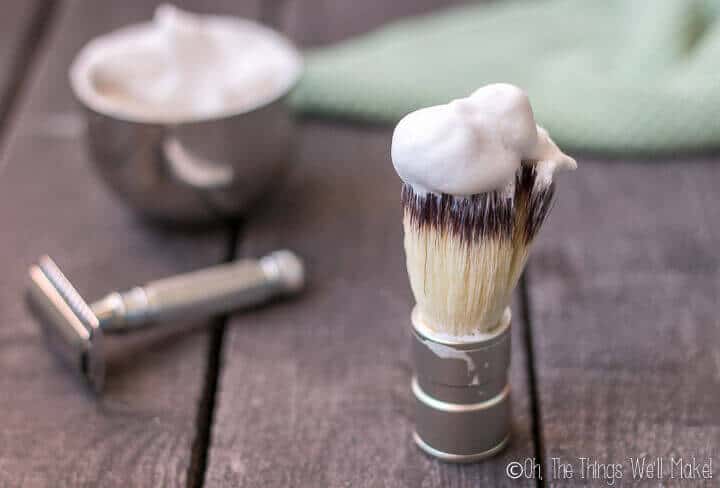
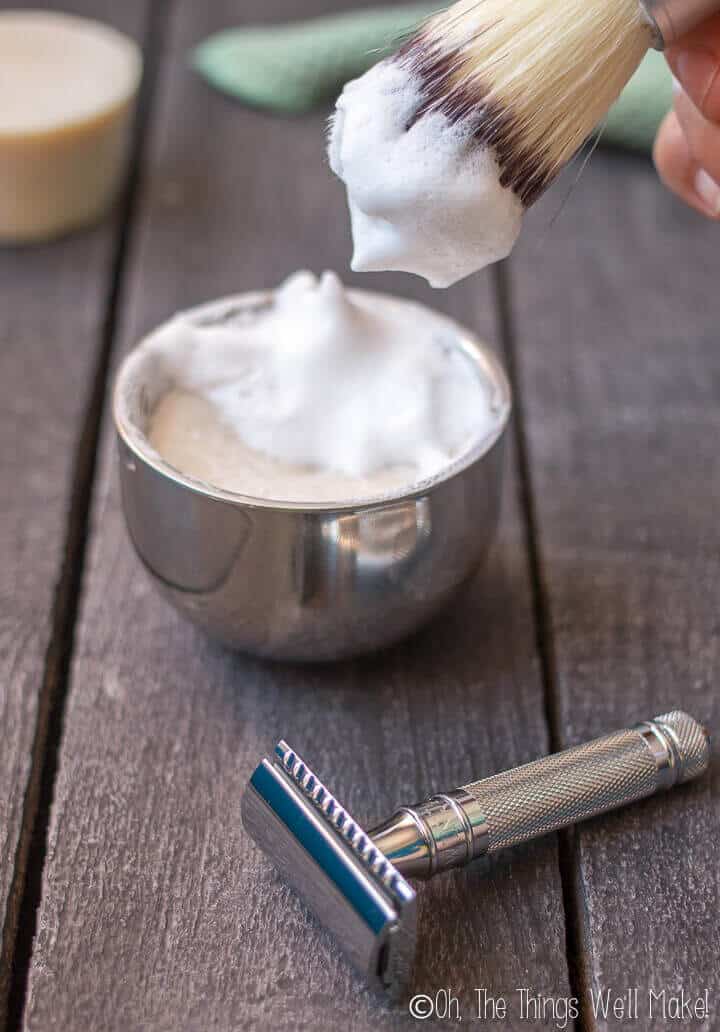
The easiest to use was the safety razor, which is the one I’ve shown in the pictures with my soap. I actually quite like that razor, and am very happy to never have to buy a plastic pink disposable razor blade again!
While I loved it, my curiosity was still piqued by the straight blades, and I decided to buy a more inexpensive model, a straight razor with a replaceable blade. I was actually surprised that it was much easier to use than I had ever imagined, and I didn’t majorly cut myself in any way while learning how to use it. (I did leave a little bit of a mark in a couple of places, but nothing that drew blood.) 😉
Why am I writing about the different types of traditional shaving blades?
Shaving soap and traditional razors go together like salt and pepper. 🙂 After the initial investment, both will save you a lot of money in the long run. Plus, they are both more environmentally friendly choices for shaving.
Plus, it was during my search for a good razor that I learned that shaving soap existed!
While browsing the different types of razors available, I found a lot of traditional shaving accessories like shaving bowls and brushes made for lathering up shaving soap!
What is shaving soap?
Shaving soap is a type of soap that is made specifically to have a long-lasting, creamy lather and the amount of “slip” necessary to allow your shaving blade to glide over your skin, protecting it while you shave.
Shaving soap actually helps aid in the shaving process more than the more modern shaving creams and gels because the soap helps remove the natural oils of the face and hair. This helps make the hairs more penetrable by water, which helps soften them so that they are more easily cut by the razor. The action of building up the lather on the skin with the brush also helps prepare the hair for easier shaving.
Shaving soaps normally have a high level of more solid oils that give a lot of lather like coconut oil, tallow, and palm oil. They often use a higher percentage of castor oil than other soaps too because castor oil helps hold the lather and make it last longer. Many shaving soaps also use bentonite clay, or other cosmetic clays like kaolin clay, to help provide more slip, allowing the blade to more easily glide over the skin.
Many shaving soaps, like cream soaps, use both types of lye: sodium hydroxide, the “normal” lye used when making a basic bar of soap, and potassium hydroxide, the type of lye used to make liquid soaps. To keep things simple this time around, I decided to stick with using only sodium hydroxide, and tried to use as few, simple ingredients as possible.
(I will probably work on formulating a mixed lye shave soap eventually.) ?
Why make your own shave soap?
Control your ingredients!
You probably know by now that my main reason for making things myself is to be able to be in control of the ingredients used!
I wanted this soap to be suitable for beginners and those who are avoiding palm oils and animal fats.
Instead of using palm oil or stearic acid (which can be harder to find, and can be derived from palm oil), I chose to use soy wax. Soy wax has a high percentage of stearic acid, which helps build up the creamy lather necessary in a good shave soap. (If you were to only use coconut oil, you’d have a lot of bubbly lather, but with big bubbles rather than the creamier lather that you want for shaving.)
Note that this recipe uses vegetable glycerin and that many (most) vegetable glycerins sold for cosmetic use are palm based. If you are avoiding palm derived ingredients, you should choose one that isn’t palm derived, of course. I’d suggest using one that is coconut-derived as soy and corn-derived glycerin tends to use genetically modified corn and soy.
Commercial shaving creams can have a lot of undesirable ingredients. That isn’t the only problem with them, though. Their containers contribute to a lot of unnecessary waste!
Shave soap is more sustainable than store-bought shaving creams
By making your own shaving soap, you can make a more natural product that is a lot more sustainable. Because these soaps don’t need any sort of container (unless you choose to use a reuasable glass container), there is no wasted packaging of your homemade product. The only waste comes from the packaging of the ingredients, and the ingredients can be used for many different projects.
Save money!
Shave soap is also very frugal. It’s inexpensive to make and lasts for a very long time. So, yes, you can also save money by making your own shaving soap.
How to mold the shaving soap
Make a puck form with PVC pipe.
Shaving soap is traditionally sold in “puck” form, which can be easily made by using a cylindrical mold like a PVC pipe.
To make soap in a PVC pipe, find a pipe with the diameter you want your shaving soaps to be. You can seal the bottom end with either a pipe cap, with a relatively thick plastic bag, or a couple of layers of wax paper held in place with some (tight) rubber bands.
Pour the soap, when it reaches trace, into the PVC pipe, and let it set for at least 24 hours. After 24 hours, freeze the soap within the pipe for at least an hour. Freezing will help harden the soap and make it shrink slightly, both of which will help you be able to slide the soap out of the mold more easily. To get a better idea of how the process works, check out my recipe for making peppermint candy soap using the same technique. There is also a video to show you exactly what you need to do.
Once you have un-molded the soap, you cut it into slices.
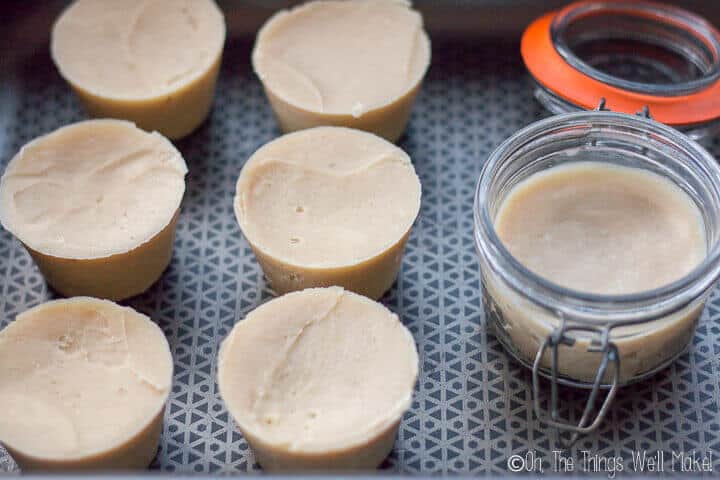
Use muffin molds
I used silicone muffin tins for making most of my shaving soaps this time. The thing I like about using muffin tins is that the puck shape formed in the tin is tapered on the bottom, just like the shaving bowl. I found that mine fit into the shaving bowl I bought almost perfectly. I’d suggest you stick to using only silicone muffin tins as some metals can react with the lye in the soap. If you want to use metal muffin tins, you should line them with something like plastic wrap first just to be on the safe side.
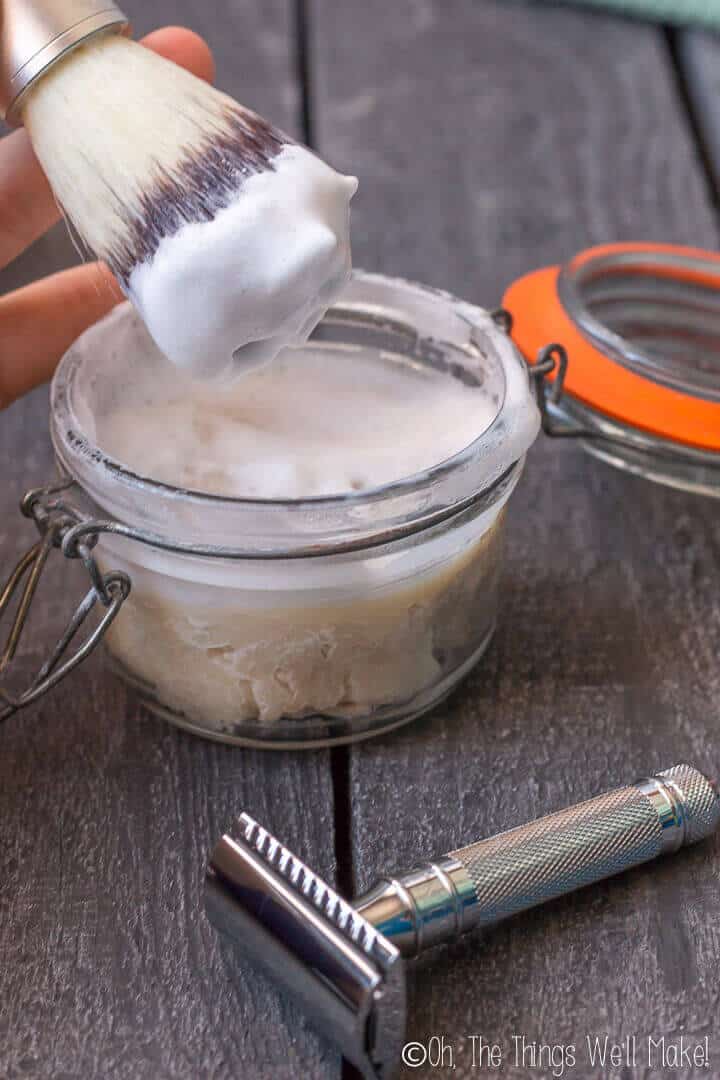
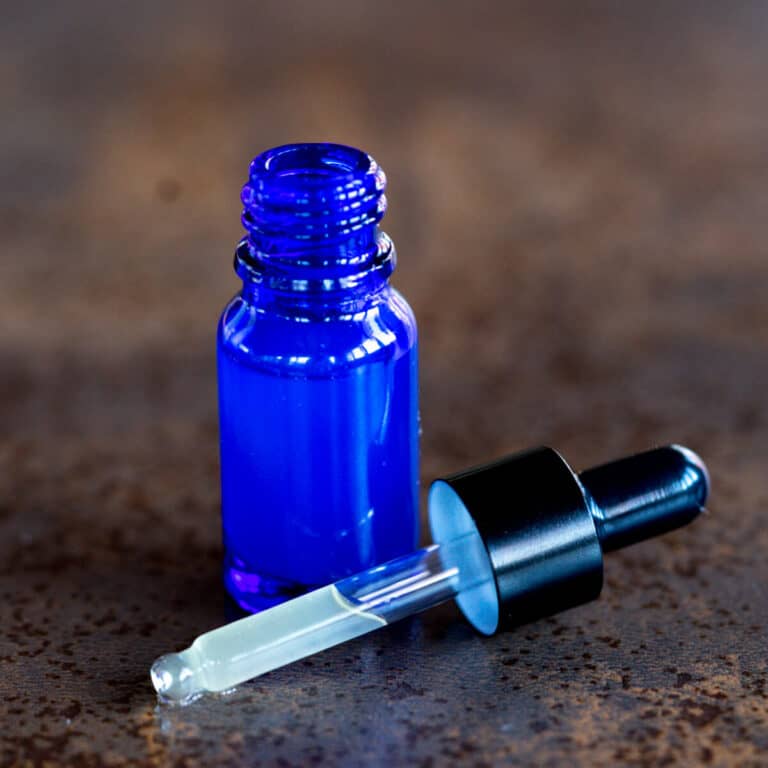
Use glass jars to hold the soap
Rather than mold the soap, you can choose to pour it directly into a glass jar with a lid. This is handy for easy storage between uses. the disadvantage to this method is that the soap can’t dry out well on all sides while curing so you may want to compensate by using slightly less water when making your soap. (I didn’t because I was making a variety of forms and it wasn’t a problem.)
Substituting ingredients in the soap
I don’t suggest making changes to the oils of the recipe unless you know what you are doing. When making changes to the oils used, you’ll likely need to adjust the amount of lye needed so you’d need to run the recipe through a lye calculator to make sure that it will still work. (Different oils/fats need to have a different “saponification factor” and use a different amount of lye for similar results.)
I formulated this recipe to be superfatted by 8-9%. Superfatting is the process of adding more oils than what you need to react exactly with the amount of lye in the recipe. You end up with some unreacted oils in the soap that can help condition your skin. This is done to help make a less harsh and more conditioning soap. (Too many oils, though, can make a bar of soap go rancid more quickly and can make it feel like it leaves a film on your skin when using it.) This recipe uses a high percentage of hard oils and coconut oil (a very cleansing oil), both of which tend to be very stable, so I felt comfortable using a relatively high superfat percentage to make a more conditioning bar of soap.
On the other hand, the aqueous components of the soap can be more easily modified. I used a combination of distilled water, glycerin, and coconut milk for the aqueous component of the soap. Glycerin helps add moisture to the soap, and also helps to build up a good lather. I decided to try using some homemade coconut milk in place of part of the water, too, to help slightly increase the amount of lather it would produce. I’m not sure if it actually makes much of a difference, though, and you can replace it with the same amount of distilled water if you prefer.
DIY Shaving soap recipe
DIY Shaving Soap Recipe (& How to Use Shave Soap)
Equipment
- Glass spring top jars
Materials
- 100 g coconut oil 76º
- 40 g avocado oil
- 60 g cocoa butter
- 60 g shea butter
- 80 g castor oil
- 60 g soy wax
- 53 g lye NaOH (Sodium hydroxide)
- 30 g glycerin
- 30 ml coconut milk
- 20 ml distilled water
- lavender essential oil
- orange essential oil
Instructions
- Mix together the glycerin, coconut milk, and distilled water in a medium sized bowl. (I like to use stainless steel. Avoid other metals as they may react with the lye. Certain glass bowls can break when heated rapidly through the chemical reaction that occurs when you mix the lye solution.)
- Measure out the lye and add it to the liquid mixture in the bowl. Stir until the lye is dissolved and well incorporated into the mixture.
This is best done outside or in a well-ventilated area. You should also use gloves and safety glasses when working with lye and the lye solution. Always make sure to add the lye to the liquid and not the liquid to the lye container. (For more safety tips and information about how to make soap, check out my post on making a beginner soap.) - The lye mixture will begin to get hot. Leave it outside to cool in an area where animals and children won't have access to it while you measure out the oils, butters, and wax.
- Heat the oils, butters, and wax in a large bowl over a double boiler to help melt the wax and butters. You can remove them from the heat once the butters and wax have melted and you have mixed them all together.
- Carefully pour the lye mixture into the oil mixture. (It may still be warm, so be careful not to burn yourself.) You can gently combine them at first with a stainless steel spoon.
- Once the oils and lye solution have been combined, begin to blend them together with an immersion blender. As you blend the ingredients with the immersion blender, they will become thicker and more opaque. When you have reached the consistency of a thin mayonnaise, you can stop blending.
- Add in any essential oils of choice to help add fragrance to your soap. I chose a combination of lavender and orange essential oils because not only do we love the scent of that combination, but both oils are thought to aid in healing skin irritations.
- Once you’ve stirred in the essential oils, you can pour the mixture into your molds or glass jars. Leave the soap uncovered and untouched for at least 24 hours.
- Because this soap uses mostly solid oils and butters, it should harden quite quickly, and you'll likely be able to unmold your soap after only a day. Check your soap for hardness, and unmold it if it has reached a hardness in which you can remove it from the molds without damaging it. If it's still soft, wait a few more hours or another day, as needed. Placing the molded soap in the freezer for about an hour will help you with the unmolding process. Not only will it help harden the soap, but it also slightly shrinks it to make it easier to remove it.
- Once you've removed the soaps from the molds, separate them and leave them in an area to dry out and further harden for several weeks. It's a good idea to turn the soap over occasionally so that the soap will evenly dry out on all sides. If you've used glass jars, keep the lids off the jars to help allow the soap to dry.
The saponification process will complete in the first few days after your soap is made, and you can technically use it immediately afterward. That said, the wait time will help form a harder bar of soap that will last longer and work better.
How to use Shave soap
Once you have your shaving soap made, it’s time to figure out how to use it!
At first, I thought I hadn’t made a very good bar of soap because it wasn’t lathering up as much as I expected it to. After a bit of studying online, though, I realized that the problem wasn’t in the soap itself, but was in my method for trying to work up a lather.
I found this video with a lathering tutorial very helpful for figuring out how to work up a lather with my shaving soap.
I realized that my main problem is that I wasn’t using enough water to try to work up a lather. Instead, I was really only working up a thick paste on my skin. You need to keep adding water throughout the process to turn the soap from a paste to a protective lather!
You can choose to lather up your soap in the bowl itself, or directly on the skin. I find that working up the lather on your skin is much easier and less messy.
- Wet your brush and sprinkle some water on the shaving soap.
- Swirl the wet, softened brush over the top of the shaving soap. You need to build up a good coating of the soapy paste onto the bristles of the brush, so keep swirling the brush over the soap until it is well coated.
- Wet the skin, and begin to work the lather directly on your skin. It will leave a thick paste on your skin at first and won’t be the right lather consistency quite yet.
- Add several drops of water to the brush, and continue to work up the lather. You should repeat this process several times, adding water, as needed, to build up the lather to the proper consistency.
- Once you’ve built up your lather, you can begin to shave. It should now leave a protective layer with the glide necessary to help protect your skin while shaving.
I’m really happy going back to more traditional, and more ecologically friendly, methods of shaving!
If you give it a try, I’d love to hear how it goes!


Hi Tracy,
Is lye, you are talking about, NaOH (sodium hydroxide) or KOH (potassium hydroxide)?
Thank you.
Hi Simona,
It’s NaOH for this recipe. Sorry about that!
When I switched over my recipes to a new kind of recipe card, some of the notes disappeared. I just updated the note after the ingredient in the recipe card to show that.
I may try a dual lye soap for my next shave soap attempt. This time, I wanted to start simple for beginner soapers. We still have a lot of this one left so it may be a while. 😉
Hi Tracy. I have tried to follow your intructions to make the soap today. However, It doesnt look like alright. I mix the mixture when it was still quite warm. Is there anything to be careful for the temperature when i start mixing? It looks like a butter in the end that i cant really pour my mixture. I used a spectular to put it the moulds.
Thanks a lot.
im just sharing what other ppl have passed on to me and how will you kno w/o asking Qs ,right? i had a girl tell me once the lye water and oils n butters when ready should be within a 5 min range aim for 100 degrees for each just as a quick way to recall back888 AS A RULE i guess when that info isnt available w/the recipe!*
Hello,
Yes, I’ve heard that (and similar “rules” about temperature) numerous times over the years. That, of course, was after having made many successful batches of soap without worrying about temperatures and without having issues. Here in Europe, it’s actually more common to use the warmth of the lye solution (from the chemical reaction) to warm the oils than it is to test the temperatures, heat the oils and/or the lye solution. They’re definitely not within 5 degrees when most people mix them together- not even close.
I’ve never found any good information that backs the reasoning behind those rules- and I’ve stubbornly experimented with extreme temperature differences (both ways) to see if I can provoke a temperature-related failure. I’ve never been able to do it.
I do suggest people, especially beginners, melt their cold solid fats first in most cases (despite the fact that I successfully make soap without doing so quite often) because not doing so can confuse people into thinking their soap has reached trace when it hasn’t yet. It also helps move the process along more quickly so it’s not painfully slow. (Cold slows things down!)
That said, I still don’t know why those rules are around in the first place.
I’ve found when it comes to soap making (and a lot of other DIY things on the internet), many people copy each other without doing any real experimentation of their own. While that helps spread good information, it also sometimes spreads misconceptions and errors.
I’m not saying this is necessarily a misconception. There may very well be sound reasoning behind it. I’m just saying that I don’t think it’s a necessity by any means.
I’m still trying to get a soap to fail only because of the temperatures when making it- but to this point, any failures I’ve had have had other explanations. I’ve never been able to make a soap fail due to extreme temperature differences. (And, yes, I’m crazy and stubborn enough to try it often.)
Hi Tracy!
I tried making this shaving soap today but it did not go very well…I used sweet almond oil instead of avocado oil and beesewax instead of soy wax. I calculated through brambleberry lye calculator at 8 % superfat level. The suggested amount of liquid was 132g for 50g of lye. Your recipe (total water mixture 80g) is not even close to that but I actually went ahead and used yours. The mixture of the lye and the liquid did not mix well and it looked like icing. So I ended up adding more water like the lye calculator called for. My second problem was the oil mixture. I melted them all together but at around 57℃/134℉, it was already getting hard. I didn’t want to mix a hot oil to a cooled temp lye mixture so I stopped right there and thought I ask you for help.
I have been making cold processed soap for 5 years now but this is the first time I ran into a problem like this. Thank you so much for reading!
Hi Junko,
Sorry, you caught me in the middle of the night here in Spain. I had just gone to bed when you wrote.
If I remember right, I think I may have even (slightly) reduced the water amount intentionally to allow for people to be able to pour the soap into jars and use it that way. (Being in jars, the sides of the soap aren’t exposed to air, so they won’t dry adequately during the curing time.) Most of the shaving soap recipes I found used less water than called for in the lye calculator in part for that reason. My lye mixture definitely did not look like frosting, but I guess seeing as glycerin and the coconut milk, depending on which one you use, could be thick in a way, maybe the lye reacted to something in your particular brand of coconut milk? I usually use homemade coconut milk to avoid thickeners and emulsifiers. I can’t remember which one I used when I made the soap, though. (I may have used canned to make sure that the lye wouldn’t react- but perhaps the lye reacted to something in yours?)
The extra water shouldn’t be a problem, if you didn’t go overboard. It may just take a bit longer to dry the soap in the end…
I used soy wax to specifically help with the lather because it’s high in stearic acid. Beeswax won’t do the same thing. It would better be replaced by stearic acid or palm oil. That said, you already have a mixture made, so let’s at least try to salvage it to make it usable. It may not make the same creamy lather, but hopefully it will be close, and in the worst case scenario you should have a nice soap for the shower. 😉
I have never had a problem mixing hot lye solution with cold oils or hot oils with a cold lye solution. I know that there are books out there that make a big deal of this point, but I’d never heard it until I’d already been making soap for awhile, so I’d never worried about the temperatures being the same. Hearing that piqued my curiosity, and I’ve purposely mixed a hot lye solution with solid, cold oils, for example, and had absolutely no issue (other than it was slightly harder to mix together with a solid oil mass). 😉
I can’t remember if I’ve specifically tried a cold lye mixture with hot oils, but my guess is I’ve probably done that numerous times when trying to make liquid soap as I use the hot process method and my oils are hotter than normal when I do that. My point is that I wouldn’t worry too much about any of that.
In fact, by this point, I’d probably just hot process it all. I’d probably heat the oils in the double boiler with the lye solution and carefully mix everything together until trace. That would also help evaporate off some of the excess water. The only problem with that is that this already makes a very thick mixture to work with when pouring into molds. (Check out the texture on the picture of the soaps- it isn’t smooth like when you pour a liquid mixture into the molds. I think my final mixture WAS like frosting. 😉 )If you hot process, it may get even harder to work with. To account for that, you can do several things- just heat until everything is combined, and then start with the immersion blender. I did this in the summer, so I probably had a bit more working time before everything got solid.
Or- you could just do the whole immersion blender thing over the heat source. If it gets too solid to spread the mixture into your jars or molds, you can add a bit more water first. Don’t add so much as to try to get a smooth liquid to pour, though- just enough to be able to get the soap where you want it!
Perhaps I’ll have to make a video the next time I make this soap. It appears that it would have been helpful! At the time I hadn’t really started to do that, but I’ve since been filming myself make pretty much everything! (It may be awhile, though, as we still have a lot of shaving soap. It does last for some time, especially if you don’t shave very often.) 😉
Good luck! I’ll be in and out all day, but can check in to see if you have any problems or questions along the way!
Hi Tracy! Thank you so much for taking your time to help me with the situation so quickly. I am so grateful! Very interesting about the temperature of the oil and lye mixture. I had no idea! I ended up mixing a very hot oil and butter with cooled temp lye mixture. I actually didn’t use coconut milk, I just used water. The combined mixture got instantly got thick like pudding even before I got to mix them! I managed to put it in a mold and I was able to take the bars out after a couple of hours. It was dark brown in the beginning but it’s off white and very hard already. I made these for my husband and he can’t wait to use it next month!
Thank you again for your advise and I will let you know how it turns out!
Hi Junko,
I missed your new comment when going through my messages. (I’m getting used to a new program that allows me to better manage my comments, but I didn’t realize that the replies to replies were in a separate folder, so I didn’t see them! Oops!)
Interesting! Mine are an off white too, so it sounds like in the end, it all worked out. I’m looking forward to hearing how it works out for him!
Hi Tracy. I think i have the same problem that my mixture is quite hard. This is my first time making a soap. I used everything exactly the same as your recipe. Both mixtures are hot when i combine them. Is this called bot process?
Hi Ashley,
Yes, this is a hot process soap. I don’t normally use the hot process, but did choose it for this soap because I wanted to make a soap with less liquid in it. If you are pouring this into containers, it is almost impossible for the soap to fully dry properly, so I was trying to compensate for that.
This definitely isn’t a liquid that you pour into the molds like some of my other cold process soaps. I also used a spatula for filling them.
My guess is that you did everything correctly, and perhaps I need to be a bit clearer about the final consistency in my post. 😉
This is part of the reason that I now film almost everything I make- it helps people visually see the process, consistency, etc. – it also helps me remember when I’m having doubts.
since soy is an estrogen , I avoid it.
wonder if bees wax would work ?
Hi Lisa,
Soy wax is high in stearic acid, which helps make the nice, creamy lather that you want in a shaving soap. Beeswax won’t do the same thing.
If you want to avoid soy, you can substitute it with stearic acid or palm oil. A lot of people avoid these because of the palm oil crisis. Stearic acid can be found that is derived from other plants or even animals, but you’d have to specifically look for that information.
I just ran it through a lye calculator substituting the soy wax for stearic acid, and you would be fine doing a switch using the same amount.
Thank you for some very interesting reading .
I have used a strait single blade razor all my life ( I inherited from my dad ) when he passed away when I was 19 yrs old I’m now 62 yrs and the razor has been polished to my face perfectly .
On occasion over the years I have used just plain simple olive oil to shave with with no discomfort or razor burn and as I used two to three drops of oil with wet hands on wet face it acts a a moisturizer as well.
I look forward to trying your recipe for the shaving soap and using it.
Hi Jon,
Wow, that’s so cool that you have been able to use that same razor for so many years! What a wonderful keepsake to have.
I really love how frugal and environmentally friendly a traditional straight blade is. It’s too bad that disposables took over in the name of convenience.
I hope that the soap works well for you!
Hi Tracy,
Loved the recipe – made a batch last week. The soaps are still curing but noticed the unrefined cocoa butter I used is kind of clashing with the essential oils not in a bad way but was looking for a more rustic/manly type fragrance. Hoping it will mellow out with curing. In the meantime, am attempting a second batch but only have the unrefined cocoa butter – did not receive my order yet for the refined version. Can I substitute the cocoa butter with all shea or mango butter? Or is there another essential oil blend I can use that blends better – was thinking cedarwood and lavender. Thanks so much for the recipe. Can’t wait to try it out!
Hi Jayne,
I’d probably choose the mango butter if I were going to make a switch. Mango butter is also high in stearic acid which should help with the lather we’re looking for in a shaving soap. I’ve run it through the lye calculator, and you could substitute it with either. I’ve never tried it, though, so I’m not sure what the final result would be.
I did a lot of research when I formulated my recipe, but it’s been awhile, so I don’t remember exactly why I chose the fats I chose in the proportions I chose.
Hi Tracy,
Can I supstitute goats milk for coconut milk or distiller water if I were to ad a preservative? I’ve been looking for a goats milk shaving soap recipe and I just can’t find one. Your recipe I thought was the best one out there and was hoping I could either substitute the coconuts milk or the distiller water….. What’s your thought on this?
Also how many bars does this recipe yeild?
Hi Sandy,
Thanks!
You should be fine substituting the water and/or coconut milk with goats milk. There’s no need to add a preservative when making a bar soap like this.
I chose coconut milk because coconut helps to get a good lasting lather. I’m not really sure how the goats milk would change things, but I’d say it’s really the oils make the biggest difference. I’d imagine you’d still end up with a good lather, and that it may add more “creamy” to the lather.
Have you ever worked with goats milk before? I explain about the process in my pumpkin spice soap recipe. You’ll probably want to freeze it first to keep it from burning when reacting with the lye. It may be easiest to use a mixture of water and goats milk, so substituting the coconut milk might be the simplest way.
I wish I had written down exactly how many soaps I made. I think I filled 6 muffin cups to make 6 puck sized soaps to fill the shaving bowl. I’m not sure if I filled 1 or 2 other small glass jars with lids. I thought for sure I had made 2, but can only find one right now. I have soaps drying all over the house, though, so… 🙂
It looks like in the pictures I did only make one glass jar full. It appears that the picture probably shows all of the soaps I made with the recipe. I didn’t make a huge batch because I didn’t really know how much we’d be using it. I’ve been waxing during the summer because I don’t want to use the IPL machine during the summer, but I’ll be shaving and using the soap again this fall.
Another great post/tutorial!
Will definitely be trying out this recipe soon!
xo
Theresa
Thanks, Theresa!
This one was a lot of fun for me. 🙂
Can you use bees wax instead of soy wax
Hi Ladell,
Well, yes and no.
You could exchange the soy wax for beeswax, but you’d need to use less lye (48g) to get a similar amount of superfatting in the soap. That said, beeswax will not give a similar lather for this type of soap. The soy wax is used because it has a high amount of stearic acid, which will help with the lather normally wanted in a shave soap.
If you don’t want to use soy wax, but do want to get a similar type lather (keeping in mind that I haven’t personally tried making the soap with either of these combinations, but that in theory they should end up with a similar type soap), you can exchange it for either stearic acid itself, or kokum butter.
A lot of people don’t like to use stearic acid because it is usually palm derived, and a lot of people try to avoid using palm derived ingredients for environmental concerns. That said, it’s the easiest/cheapest substitute, and if you are lucky, you may find stearic acid derived from some other fat. I’d probably use 54g of lye, rather than the 53g of lye, if making the substitution, but it isn’t a big deal either way. (you’d just have an even higher amount of superfatting if you didn’t make the change.)
Kokum butter is supposed to be a great ingredient for shave soaps. It has about 60% stearic acid, a little less than the other options, but it’s supposed to work pretty well. I haven’t seen it around here, and have just recently learned about it, so I haven’t tried it yet. That could be a great solution for those who are avoiding both soy and palm. When using kokum butter, you can do a direct substitution, and use the same 53g of lye.
If you do try it with another oil/wax, I’d love to hear how it goes!
Yay! I cannot wait to try this thank you.
I’m so glad you saw the recipe. I was going to try to contact you to let you know that I finally got it up! 🙂
I’m really enjoying it so far. I hope it works well for you too.