

Easy DIY Treadmill Desk
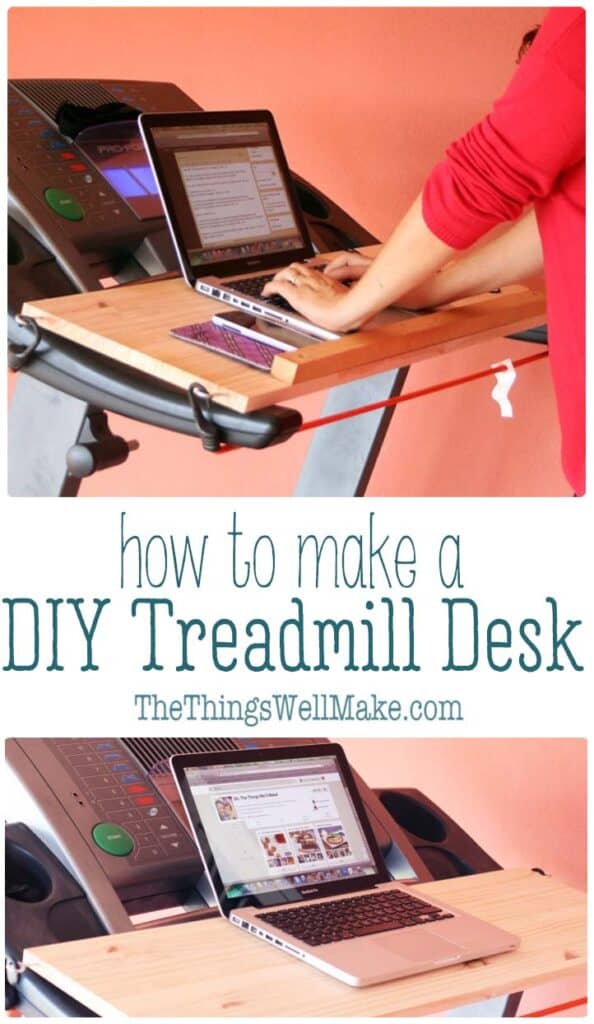
Get in those extra steps while working on your computer or watching your favorite videos using this removable, easy treadmill desk that you can probably make in under an hour!
I finally did it!
Despite writing a blog that often focuses on making things in a healthier way, I didn’t feel like I was living the healthy lifestyle myself.
Most people don’t realize the amount of time that goes into blogging. It isn’t just about making a few recipes, taking pictures, and showing them to your friends. There’s a lot of work that goes on behind the scenes like answering comments and emails, networking with other bloggers, keeping up with social media, constant updating of older posts, etc. Before you know it, you’ve spent the entire day sitting in front of your computer, hunched over staring at a screen.
I felt a bit hypocritical: writing about living a healthier lifestyle while sitting in front of a computer for hours on end, almost every day. Doesn’t sound so healthy, does it?
I was doing the occasional exercise video, and still love hiking on the mountain, but I just wasn’t getting it in every day, and even when I was, I was still sitting down for way too long.
The days I was exercising, I felt guilty for not working on my blog. The days working on my blog, I felt guilty for not exercising. Every day, I feel guilty that my house isn’t a bit more clean and organized, but that’s a whole, other story. 😉
So, I finally did what I’ve been wanting to do for some time now, and I made myself a treadmill desk!
How easy is it to make?
Once I had all of my materials together, it literally took me less than 20 minutes to finish my project. You just need a few simple materials, and pretty much anybody could whip one of these up for themselves to try it out.
Where I got the idea
Years ago, I looked up ideas online. I already had an idea of how I was going to make the desk, but I wasn’t sure how I was going to attach it. At first, I thought to use cords to tie it in place, but I later found a better idea: bungee cords! Using the bungee cords is really a genius idea because it makes the desk easily removable for those times that you might want to use the treadmill without the desk.
I wish I could take credit for having come up with the wonderful idea myself. I’d happily send credit to the person who came up with the idea orginally, but, after seeing the idea on several blogs, I don’t really know who that is.
Is it hard to use?
To be honest, I wasn’t sure that I would even be coordinated enough to use the desk. I’m a huge fan of multitasking, but I’m not thee world’s most coordinated person. You mean I have to think, write, and walk all at the same time?!?!
You may have the same concern, which is why I wanted to tell you how I feel about it.
In the end, it actually feels very natural to me. Most days, I feel so much better when I’m writing while walking on my treadmill. I think I even concentrate more, and have an easier time thinking and writing what I want to say. (When I’m sitting on the couch writing, I get easily distracted by other things, and lose focus, making it difficult to write.)
When I first wrote this post, I had only been using my new desk for about a week. It felt life-changing, though. I had more energy and felt more motivated to blog! I also felt healthier and less of a hypocrite! 🙂
Since then, I have to admit that I go through phases. I’ll go months using the desk happily, and then will get into a rut where I stop using it for a while. Some days, it isn’t as easy to write while walking as other days. (And some projects, like editing photos, I save for either sitting down or standing still.)
The people in this “active workspace” study found that there was a bit of a learning curve too. People had to get used to working on the treadmill. They also adjusted the speed depending on the tasks being done. When talking on the phone or thinking and and planning, they could walk faster than when they were typing.
How to use a treadmill desk
There isn’t just one way to properly use a treadmill desk. They’re very versatile and can be used differently depending on your goals or fitness level.
Walking while working
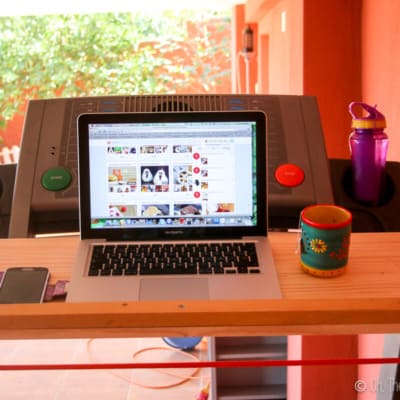
Because I’m a blogger, I do a lot of writing. So, most of the time, I use the treadmill desk on a slow 5 kilometers per hour speed. I walk as I write posts, or answer emails and comments. Sometimes I’m able to do more complicated writing or editing on the treadmill, other days I can’t.
Jogging or running while watching videos
Sometimes I want a bit more of a workout or just want to release a bit more energy jogging. I get easily bored while jogging, though, and normally want to stop right away. Having something interesting to watch helps me to keep going!
I either watch YouTube videos, movies or TV shows, or even blogging courses or courses in cosmetic formulation, all while jogging. I just place my computer on the treadmill, start the video and jog till I can’t jog any more! 😉
A standing desk
Sometimes, I get to the treadmill desk and find that I just can’t write and walk that day. Either I’m really tired, or I’m just having an off day concentrating. Those days, I often stay on the treadmill and write for a while, but with the treadmill off.
Sitting all day isn’t healthy. While it would be better to get some extra steps in, just standing for a while can be better than nothing!
Materials
To make this desk, you’ll need to have a treadmill with armrests, of course. Other than that, you only need a few materials to transform it into a working machine.
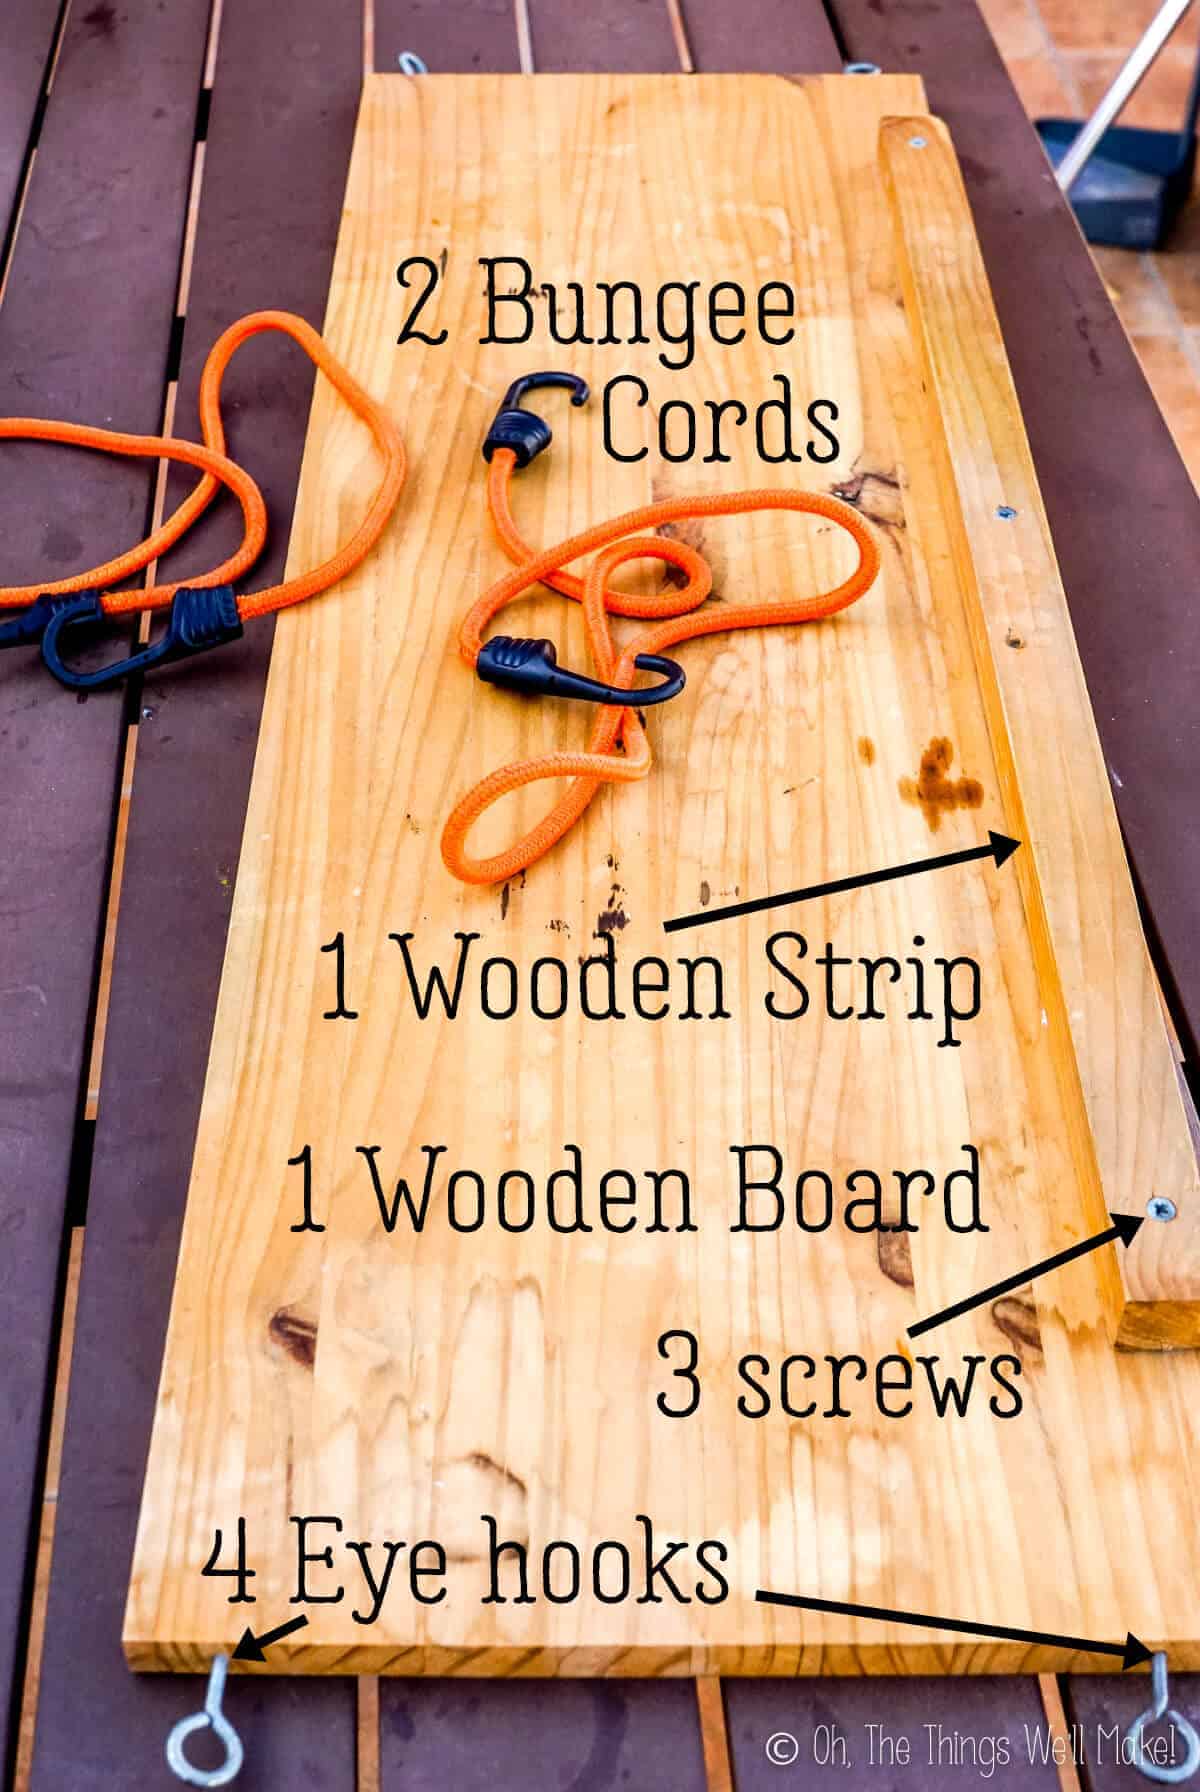
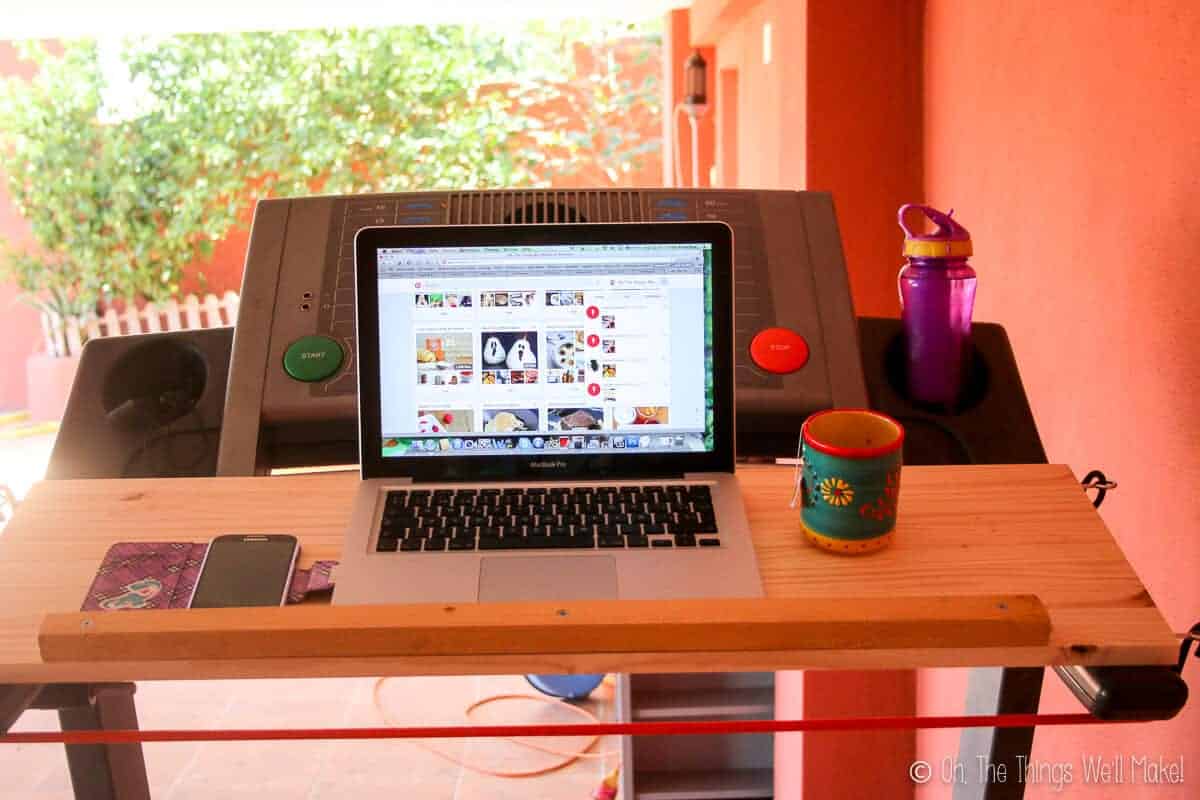
- A wooden board (pine or plywood are great) whose length is equal to the width of your treadmill. It doesn’t need to be thick, but it should support the weight of your computer and should be able to handle you leaning on it every once in a while. It should be wide enough to comfortably hold your computer, but not so wide (deep) that it takes up too much of the length of the treadmill. My board is a pine board that measures 92cmx30cmx1.5cm.
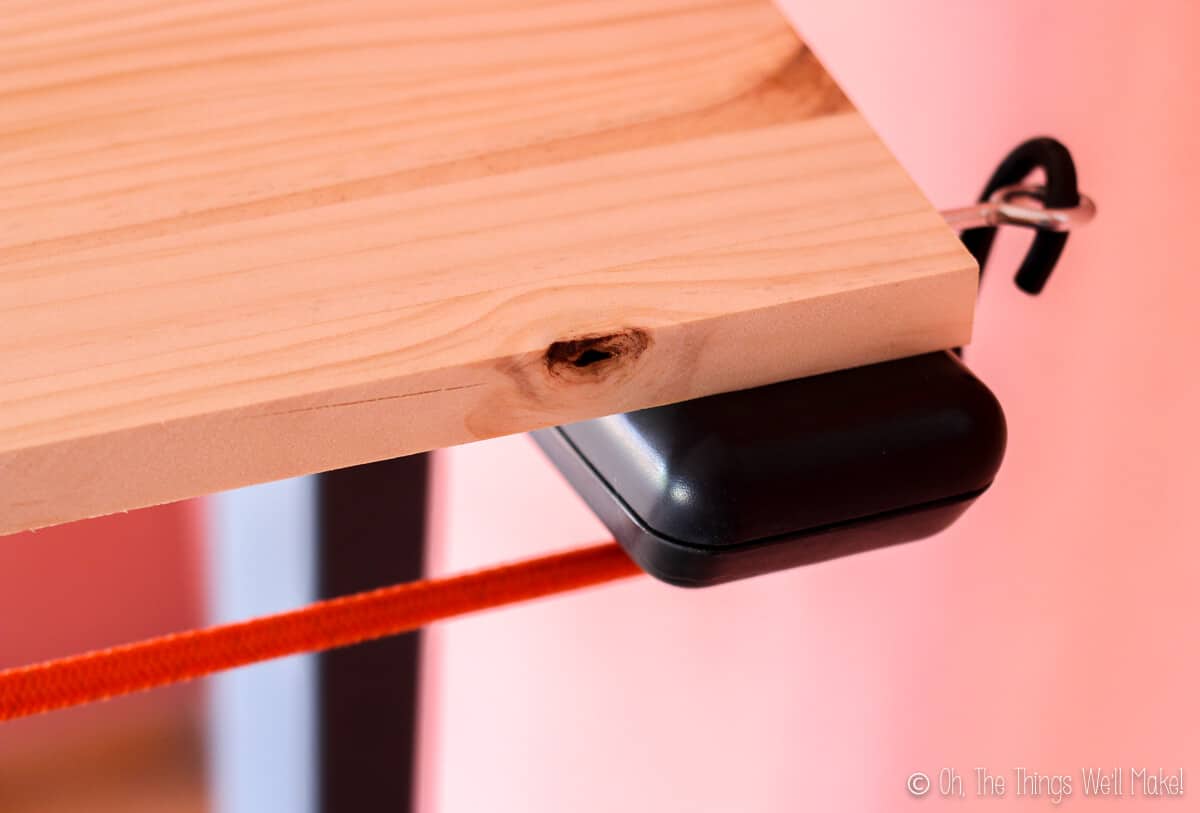
- A wooden strip to serve as a ledge that keeps your computer from sliding off the desk. This is optional, but I highly recommend adding it. If you have a long enough strip, you can cut it to the same length as your desk board. I found a shorter piece in our scrap wood and used that. It was wider than my computer and allows me to keep my phone or a booklet for jotting notes (or both) by my computer. (Mine measures around 60cmx3cmx2cm.)
- 3 screws – The screws should be longer than the depth of the wooden strip (in my case 2cm), but not as long as the depth of the strip plus the depth of the board (in my case 2+1.5=3.5cm). (Mine are 3cm long.)
- 4 large eye hooks. The size of the hooks isn’t that important. The hole should be large enough to fit the hook of the bungee cord, though. It’s also important that the wooden board is thick enough to accommodate the size of the screw part of the eye hook.
- 2 bungee cords
Tools
While you could try to make this by hand with brute force and a screwdriver, it will be easier to make if you use a drill.
- Drill
- Drill bit (around 3-4mm to make it easier to screw in the screws and not split the wood.)
- A countersink drill bit (optional)- helps you to make a rounded hole for the screw head to fit into, leaving the screw flush with the wooden strip.)
How to make the removable treadmill desk
Once you have your materials together, this is very simple to put together.
1. Measure the width of the armrests of your particular treadmill. I measured from the outside edges, and mine is 92cm across.
2. Next, measure the depth that you want your desk to be. I wanted mine to be just deep enough to comfortably hold my computer, and decided on an even 30cm. (I used a board that was already 30cm wide so I didn’t need to cut it.)
3. Find a wooden board in the measurements you want your desk to be. I went to the hardware store and had them cut a 30cm width board at 92cm, forming a 92cm x 30 cm rectangle. While I was there, I bought a package of 4 eye hooks, and some bungee cords.
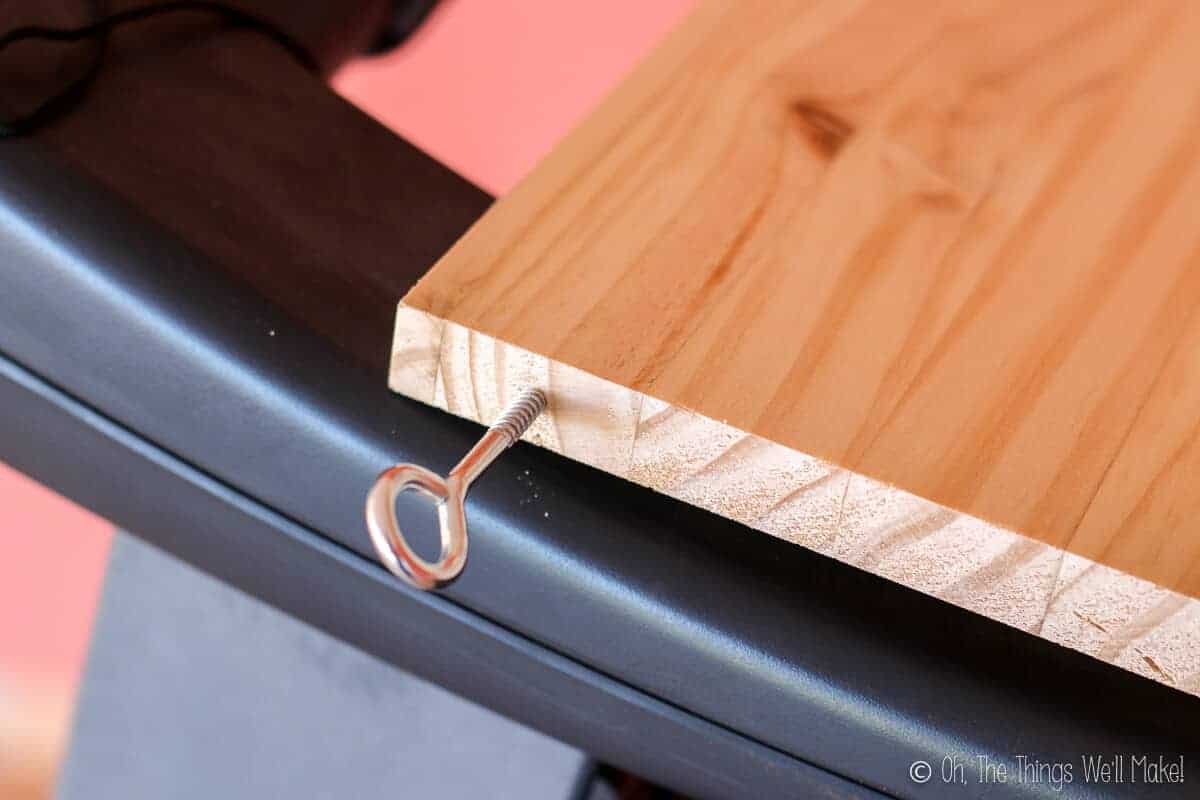
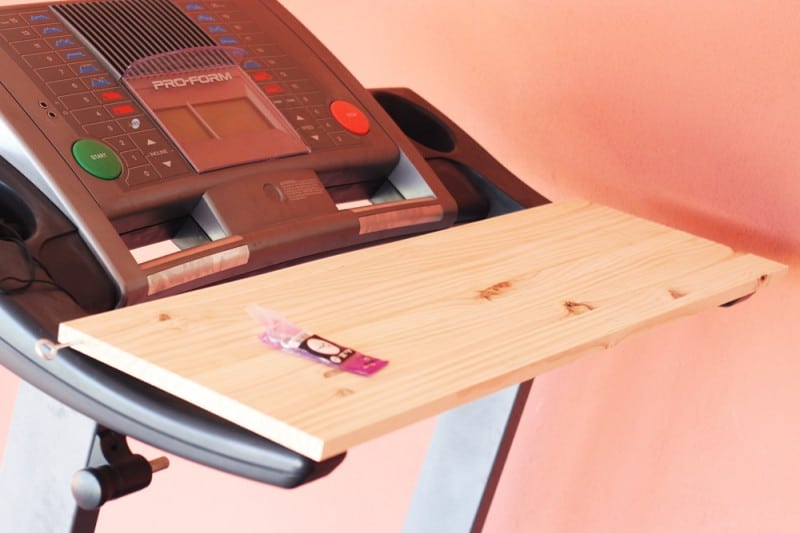
4. When I got home, I screwed two eye hooks on either side of my desk-to-be (One at the top, and one at the bottom). You can use a drill to drill small holes where you want to place the eye hooks to make it easier to screw them in place.
5. My desk was pretty much done!
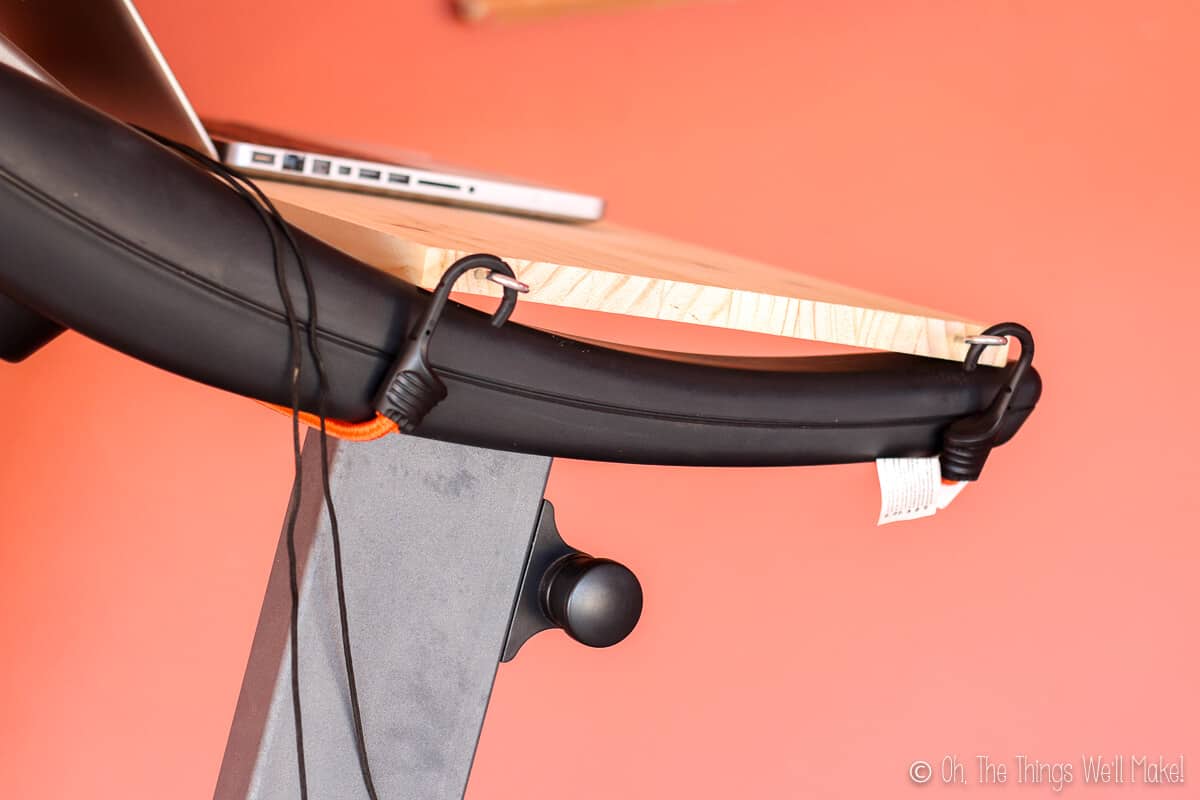
To put it all together, I took the two bungee cords, in the size that worked the best for the size of my treadmill, and hooked them from one side to the other, underneath the handrails.
Adding the ledge
The first day I used my treadmill desk just like that. It worked well, but I decided that I wanted to add an extra ledge to keep my computer from falling. My computer stayed up pretty well without it, but I couldn’t keep my phone next to it, in case someone called. The ledge works perfectly for keeping everything in place.

I used a small wood strip that we had around the house, and screwed it in place at the bottom of my desk. (These were the same strips that I used to make my earring organizers with wine corks.) 😉
To add the ledge, I’d suggest drilling a small hole through both pieces of wood where you want the screws to go. That helps keep the wood from splitting and makes it easier to add the screws. (The diameter of the holes should be smaller than the diameter of the screws!)
To get a more professional look, you’ll want the heads of the screws to be flush with the surface of the desk. This can be achieved by using a countersink drill bit to hollow out just enough wood on the surface of the wooden strip where the screws will go to fit the heads of the screws.
Using the desk
To use the desk, place it on the armrests of the treadmill. Hook it in place with the two bungee cords. I loop one cord around the back of the treadmill. I then hook the other bungee cord from one hook, under the handrails of the treadmill and into the hook on the other side. You can also try crossing both bungee cords around the back of the treadmill if it feels more secure that way with your particular treadmill and bungee cords.
It’s easy to remove the desk part whenever you want to run or fold up the treadmill for storage. Luckily, it’s just as easy to put it in place again too!
I love that the treadmill also has cup holders in place, making it easy for me to have some sparkling water or homemade chai tea right by my side when I write!
I hope you like it and take charge of your health and make one yourself. Sitting around too long each day is never a good idea!
Easy Treadmill Desk
Equipment
- Drill
- Drill bit (around 3-4mm
- A countersink drill bit (optional)
Materials
- A wooden board
- A wooden strip
- 3 screws
- 4 large eye hooks
- 2 bungee cords
Instructions
To make the desk
- Measure the width of the armrests of your particular treadmill from the outside edges.
- Next, measure the depth that you want your desk to be. It should comfortably hold a computer without taking up too much room on the treadmill. (Around 30cm is good.)
- Cut the wooden board to the measurements calculated above. (Mine was 92cmx30cm)
- Screw two eye hooks on either side of the board; one at the top, and one at the bottom. You can use a drill to drill small holes where you want to place the eye hooks to make it easier to screw them in place.
- Cut the wood strip to the same width as your desk (or use a smaller pieces that you have on hand).
- Screwed the wooden strip in place at the bottom of the desk using the 3 screws. Again, to make it easier and to keep the wood from splitting, drill small holes in place where you want to place your screws. For a more professional finish, use a countersink drill bit to hollow out enough of the wood for the screw to fit flush with the board.
To use the desk
- Place the desk on the armrests of the treadmill. Hook it in place with the two bungee cords. I loop one cord around the back of the treadmill and hook it on the back eye hooks. Next, hook the other cord from one side to the other underneath the handrails.


Amazing! I have been looking for a treadmill desk attachment and they are all so expensive. This is such a good idea! As soon as I read this, I went to the store to get everything I need and I am making this later today. Fantastic! You have saved me at least half of what I would pay for the cheapest treadmill desk I would have had to buy. Thank you!
You’re very welcome! I’ve been happily using mine for years now and still use it! 🙂
Thanks so much for this! I work from home and I find myself just sitting way too much. I’m ordering the materials right now.
Hi Nickie,
Great!
I hope you love using it as much as I do.
There are some things that are a bit tricky on the treadmill, but I love it for answering emails, comments, and writing out posts- which is most of my computer time most days.
Tracy,
I’m doing it!! Did you find that it slipped at all from the vibration of walking? I sit all day and am really tired of having a tight back and shoulders. I would love to get back to walking on my treadmill too! Win!!
Thanks for blogging about it 🙂
JoAnne
Hi JoAnne,
I haven’t had any issues with slipping, but the arms of my treadmill have a sort of rubbery coating, so that may help keep it gripped in place. In any case, the elastic ties do a good job of holding it in place.
I hope it goes well for you. I find that it really does help on those days when I’m feeling the tight back and shoulders. I’ve found that I’m not good at editing photos while walking, so that sort of work I still do seated, but I love writing posts and checking email at the treadmill.
Thanks for your comment!
Wow. What a cool idea! I don’t have a treadmill, but if we ever get one, you can bet I’ll be making this. 🙂
Hi Crista,
Definitely! I feel so much better when I work using the treadmill desk.
Thanks for your comment! 🙂
Super smart and just what I need. Thank you.
Hi Alice,
Thanks! I hope you enjoy it as much as I do! 🙂
I love my treadmill desk. SO GLAD I finally did it too: http://www.jennifermargulis.net/blog/2014/01/dont-read-this-sitting-down-or-why-im-buying-a-standingwalking-desk/
Wow- that does look nice, but that price tag is pretty hefty, too. That’s the price for just the desk?
In all honesty, though, even a hefty price tag would be worth it for me now that I see how much better I feel when I work for several of my hours on the treadmill. I think something like that would be great for an office for somebody who is doing more than just writing and social media at their desk. For me, this covers my basic needs quite inexpensively.