DIY Garden Markers
Super cute and easy to make, these polymer clay garden markers are a durable way to dress up your garden.
Ingredients
- Metal skewers for kebabs or other metal wire with a diameter of around 3-4mm
- Polymer clay
- Rolling pin
- Parchment or wax paper
- A toothpick or bamboo skewer for writing on the clay
- An oval cookie cutter knife, or other round/oval recipient to use as a cutter.
Instructions
- Preheat the oven to the temperature setting for your particular polymer clay brand. (It's usually between 230ºF-275ºF /110º- 135ºC.)
Make the clay disks
- Knead the clay to soften it and make it workable. This is probably the hardest part of this tutorial. I usually roll it out with a rolling pin, between layers of parchment paper, to get it into thinner pieces rather than trying to knead thicker pieces of the clay.
- Once the clay is workable, roll it into a thin sheet. I made mine around 4mm thick.
- Cut the clay into round or oval shapes. I find that the easiest way to get smooth edges is to use some sort of cookie cutter. If you don't have the right shaped cookie cutter, try using something you have at home like a cosmetic container lid.
- Using a toothpick or a skewer with a pointed tip, write the names of the plants in the clay. Work little by little, removing any clay that comes off onto the point for a cleaner look. I find it easier to lightly scratch in the name, and then clean it up by passing over the letters once again. (If you have small rubber stamp letters, you can stamp the words into the clay instead.)
- Using the point of the skewer, make a hole in the top of the clay oval for hanging the markers once they are ready.
- Bake the clay disks in the oven for the amount of time specified for your particular polymer clay, usually 15-30 minutes.
Make the wire hangers
- To hang the markers in place, I repurposed the metal skewers that came with some pre-prepared kebabs from our butcher. They were actually perfect for this purpose because the handle end was coiled in a way that was perfect for hanging the clay disks. If you don't have skewers like mine, use metal wire with a diameter of 3-4mm instead.
- Cut the wire into segments that are 10-12 inches long (or whatever length you prefer).
- Using pliers, carefully coil one end over in such a way that you can hang your clay disks on the wire, leaving the other end straight for sticking into the soil.
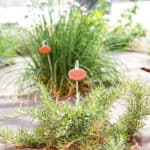
Assembling and using the garden markers
- Once the clay disks have finished cooking and have cooled, you can carefully hang them on the wires. If the hole is a little small you should be able to make it slightly bigger with the point of a pair of scissors or something similar.
- When ready to use them, poke the straight end of the wire into the ground near the plant you want to mark.
Notes
Heat may also help make the clay more pliable for easier working.
Make you own cookie cutter by using a strip cut from an aluminum beverage can. Once you've formed the desired shape, hold the open ends together with epoxy glue (or just hold it together as you cut).
I make the hanging holes of the disks small enough for a relatively tight fit to prevent the tags from flying off the wire.