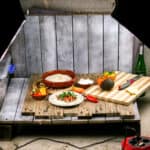
DIY Pallet Photography Backdrop
Upcycle a pallet into a versatile DIY photography backdrop! Learn how to make and use it for food and still-life photography, getting the perfect shot even when it's dark outside.
Equipment
- Jigsaw
Ingredients
- 1 pallet
- 1 wood plank The length should equal the width of the chosen pallet.
- short nails
- paint optional
Instructions
Choose a pallet
- Look for a pallet with the planks as close together as possible.
- Choose a pallet that is bigger than what you want your final photography surface size to be. (We'll be cutting the pallet in half.)
Cutting the pallet
- Cut the pallet in half to end up with a matching "floor" and "wall" backdrop. Begin by cutting the top planks of the pallet just slightly above the center, leaving the center support blocks in place underneath.
- Next, flip the pallet over and cut through the bottom planks, along the same line, to fully separate the pallet in half.
- You'll end up with one pallet half that is completely supported in all 4 corners. It will be used as the studio "floor." The blocks help raise it slightly off the floor, making taking pictures a bit more comfortable. It also gives you a place to hide other wooden planks and props.
Fixing the pallet "wall"
- The smaller half of the pallet will now have unsupported, loose planks along the cut line. To fix that, place another plank along the cut line on the backside of the pallet across the loose boards. Use small nails to nail each unsupported plank to the new one. (Hit the nails from the front side and make sure they go into the other plank underneath.) If the nails don't successfully hold the plank in place, consider using glue and/or screws to hold everything together.
- Remove the remaining blocks on the other side (along with the unsupported bottom pieces). This leaves a flatter, lighter panel that takes up less space. (Cut off the long nail pieces if any stick out.) Make sure the pallet pieces are still nailed to the plank below them. Fix any loose boards.
Fixing Problematic Planks
- If your pallet looked decent, you are finished and ready to start using your backdrop. If, on the other hand, any planks have issues, now is the time to address them.
- Switch out any bad looking planks for similar-sized boards. Remove the bad ones and nail the newer boards in their place.
Painting the pallet studio
- While you leave the pallets unfinished, you can also consider painting the pallets to change the color of your backdrop.
- Use a paintbrush or spray paint to cover the pallets with paint. Try using a light coat to leave some areas uncovered for a more rustic look. The painted pallets can also be sanded later on to give a distressed look.
Notes
To use the pallet studio, place the bottom pallet section against a wall. Rest the top piece on top of the bottom and against the wall to keep it up.
If you won't be using the pallet "studio" against a wall, consider attaching the top pallet piece to the bottom one with L-brackets. If you plan on using it against a wall, it's easy to rest the top piece against the wall instead. Leaving them separate gives more possibilities for using them. (You can change the direction of the planks by rotating one of the pallet pieces. You can also drape cloth over the back and between the bottom and side pallets.