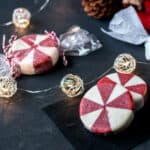
Peppermint Soap
This fun holiday peppermint soap looks like peppermint candy and it’s perfect for Christmas time, but can also be enjoyed year round.
You will need to make this recipe twice to get the look of my peppermint candy soaps.Servings 8 soaps (7cm diameter)
Ingredients
- 90 g lard or tallow
- 105 g olive oil
- 90 g coconut oil
- 15 g castor oil
- 114 g distilled water
- 43 g lye
- 8 g peppermint essential oil
- red iron oxide
- titanium dioxide
Instructions
- Just as in previous soaps, add the lye to the water (not the other way around), and mix them until the lye is fully dissolved. It will heat up and get cloudy, but will then clear again as it cools.
- While the lye is cooling, prepare your mold by greasing a PVC pipe with a tiny bit of any of your oils. Cover one end with wax paper, parchment paper or some relatively thick plastic film (like plastic taken from a freezer bag). Secure the paper or plastic with a tight rubber band (or two).
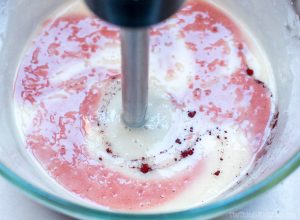
- Measure out the oils and combine them. I use a hand held blender to help combine the solid oils into the liquid ones, but if you are having a hard time of combining the oils, you can slightly heat the solid oils to melt them.
- Add the lye mixture to the oil mixture and begin by mixing them together gently. Once they are well combined, you can begin blending them with an immersion blender until it begins to emulsify and look like a thin mayonnaise.
- Once you have reached the thin mayonnaise state, also known as "trace," you will want to add in the peppermint essential oil (or scented oil), and enough red iron oxide to get the desired color. I didn't really mix out the iron oxide, and just added around 1/4 tsp. and blended it in to see how bright the mixture became. I then added more as needed. Start out with a small amount. You can always add more. As for the peppermint essential oil, I added in enough to get a nice peppermint scent, but I didn't really add much, and my soap lost a lot of its scent after a month or so. Next time I would definitely add in more.
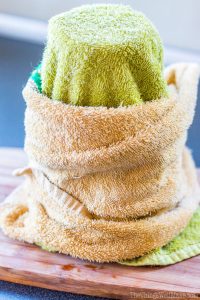
- Pour the mixture into the prepared PVC pipe, and wrap it with towels to help keep the heat in. In the rest of my soaps so far, this wasn't really a necessary step, but by insulating the soap when it is first poured into the molds, you will help the soap get to what is called the "gel phase." Reaching the gel phase helps to brighten the colors of a soap and may also make it slightly harder faster because more of the liquid may evaporate. Both of those qualities are perfect for a soap like this one.
- After a day or two, check on the soap. It should be relatively solid to the touch. If it isn't, leave it for another day, and check again. If it is, unwrap the mold, and place it into the freezer for several hours. This will help harden the soap so that you can umold it without damaging it. It will also help shrink the soap slightly so that it is easier to remove it from the mold.
- Scrape off any excess soap from the bottom of the mold, smoothing it out with a knife.
- Push the soap out of the mold by pressing on it from the inside. I used a thermos bottle with a flat bottom to push the soap out of the mold.
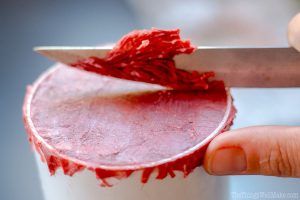
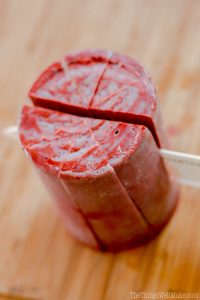
- Once the soap has been removed from the mold, you'll want to cut off any uneven bits to smooth off the top part of the soap.
- With the soap in a vertical position, cut the soap in half, and then in half again in the other direction. (Think of how you would cut a pizza into slices.) Then make two more cuts dividing each quarter in half to get eight even sections of soap.
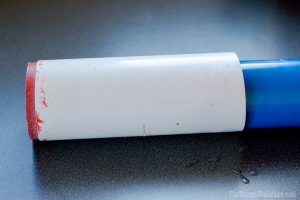
- I tried to use one pvc pipe for both layers of my soap, but the top layer pushed the bottom sections out of position and my bottom layer of soap wasn't as pretty as the top layers. I suggest using two pieces of PVC pipe of the same size instead.
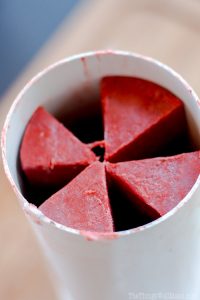
- Prepare both PVC pipes as before by greasing them and covering one of the ends. Next, insert 4 pieces of red soap into each pipe, leaving even spaces between each piece for the white soap.
- Prepare the above recipe once more as you did in the first steps, this time adding titatnium dioxide, instead of the red iron oxide, to get a white colored soap.
- Pour the white soap into the spaces between the red sections of soap, dividing the soap equally amongst the two molds.
- Cover the soap with a towel and allow the soap to rest for a day or two.
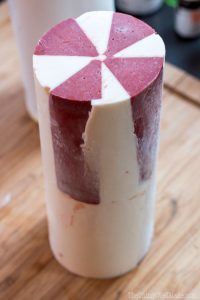
- Once again, check on the soap, and place it into the freezer for several hours to help unmold it. Push the soap out of the mold, and cut it into bars of soap that should resemble peppermint patties. (You can see that the bottom section of my soap is all white on the outside because my bottom red soap pieces got pushed to the center by the top ones. That's why I suggest using 2 separate molds instead.
- Allow the soap to dry for several weeks, flipping it over occasionally to help the soap dry evenly.
- As you use the soap, it should get rounded edges that will make it look more like a peppermint candy, but if you want to gift the soap or are in a hurry to get it to look like mine, you can scrape the edges of the soap lightly with a knife to help round them, and then smooth it out by rubbing the soap under some warm water.
- Wrap the soap to look like candies by wrapping them in cellophane, and tying either side with a ribbon or some bakers twine. If you're especially crafty, you can make your own bakers twine like I did.
Notes
After several months, the white part of the soap started to turn yellow.
I think the yellowing came from using a home rendered lard that wasn't freshly made. I have since been making soaps with a refined tallow, and my soaps are staying white. You can switch out the lard for tallow, and it won't make much of a superfat difference in the soap. If the lard is fresh, though, your soap is more likely to stay white.
The scent of my soap had also greatly faded. The peppermint scent fades more quickly than lavender essential oil. I'd suggest adding more scent than what you think you'll need to prevent the scent from disappearing. (I didn't measure, but had used much less than the 8g called for in the recipe.)